Use this article to learn how to update your inventory in the Bottle POS after you receive a shipment. By receiving your items this way, you will always be able to go back and review the invoices to track when you received your inventory and what inventory you received.
To access and enter a received item invoice, select Receive on the Items menu in your Admin system. Admin privileges are required to complete the steps in this article.
The Receive Window
Use this window to start receiving a new invoice and work with any invoices that are in process or finalized.
Please Note: Rows highlighted in red indicate that the total invoice amount (entered as the Invoice Total) and the sum of the items added to the invoice (calculated as the Total Cost) do not match.
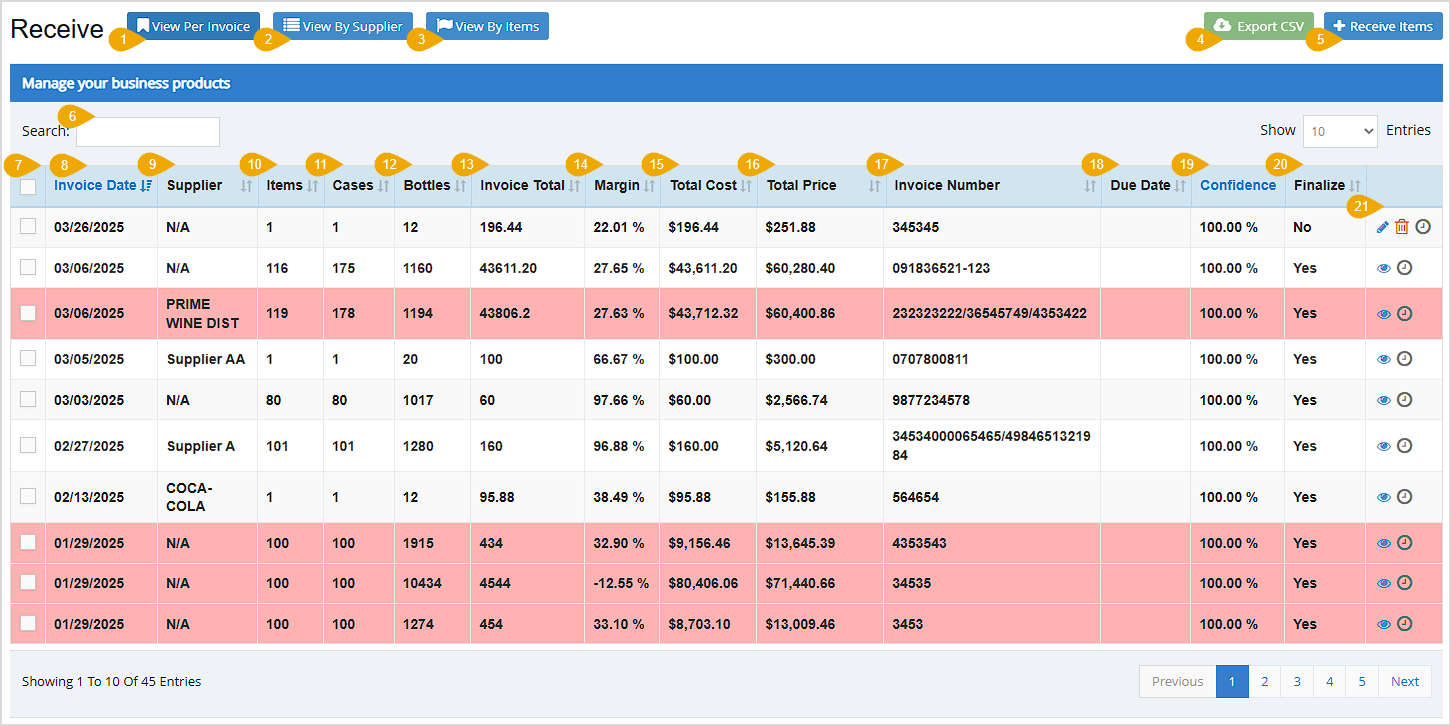
- View Per Invoice - Click to view Receive Invoices by Invoice Date. This is the default view and the one shown in the image above.
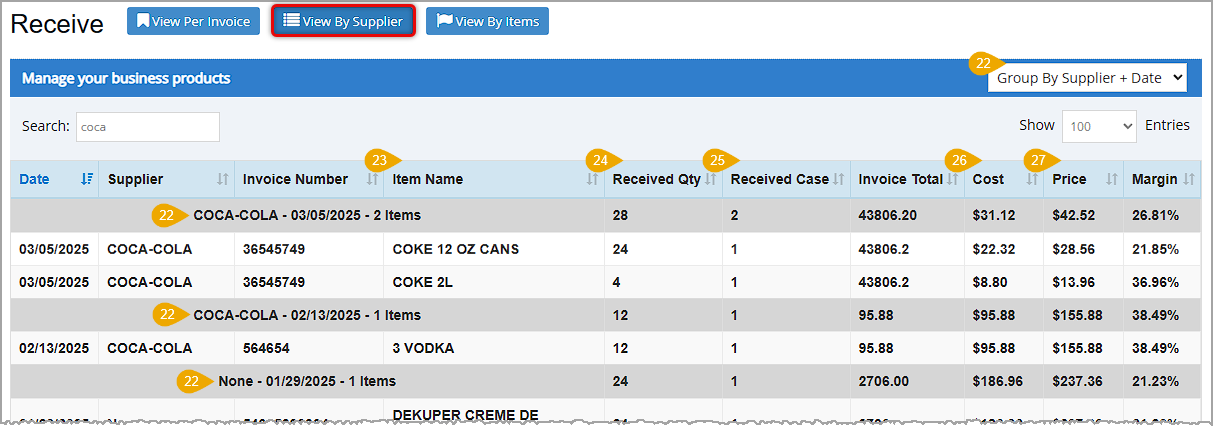
- View By Supplier - Click to view received items grouped by supplier, date, invoice number, or item name, as shown in the image below.
- View By Items - Click to view Items on Receive Invoices, as shown in the image below.

- Export CSV - Click to export all of the table data to a CSV file on your computer that you can open in any spreadsheet software. This button shows in the Per Invoice view. The downloaded file will have key data for each Item in the selected Invoices you are downloading, but will only export invoices you have selected using the checkboxes on the left.
- Receive Items - Click to open the Receive Items window and begin entering invoice details from a received supplier shipment. This button displays in the Per Invoice view. This area is fully detailed in the section below on Receiving Inventory.
- Search - Enter any search term, number, or phrase to filter the table to only invoices with matches. This box shows in all views.
- Checkboxes - Select a checkbox to perform an action for multiple rows at a time. Or, select the checkbox in the column header to select all of the rows shown. This column shows in the Per Invoice and By Items views.
- In Per Invoice view, click the Merge Rows icon
 below the table to merge each selected row into a single invoice.
- In By Item view, click the Trashcan icon
 below the table to delete each selected row.
- Invoice Date - This column displays the date entered as the Invoice Date when you created this invoice. This is not necessarily the date the invoice was received into your inventory. This column shows in all views. It is in the other two views as the Date column.
- Supplier - This column displays the name of the supplier for which the received invoice was entered. This column shows in the Per Invoice and By Supplier views.
- Items - This column displays the number of different items (rows on the Receive Items window) received on this invoice. This column shows in the Per Invoice view.
- Cases - This column displays the number of cases of items recorded as received on this invoice. This column shows in the Per Invoice view.
- Bottles - This column displays the number of bottles recorded as received on this invoice. This column shows in the Per Invoice view.
- Invoice Total - This column displays the amount the supplier charged you for all of the received items. This column shows for all views.
- Margin - This column displays your profit as a percentage of the selling price (Price - Cost Per Bottle) á Price. This column shows in the Per Invoice and By Supplier views.
- Total Cost - This column displays the total cost of all items on an invoice (in the Per Invoice view) or the total cost of the item (in the By Items view).
- Total Price - This column displays the total selling price of all items on an invoice (in the Per Invoice view), or the total selling price of the item (in the By Items view).
- Invoice Number - This column displays the invoice number assigned to the invoice. This column shows for all views.
- Due Date - This column displays the date that payment is due to the supplier for this invoice. This column shows in Per Invoice view.
- Confidence - This column displays the likelihood that youâve entered the invoice details correctly. The confidence calculator looks at Cost Per Bottle and Price to determine if the gross profit margin is within a normal historical variance range. A low confidence level is typically a red flag indicating an error in your values. This column shows in the Per Invoice view.
- Finalize - This column indicates if the invoice has been finalized (all items on the invoice have been entered and verified). This column shows in the Per Invoice view.
- Action - You can use the icons in this column to take specific actions for the row or rows you have selected. Your options depend on the item and how youâre viewing the window. This column shows in the Per Invoice and By Items views.
- Click the Pencil Icon
 to edit items. In the Per Invoice view, click it to finish entering items on an invoice or to make changes to items already added on the Receive Items window. Please Note: This option is only available for invoices that were saved for later; this is not an option for invoices that have been finalized. In the By Items view, click it to open the Edit Item window and make changes. Please Note: you are able to use this for items on Finalized invoices, so handle this function with care as it can throw off totals on the invoice.
- Click the Eye Icon
 in the Per Invoice view to view the details from this invoice on the Receive Items window. Please Note: You cannot take action on a finalized invoice other than to print it, or to edit Item details using the Pencil icon above.
- Click the Trashcan Icon to delete invoices or items. In the Per Invoice view, click it to immediately delete this invoice. You will be asked to confirm deletion. This is only available for invoices that you have not Finalized. In the By Items view, click it to delete this item from the database. This will not remove the item from a Receive invoice that has been Finalized.
- Click the Clock Icon
 in the Per Invoice view to view this itemâs order history in your software on the Stock History window.
- Group By - Select an option for grouping the data displayed in the table. Each group row is colored gray and serves as a subheading of the rows beneath. It shows the group type and number of items as well as totals for columns on the right side of the table.. The group types in this drop-list include Group By: Date, Supplier, Invoice Number, Item Name, and Supplier + Date (default). This column shows in the By Supplier view.
- Item Name - This column displays the name of each item received. This column shows in the By Supplier and By Item views (in the View By Item, it is just Name).
- Received Quantity - This column displays the quantity of each item received from the supplier. This column shows in the By Supplier view.
- Received Case - This column displays the number of cases of each item received from the supplier. This column shows in the By Supplier view.
- Cost - This column displays your Total Cost for each item. This column shows in the Per Invoice (shows as Total Cost) and By Supplier views.
- Price - This column displays your Total selling Price for each item. This column shows in the Per Invoice (shows as Total Price) and By Supplier views.
- ID - This column displays the simple Invoice ID the system assigns each Receive Invoice, and is used only internally by the system. This column shows in the By Items view only.
- Stockcode - This column displays the Stockcode lookup for each item. This column shows in the By Items view.
- Total Cost - This column displays your Per-Unit Cost for each item. This column shows in the By Items view.
- Total Price - This column displays your Per-Unit selling Price for the item. This column shows in the By Items view.
- Total - This column displays the total remaining amount owed to the Supplier for the item, if any.
- Category - This column displays the item category the item belongs to. This column shows in the By Items view.
- Actions - This is detailed above in the table on the Actions icons, but for reference, the Pencil Icon will allow you to edit Invoice information about an item even after the invoice has been Finalized, so use this function with care as it can throw off invoice amounts. The Trashcan Icon will delete the item from the database. If you click to delete, youâll be asked to confirm deletion. This action will not remove the item from the Receive order if the invoice is Finalized.
The Receive Items Window
Complete these steps when you have received a shipment of inventory from a supplier:
On the Receive page, youâll need to be in the View Per Invoice to begin receiving inventory. Then click +Receive Items to open this window.
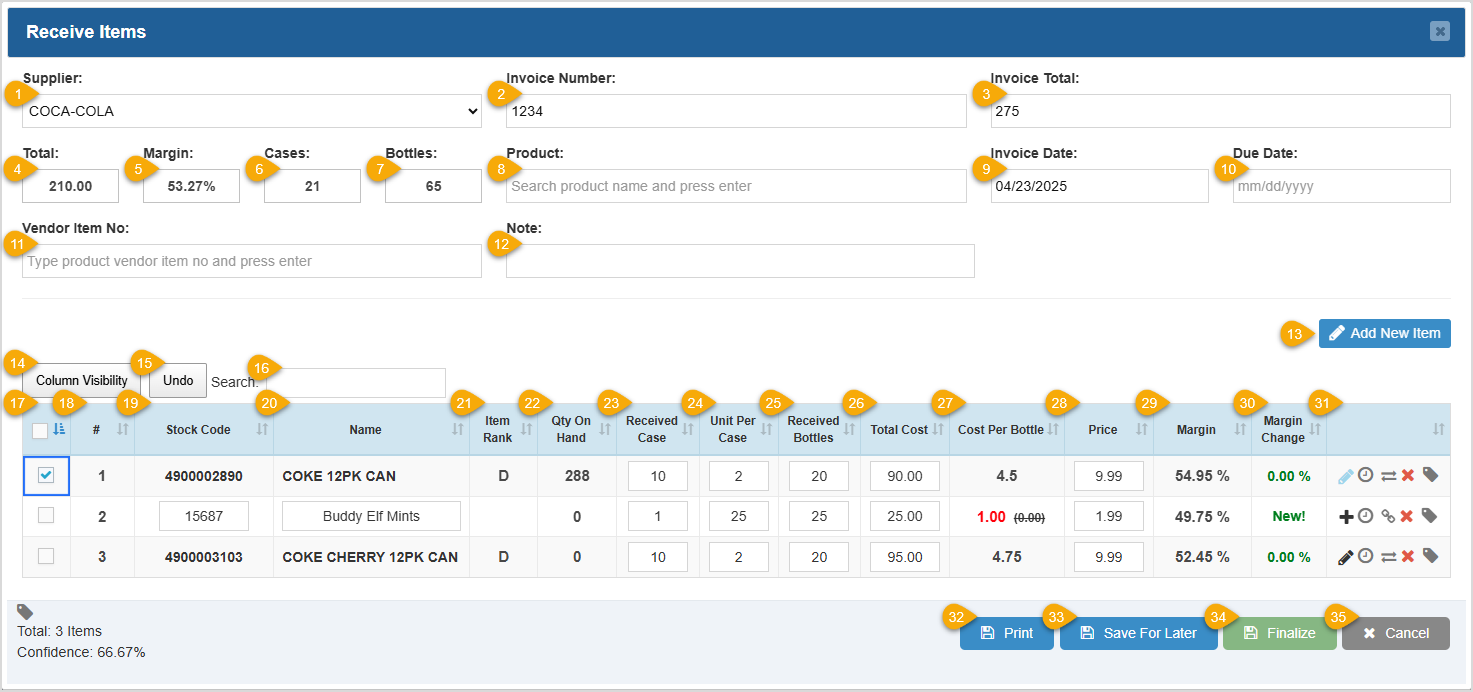
- Supplier - Select the supplier (vendor) from which you are receiving inventory from this drop-list.
- Invoice Number - Enter the invoice number from the supplierâs invoice into this field.
- Invoice Total - Enter the dollar amount of the invoice total, as shown on the supplierâs invoice, into this field.
- Total - This is a display-only field. As you add received items, this field calculates your total cost.
- Margin - This is a display-only field. As you add received items, this field calculates your selling margin.
- Cases - This is a display-only field. As you add received items, this field calculates the total number of cases you are receiving.
- Bottles - This is a display-only field. As you add received items, this field calculator the total number of bottes you are receiving.
- Product - Enter at least three characters in this field to search for items saved in the database by name or Stockcode. Select the item you are receiving from the list that drops down as you type. As you enter text the system will display matches in a drop-list. Click on the one you want and the Items Details window will open. The Items Details window allows you to configure the item in the following ways:
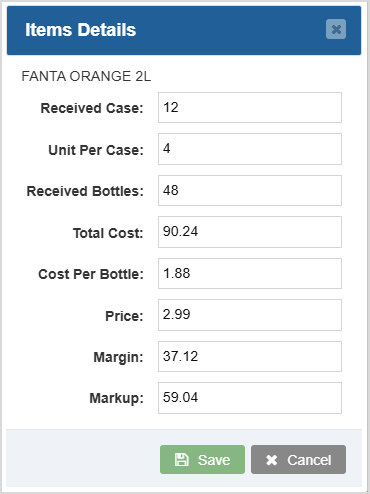
The Item Name will be at the top of the window. Youâll start with a Received Case count of 1, and the system will use whatever you previously saved for its Units Per Case (you can adjust this if it has changed). If you adjust the Received Case quantity, the Received Bottles will recalculate. The Total Cost youâre paying for the entire quantity, the Cost Per Bottle, the selling Price per unit, Margin, and Markup will also recalculate as you adjust quantities. The Total Cost will be based on whatever your previously-saved Cost Per Bottle is. You can refer to the vendor invoice and adjust the Total Cost to what is on the invoice for the item and the dollar amounts will recalculate for you. When everything matches the invoice, click the Save button to add the item and all details except Markup to the Receive item data table.
- Invoice Date - Click in the Invoice Date field and a date picker will drop down and let you choose the date you want as the Invoice Date.
- Due Date - If you want to add a Due Date for when the invoice payment is due, click in the field and use the date picker.
- Vendor Item No. - Use the Vendor Item Number search to search specifically by a saved Vendor Item Number, and when you click on a match, the Items Details window will open. That window is described above, in step 8.
- Note - You can enter as much text as you might need in the Note field for whatever details you might need to see about the Receive invoice.
- Add New Item - Click the Add New Item button to add a blank row in the Item data table, and you can enter Item Details similarly to the description above of the Items Details window.
- Column Visibility - Click to choose which columns display in the table.
- Undo - Click to undo the most recent change youâve made in the table. Click again to continue undoing the next previous change. Repeat to go as far back as you need.
- Search - Enter a search term to filter the table to items matching that term. The search begins automatically after you type at least 3 characters.
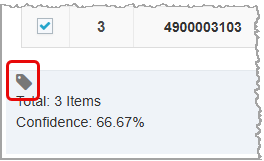
- Checkboxes - Select the checkbox in each row for which you want to print labels. Or, click the checkbox in the column header to select all of the rows shown. In this way you can print one label for multiple items in a single click. Label printing is the only bulk-selection feature in this window, and to print your labels for selected rows, click the Pricetag Icon below the table, as pictured here:
- # column - This column displays the order you entered each item. The first item you receive is assigned 1, the second is assigned 2, and so on.
- Stock Code - This column displays the stock code assigned to each item. For new items, enter stock codes here.
- Name - This column displays the Name of each item as it displays in your system. For new items, enter descriptive Names here.
- Item Rank - This column displays each Itemâs performance Rank in the system. Ranks range in order of best performing at Rank A through worst performing at Rank D.
- Qty On Hand - This column displays your current in-stock quantity for each item. For new items, this starts at 0 (zero) and will be increased when the Receive order is finalized.
- Received Case - This column displays the number of cases of each item you are receiving on this invoice. For new items, click in this field and enter the number of cases you are receiving.
- Unit Per Case - This column displays the number of sellable units in a case of each item. For new items, click in this field and enter the number of units per case.
- Received Bottles - This column displays the number of bottles of each item you are receiving on this invoice. For new items, click in this field and enter the number of bottles you are receiving.
- Total Cost - This column displays your total cost for each item on the invoice. For new items, click in this field and enter the total cost.
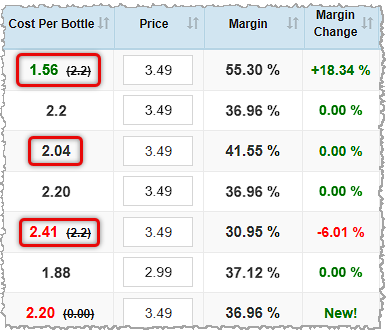
- Cost Per Bottle - This column displays the cost per bottle received for each item. If your cost per bottle is lower than your historical average, this number displays in green and the previous cost per bottle will display for you in parentheses. If the cost per bottle for an item is the same as the last time you ordered it, the amount will display in black. If your cost per bottle is higher than your historical average, this number displays in red, and the previous cost per bottle will display for you in parentheses. Since new items have no historical cost per bottle, they always display in red.
- Price - This column displays your selling price per unit. For new items, click in this field and enter the standard selling price you will charge per unit.
- Margin - This column displays your profit as a percentage of the selling price (Price - Cost Per Bottle) á Price.
- Margin Change - This column displays the percentage of change in your margin since you last received this inventory. An increase or no change displays in green and a decrease displays in red. For new items, this field simply says âNew!â.
- Actions - The icons in this column allow you to take specific actions for a row. Your options depend on whether the item is newly added or existed previously:
- Click the Pencil Icon to make modifications to an item in the Edit Item window, pictured below. This only displays for items already saved to the database.

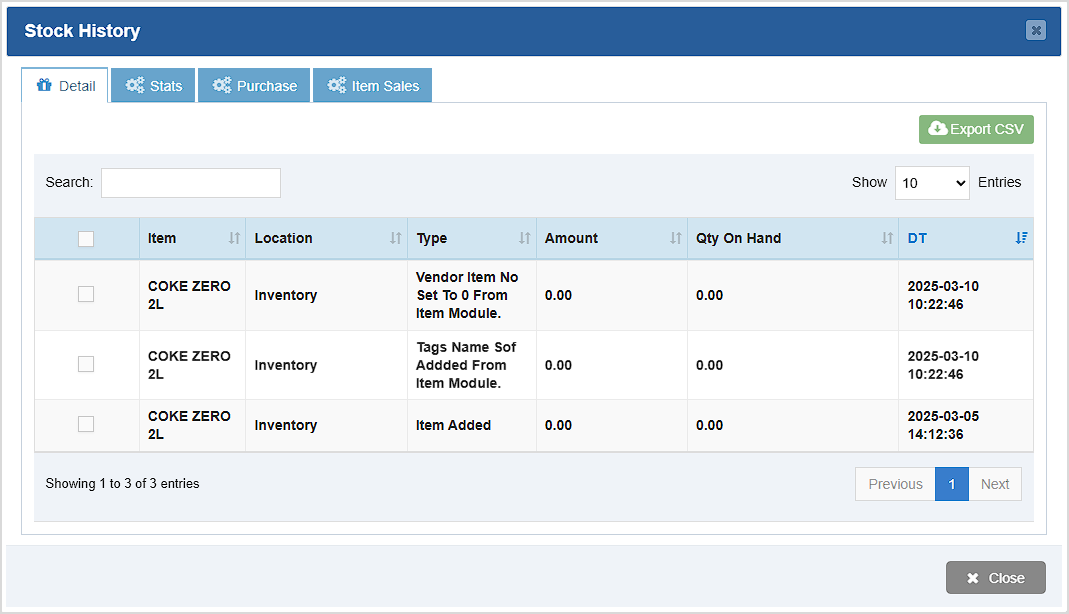
- Click the Clock Icon to view an itemâs update history in your software in the Stock History window, pictured below.
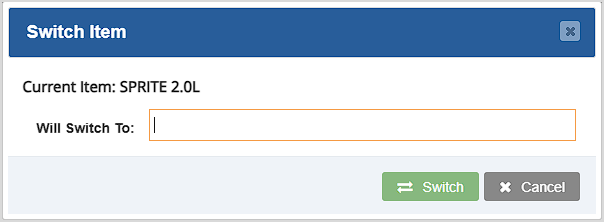
- Click Switch Icon
 to switch the details of an item with a different item in your inventory in the Switch Item window, pictured below. This only displays for items already saved to the database.
- Click the X Icon
 to remove a row from the item data table. We encourage you to be careful with this function as there is no confirmation popup, the Undo function will not reverse this, and the deletion will happen as soon as you click the icon.
- Click the Pricetag Icon
 to print a label for an item. This will send a single label print to a connected label printer and no print window will pop up for you. Click multiple times if you need to print more than one label.
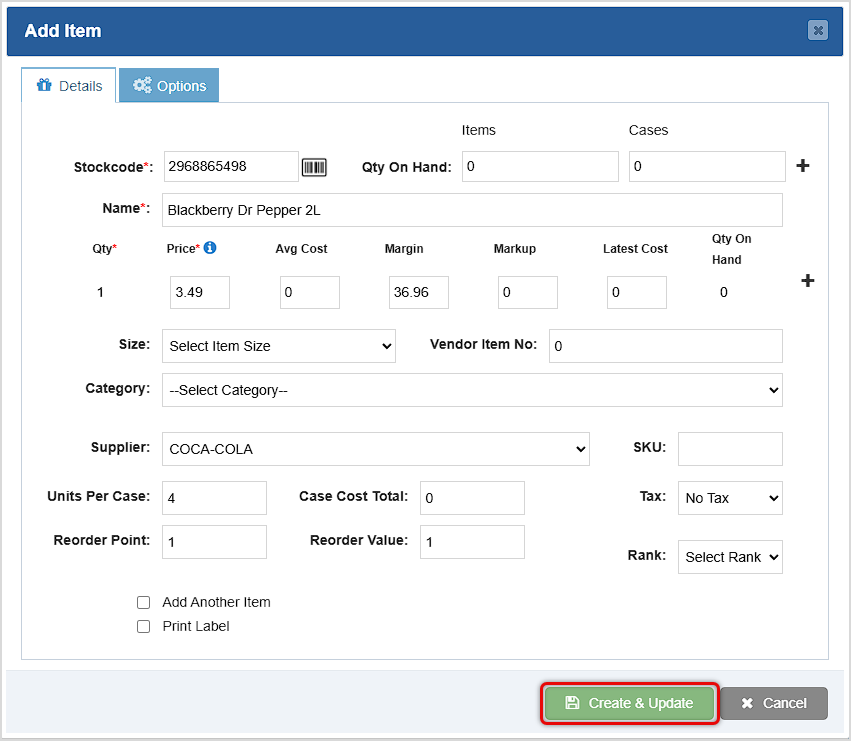
- Click the Plus Icon
 to add or adjust details about this item in the Add Item window and save it to your database. This only displays for new items not yet saved to the database.
- Click the Link Icon
 to link this new item to another item in your inventory. The Link Item window pictured below will pop up and allow you to select the item you want, indicating that they are the same. This only displays for new items not yet saved to the database.

- Print - Click the Print button to print a copy of the table to a connected printer or to a PDF file. The output will look best if printed to letter-size paper.
- Save For Later - Click the Save for Later button if you need to step away and havenât finished receiving everything on the invoice. You can come back later and click the Pencil Icon to open it in the Receive window to continue entering items.
- Finalize - Click the Finalize button to commit your changes and update the inventory in your system. This cannot be undone so be sure you review your work before finalizing.
- Cancel - Click the Cancel button to exit the window.
Related Topics
LINK: How to Create Purchase Orders
LINK: How to Review a Receive Order for Errors
Frequently Asked Questions
Q: Is it possible to hide some of the columns on the invoice that I don't use?
A: Yes, you can click the Column Visibility button in the invoice window to select which columns to view.
Q: What if I'm not ready to finalize an invoice but I need to be able to close it without losing my work?
A: You can click the Save For Later button next to the Finalize button to save the invoice and modify it later.
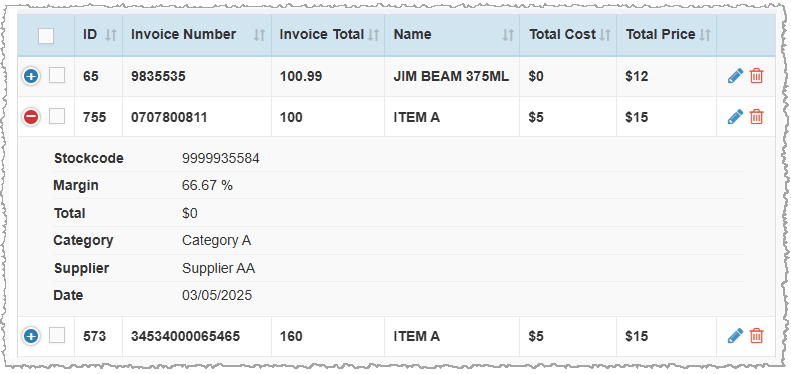
Q: Why donât I see all the columns?
A: When this window is viewed at smaller sizes, some column information will not be visible unless you use the  (expand) and
  (collapse) options in the left-most column, as shown in the image below. Click the Expand icon to view information from any columns that do not fit in this view. Click the Collapse icon to hide the additional details.
Q: I have a question, but I can't find my answer here, how do I get more assistance?
A: You can ask any question at the number below. Contact our 24/7 support team at: (877) 381-4087
 October 01, 2024
Is this page helpful?
×Help us improve our articles