The Bottle POS bulk text messaging in SMS Campaigns guides you in the creation and sending of text messages to select groups of your customers. Take a look at how easy it is!
Enabling Bottle SMS for Your Customers
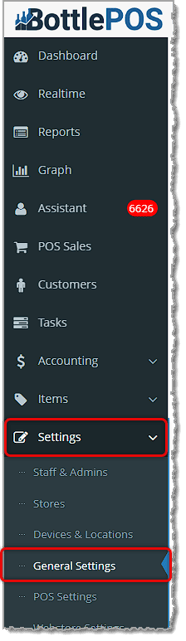
To get started, you'll need to enable the feature in your settings. After logging into your Admin, go to Settings in the main menu on the left and click on General Settings.
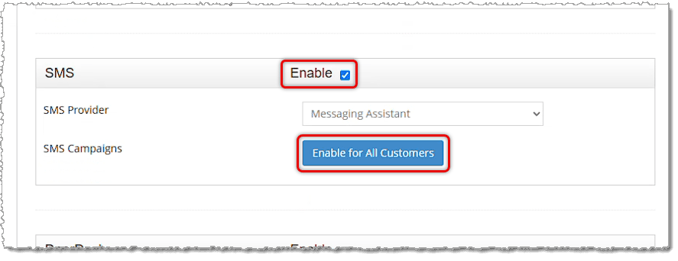
Scroll down to the SMS settings area. If it is not already on, check the box to Enable Bottle SMS. Then for the Messaging Assistant SMS Provider, click the button to Enable for All Customers. They will still need to opt in, as described below, but this will make the service active for them.
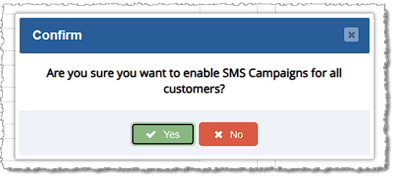
A confirmation window will pop up asking if you are sure you want to activate the feature. Click Yes if you are sure.
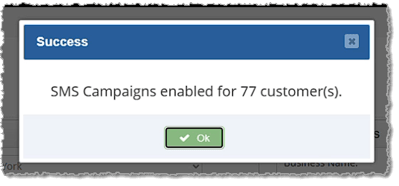
The system will enable the feature and will then pop up a window showing how many customers are now active, as pictured below.
SMS Campaigns
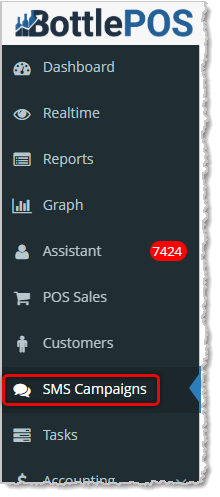
You can get to this part of the system by logging into your Admin app and clicking SMS Campaigns on the left.
Please Note: Because the SMS Campaigns system is bulk-sending text messages for you, there is a charge for this service based on how many customers you are sending to. The SMS Campaigns page will show you the estimated cost of messages as you compose them.
SMS Campaigns
Please use the links below to jump to a specific part of this article:
Using SMS Campaigns
Creating and Sending an SMS Campaign
The Past Campaigns Tab
The ROI Report Tab
Customer Enrollment
Messaging Costs
Customer Consent
Using SMS Campaigns
For messaging to groups of customers, you are only able to send bulk messages between 12pm and 8pm for your time zone. This restriction is in place to respect 'Quiet Hours' for messaging so recipients don't get too many messages during those hours. If you create an SMS Campaign text message using the instructions below outside of those hours, in the 'Send' step, instead you'll need to save the campaign as a Draft and you won't have the option to send it.
Creating and Sending an SMS Campaign
To begin working with SMS Campaigns, in the Admin click the SMS Campaigns link in the main menu and the SMS Campaigns page will load for you. Here is how to use the page:
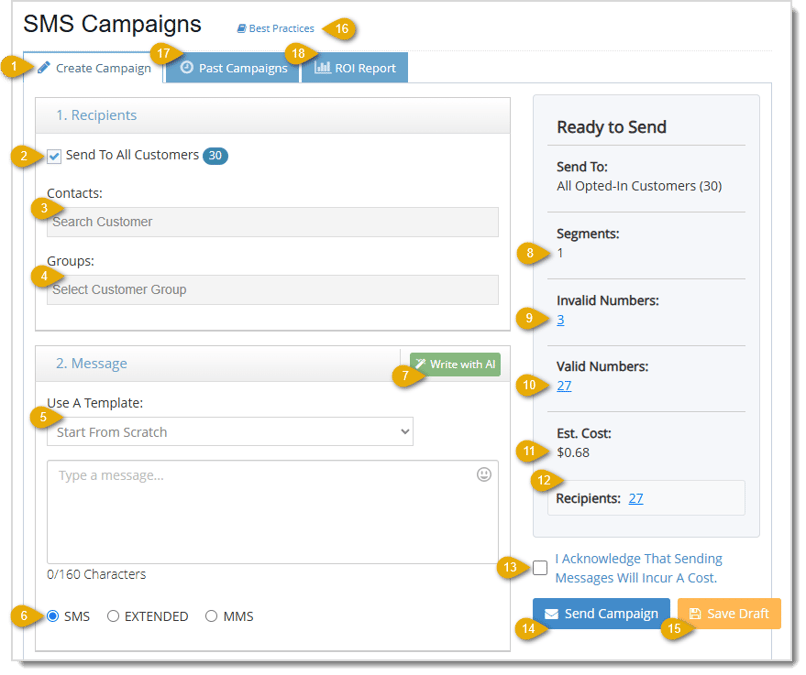
- Create Campaign Tab — The Create Campaign Tab opens by default and offers you areas to configure Recipients and the Message.
- Send to All Customers — Check this box if you want the message to go to all of your customers that have opted-in to receive text notifications. When you check the box, you'll see the number of customers that have opted in.
- Contacts — If you want to add one or more individuals as the recipient(s), search for them in this area. You can add as many as needed.
- Groups — If you want to add one or more Groups of customers you've created (on the Customers page under Manage Groups) as the recipient(s) search for them in this area. You can add as many as needed.
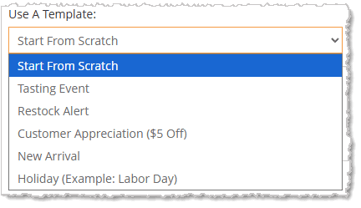
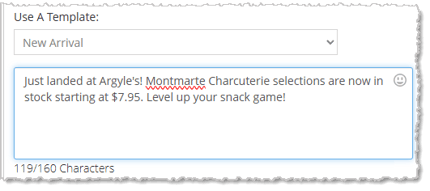
- Use a Template — If you want to start from a pre-written thematic template written by one of our Marketing team specialists, click to open this drop-list. You can choose from the default Start from Scratch (blank message), Tasting Event, Restock Alert, Customer Appreciation ($5 Off), New Arrival, and Holiday (Example: Labor Day) as starting points for the message you want to write. Selecting a template will populate a 1-Segment message (about two lines of text, more info on Segments below) you can adjust to your needs.
As you compose your message, the editor will keep a running character count for you. You will also see how many Segments and what the Estimated Cost will be in the stats area on the right, described below. You can click the Emoji Icon in the upper right to add emoji (note that doing so will almost always add a Segment and increased Cost to the message) or use your Tab key to open or close the emoji selection window.
- Message Protocol — You can choose the message protocol you will use with the radio buttons at the bottom. SMS (Short Message Service) is the default and allows you up to 160 characters including spaces. This is the cheapest option per message (see the Pricing section below). Extended allows you up to 320 characters, but like SMS is text-only and will typically cost a little more per recipient. MMS (Multimedia-Messaging Service) allows the inclusion of images and active URL links. MMS messages can be up to 1,600 characters long including spaces and cost more depending on the size of the message.
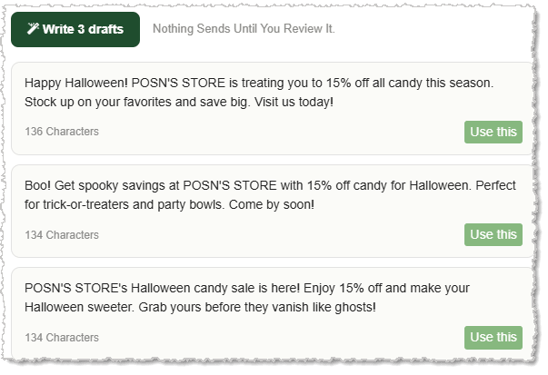
- Write With AI — Click this button to get some AI-generated suggestions for your message. In the window that pops up, you can enter some basic details about your message in the What's This Message About? area. Click a message type button, either Promo, New Arrival, In-Store Event, or Holiday Hours. You can select the Tone you want the AI to use, either Warm, Direct, or Playful. Once you have configured your preferences, click the Write 3 Drafts button and the AI will go to work on your request for a few moments.
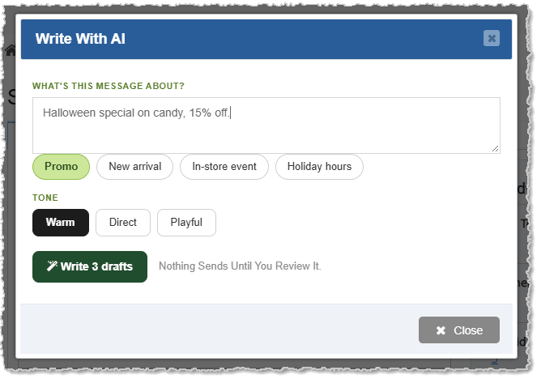
Once it's done, it will display the drafts for you, as in the examples below. Click the Use This button for the one you want, and the window will close and your selected version will populate in the Message window.
A Note on Message Details — As you compose your message, the system will check your message content to make sure it is in compliance with the federal regulations regarding bulk text messaging (the regulations look for any content in the SHAFT list: Sexually explicit, Hate speech, Alcohol, Firearms, and Tobacco which includes vaping / cannabis / CBD products even if they are legal in the recipient's state). If no offensive content is found, you'll see Ready to Send at the top of the panel on the right. You will also see all details of your campaign (each is described below) in case there is anything you want to change.
- Segments — A segment is a 'packet' of data sent via text message. Costs for messaging are charged per segment, and the amount of actual content in a segment is irrelevant; each segment costs about 2.5-cents per recipient. If your message is SMS and under 160 characters, you will almost certainly send the message in 1 Segment. If you add an emoji, that will almost certainly add another segment. You can always see in the panel on the right how many Segments your message will use and what your estimated cost will be to send it to your recipients.
- Invalid Numbers — If any of the opted-in customer phone numbers are invalid for whatever reason, you'll see how many here and you can click on the number to view details, as pictured below.
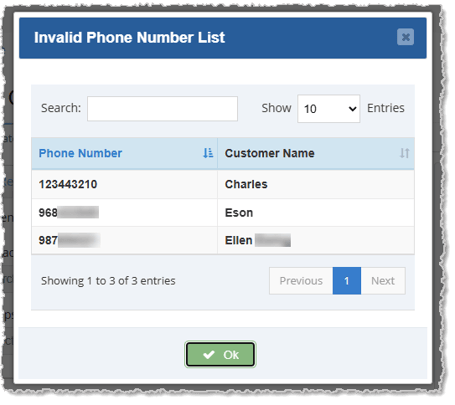
- Valid Numbers — You are able to click on the count of Valid Numbers and see details similar to those shown above.
- Estimated Cost — As you build your Recipient List and compose your Message, you'll see the Estimated Cost to send it to all recipients on the right. This Cost will be accurate to within a few cents in almost all cases.
- Recipients — The final count of Recipients will be the initial number of opted-in customers minus any invalid numbers, as pictured above. Clicking this will show you the same window you'll see for Valid Numbers.
- Acknowledgement — Check the box acknowledging that sending the message will incur a cost, and your message will be ready to send.
- Send Campaign — Once you are ready, click the Send Campaign button. A confirmation will pop up letting you know the estimated cost and asking if you still want to send it. After clicking Yes, the system will work on the request for a few moments, you'll see an animated graphic indicating the system is busy, then you'll see confirmation that the campaign was successfully sent and the number of phones it was sent to. You'll be able to see your message under the Past Campaigns Tab, described below. You'll see the campaign at the top of your list with the Sent status. It may take a while for all messages to be delivered, but once they are fully delivered, the status will become Delivered.
- Save Draft — If you need to pause your work to resume your message later, you can click the Save Draft button at any point to save what you've done so far. You'll be able to find your Draft in the Past Campaigns Tab, described below.
- Best Practices — You can click this link to load a page that shows you some good strategies and practices for using SMS Campaigns.
- Past Campaigns Tab — You can see a list of all Drafts and sent campaigns on this tab. For the full functionality, please see the section below about the Past Campaigns Tab.
- ROI Report Tab — You can see what your Return on Investment for your Campaigns is on this tab. For the full functionality, please see the section below about the ROI Report Tab.
The Past Campaigns Tab
Here is how to use the functionality in the Past Campaigns Tab:
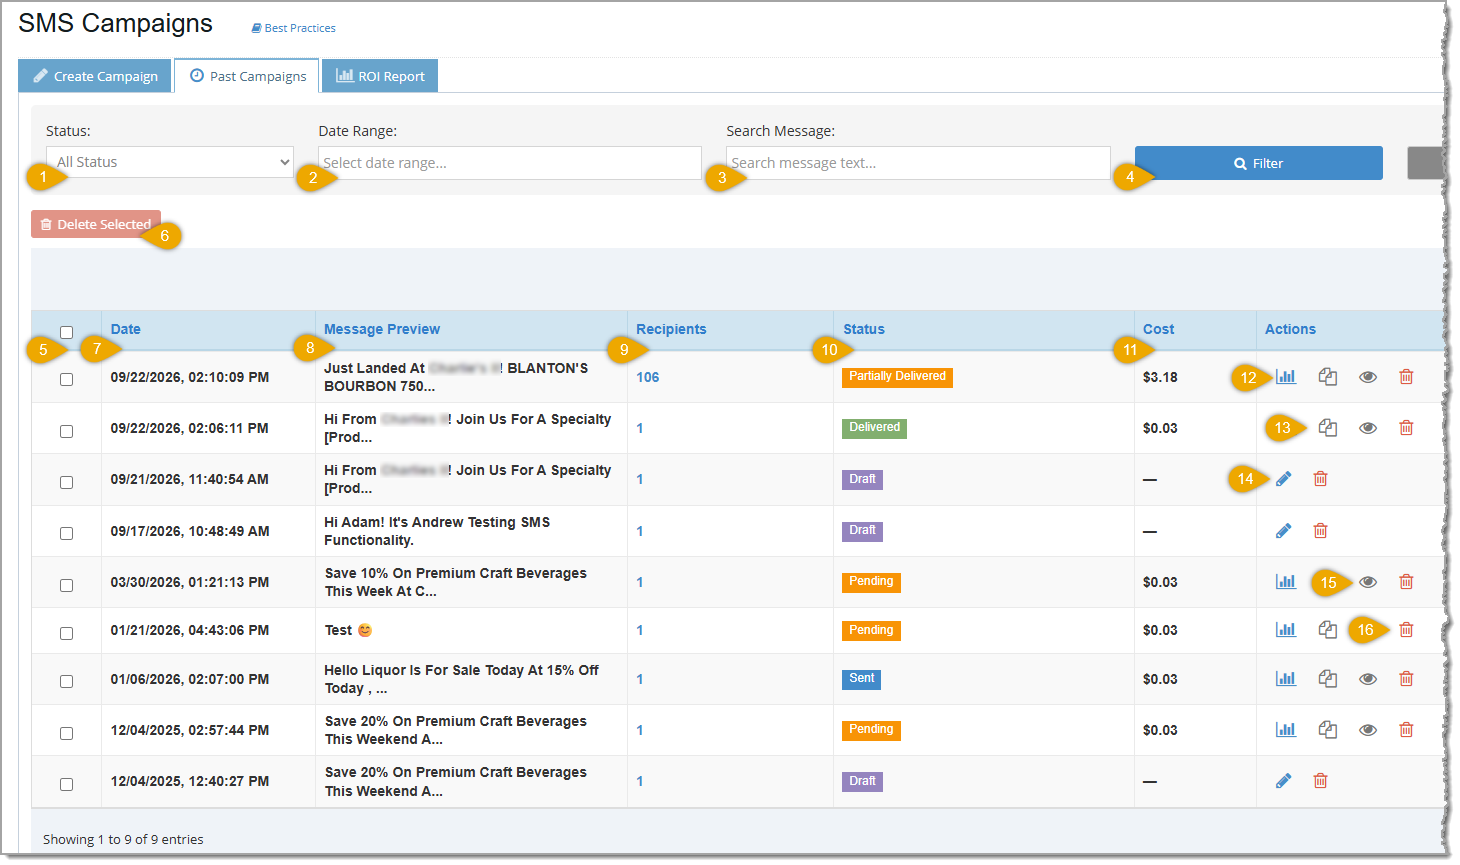
- Status — Click this drop-list to filter the list of your SMS Campaigns to a specific Status, if needed. Statuses include Draft, Pending, Sent, Partially Delivered, Failed, and Delivered.
- Date Range — Click this field to open a date-picker that will let you set your from and to dates for the date range you want. Doing so will filter your list of SMS Campaigns to display only those that fall within your date range after you click the Filter button described below.
- Search — If you need to find a specific SMS Campaign, you can search numerically by date or alpha-numerically by Message Preview keyword to find the one you want.
- Filter — Click this button to apply whichever filter you added and refresh the table to display SMS Campaigns that fit your filtered criteria. You can also click to Clear your filters and reset them to the default view (not pictured).
- Selection — You can check the boxes in this column to select one or more Campaigns, or you can check the box in the table header to Select All / Deselect All. You can then apply actions, such as Delete or Duplicate, described below.
- Delete — You can click this button to Delete one or more selected Campaigns. A confirmation will pop up asking if you want to permanently delete the record(s).
- Date — The date and time of the most recent save for each of your SMS Campaigns will display in this column.
- Message Preview — The first few words of your message for each of your campaigns will display in this column.
- Recipients — The number of recipients for each of your SMS Campaigns will display in this column. You can click the number to open a window listing them, if needed.
- Status — The current Status for each of your SMS Campaigns will display in this column. Statuses include Draft, Pending, Sent, Partially Delivered, Failed, and Delivered.
- Cost — The estimated cost to you for each of your SMS Campaigns will display in this column. The amount of this charge is based on the number of recipients and the message type (SMS, Extended, or MMS described below) and may vary according to provider segmenting rules, so this is only an estimate, but should be very close to the final charge for each of your campaigns.
- Report — Click the Chart Icon to open the Campaign in the ROI Report, with full details on Cost, Earnings, and Attributed Customers. Please note, this will take you to the ROI Report tab described below, but your current view of the Past Campaigns tab will remain as it is and you can return at any time.
- Duplicate — Click the Copy Icon to create a clone of the SMS Campaign. It will be in Draft status and its details will open in the Edit window so you can adjust it as needed.
- Edit — Click the Edit Icon to open the Edit SMS Campaign window (exactly like the first step of the Messaging Assistant described below) where you can adjust the campaign as needed.
- View — Click the Eye Icon to open a window with the SMS Campaign's details.
- Delete — Click the Trashcan Icon to delete the SMS Campaign. A confirmation will pop up for you to make sure you really want to permanently remove it.
The ROI Report Tab
Here is how to use the Return On Investment functionality in the ROI Report Tab:
Please Note: To view the Info Icon tooltip text, hover your mouse over the icon for a few seconds and the text will pop up for you.
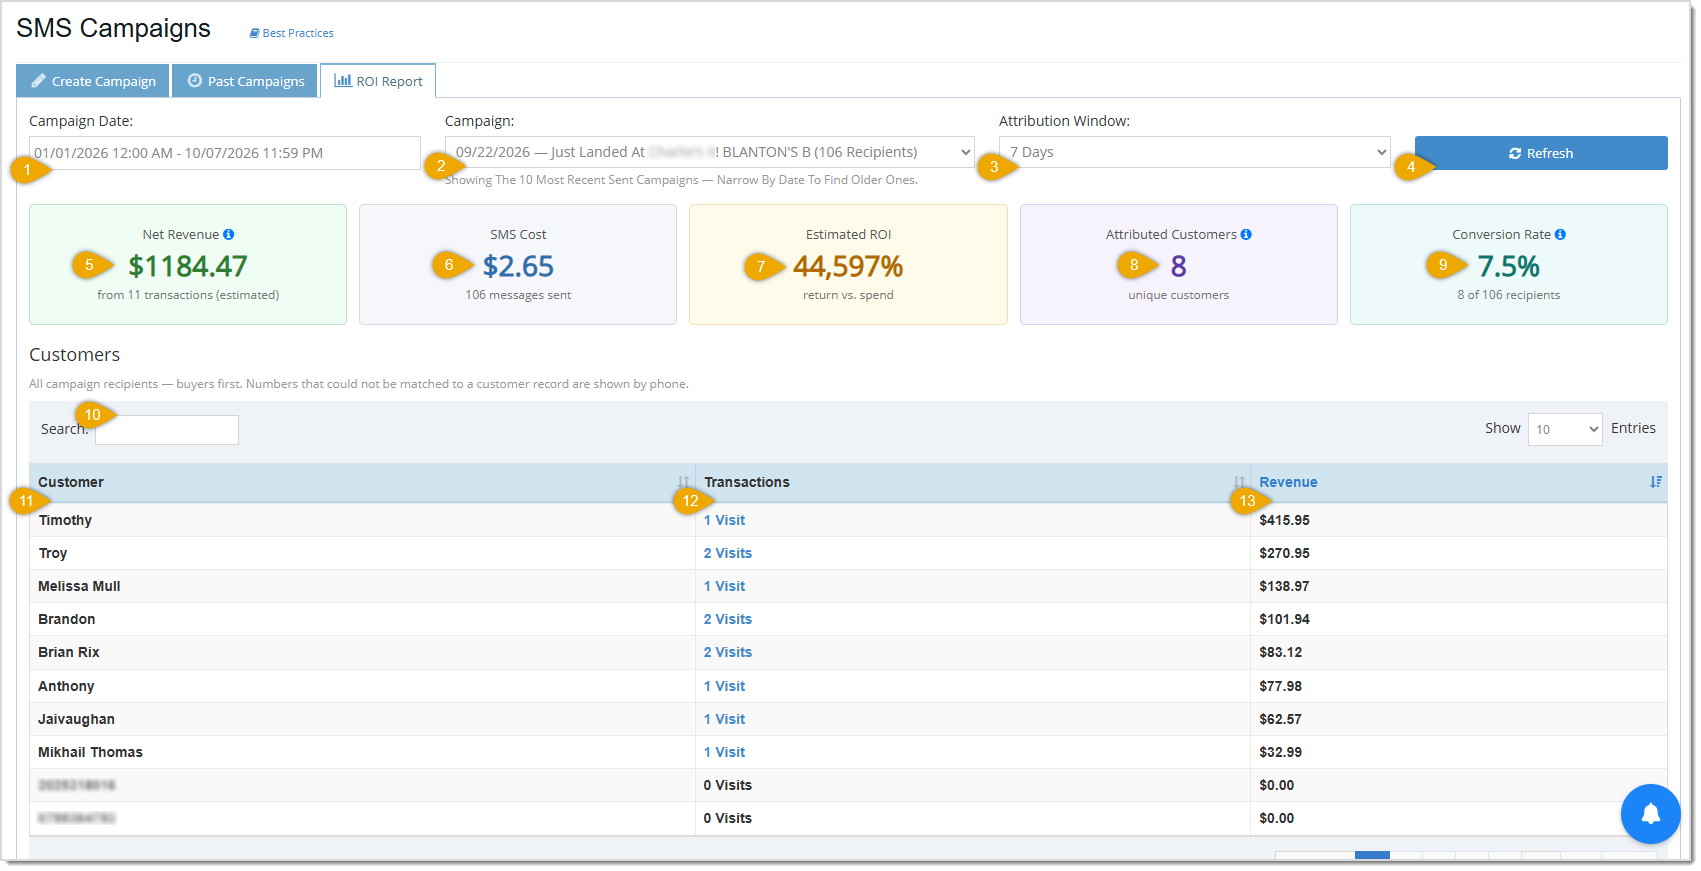
- Campaign Date — Click this field to open a date-picker that will let you set your from and to dates for the date range you want. Doing so will filter your list of SMS Campaigns to display only those that fall within your date range after you click the Filter button described below.
- Campaign — Click this field to open a drop-list with your 10 most recent Campaigns (by default). If you've chosen a Date Range, the system will list Campaigns from that range. By default, the ROI Report will show you your most recent Campaign.
- Attribution Window — By default the report will attribute sales from the subsequent 7 days after sending the campaign to the Campaign as revenue directly generated by the message. You can change this time frame to 14 days, but 7 is standard.
- Refresh — If you change any of the filters, click the Refresh button to load the campaign data that fits your updated filters.
- Net Revenue — This card displays the total dollar amount of all transactions attributed to the Campaign. These are sales you are likely not to have had without the Campaign. You'll also see the total number of attributed transactions.
- SMS Cost — This card displays your total Cost for sending the Campaign to all recipients. It will also show you the total number of messages sent.
- Estimated ROI — This card displays the return / spend percentage, so your Net Revenue divided by your SMS Cost as a percentage. The example is dramatic but this type of marketing can often deliver a very high Return on Investment.
- Attributed Customers — This card displays the number of unique customers that had attributed transactions after you sent the Campaign.
- Conversion Rate — This card displays the percentage of customers out of the total number that had attributed transactions after you sent the Campaign. It will also show you the number of customers with sales and the total number of recipients.
- Search — Enter search text into this field to find a specific customer.
- Customer — This column displays the name of each Customer to whom you sent the Campaign. They will be listed in descending order of the amount they spent in attributed transactions, with the biggest spenders at the top.
- Transactions — This column displays the number of attributed transactions for the Customer.
- Revenue — This column displays the total revenue dollars of attributed sales for the Customer.
Customer Enrollment
Customers must opt in from the POS after entering their phone number on a transaction before they are eligible to receive messages. Those who are opted in can be added to SMS Campaign Drafts, but if not opted in it will not be an option to do so. If there are customers who are currently not opted in or who have opted out, you can offer them the prompt again to enroll using the steps below, if you want them to have a chance to be included, but they won't be able to enroll until they do their next system transaction and then confirm via text message.
When you send the customer their first SMS Campaign message, they will receive a text to opt-in and they can confirm their subscription at that time.
When you send a customer a text message for the first time the system will require their enrollment (Opt-In). Enrolling a new customer will require three message 'segments' in addition to the original message itself (charges per segment are listed in the section below): an initial message asking the customer to enroll, a reply message from the customer agreeing to the enrollment, and a third message sent back to the customer to confirm enrollment.
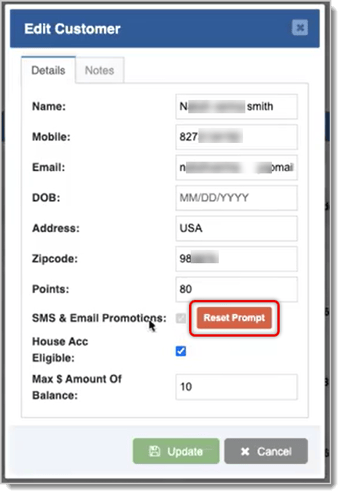
If the customer opts out, you can open the Admin and go to Customers > Customers, search for the customer and click the Pencil Icon to Edit them, and you can click the Reset Prompt button if you want them to be offered the POS opt-in prompt in their next transaction. Click the Update button to save the change.
Please note that if a customer has agreed to the opt-in request from a transaction but has not yet opted in from the text message the system sends to them they will go through the initial opt-in process where they receive the age-verification prompt.
Messaging Costs
Messages will cost $0.025 (2.5 cents) per message segment. Messages that 160 characters, including spaces, will generally be one segment. Special symbols such as emoji may affect character counts toward segments.
The Bottle POS system will give you your first 500 segments free each month! After that, further segment costs will be added to your monthly billing calculation for the calendar month.
Customer Consent
Important Legal Note
According to TCPA guidelines, it is up to you as the retailer to collect consent to send SMS messages to your customers. Below is a template for you to use in doing that.
Consent to Receive SMS Messages
By signing below, you agree to receive promotional, transactional, and customer service related text messages at the phone number you have provided. Please note:
- Message frequency may vary.
- Message and data provider service rates may apply.
- You can reply STOP to opt-out at any time to any message.
- You can reply HELP for assistance.
- Your information will not be shared with third parties.
Customer Agreement
🔲 I consent to receiving marketing text messages. Message frequency my vary and standard data rates may apply.
🔲 I consent to receiving account notification and order update text messages. Message frequency may vary and standard data rates may apply.
Signature:
Date:
Click here to download a printable PDF version of this form.
Related Topics
How to Create and Manage Customers
Customer Groups
Frequently Asked Questions
Q: If I sent a campaign before I was ready, is there a way I can stop it from going out?
A: No, once you have clicked the Send button, the system will send the message to all recipients, and charges will be posted to your account for your next billing cycle for the cost of the service.
Q: I have a question, but I can't find my answer here, how do I get more assistance?
A: You can ask any question at the number below. Contact our 24/7 support team at: (877) 381-4087





 December 05, 2025
Is this page helpful?
×Help us improve our articles