Learn how to successfully add new employees to your Bottle POS and to set their security permissions. It is highly recommended that you add an account for each of your employees. Individual employee accounts allow you to track data by staff member for your business.

To get started, log into your Admin. Go to the Settings tab on the far left and click Settings, then click Staff & Admins.
The Staff & Admins Page
On the Staff & Admins page, you can add or modify employee user accounts:
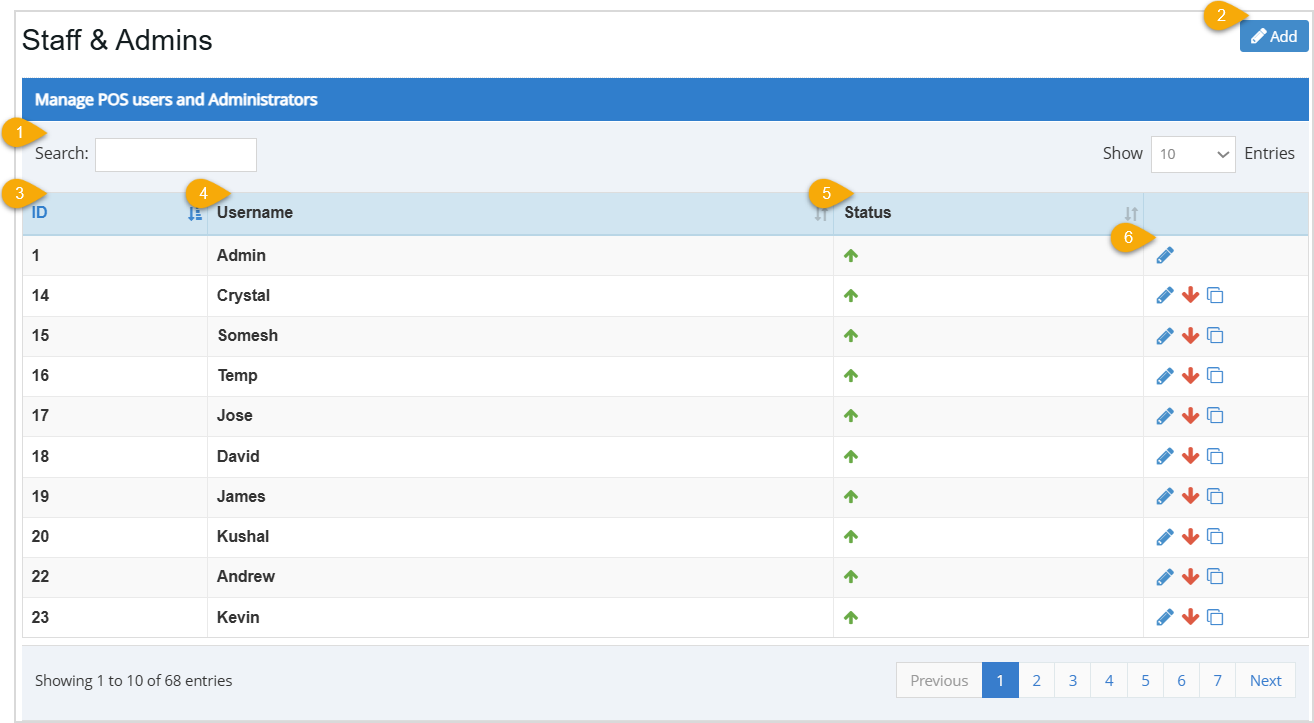
- Search – Enter text into the Search to find the Username you want.
- Add – Click this button to add a new employee. Full details on this process are below.
- ID – This column displays the unique identification number assigned to each employee. This number is used only internally by the system.
- Username – This column displays the employee's Username.
- Status - This column displays if the employee's user account is Enabled (the Green Arrow icon) or Disabled (the Red Arrow icon).
- Actions:
- Pencil Icon – Click this icon to open the Edit User window and edit a saved user account.
- Arrow Icons – This will be a Green Arrow for staff user accounts that are Disabled (so you can click to Enable them) and it will be a Red Arrow for staff user accounts that are Enabled (so you can click to Disable them).
- Copy Icon – Click a Copy action icon to Clone an employee user account. This will allow you to more rapidly create a new user account if the new staff member has similar information to the cloned user.
Creating Employee User Accounts
To add a new employee user account, click the Add button at the top right of the Staff & Admins page.
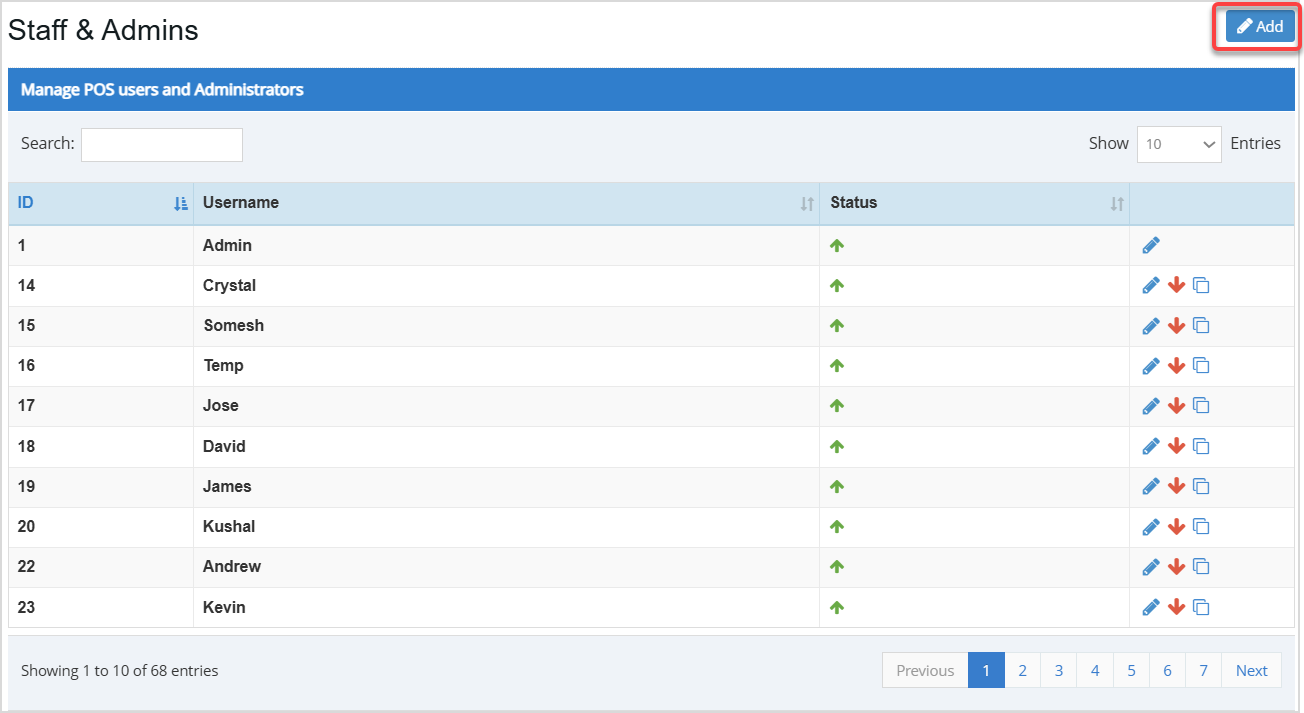
When you click the Add button, the Add User window will open.
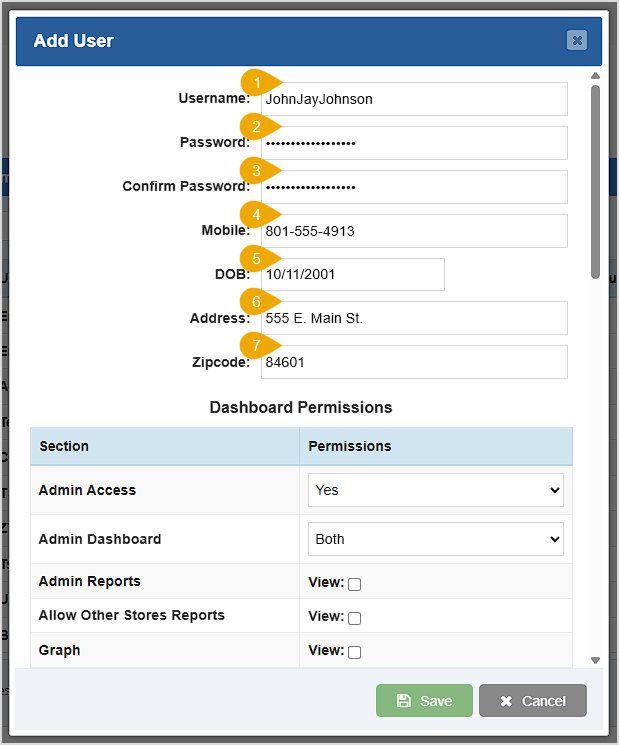
In the upper part of the Add User window here are the fields you can configure:
- Username – Enter a Username that makes sense for the employee.
- Password – Enter a Password for the employee to use. We recommend at least 8 characters, with at least one number, one non-letter / non-number, and at least one character each of uppercase and lowercase. Write it down before you enter it since you won't be able to see it after it is entered.
- Confirm Password – Enter the password again in the Confirm Password field.
- Mobile – Enter the employee's mobile phone number. This field is optional.
- Date of Birth – Enter the employee's date of birth. This field is optional.
- Address – Enter the employee's street address. This field is optional.
- Zipcode – Enter the employee's ZIP code. This field is optional.
Dashboard Permissions – The settings described below cover permissions that affect the Admin portion of the software.
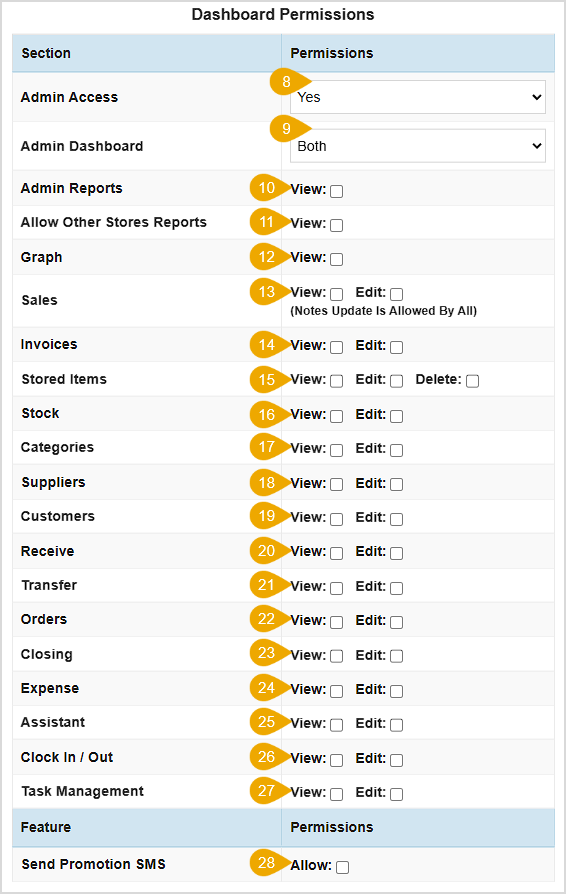
- Admin Access – This field determines whether or not the employee receives administration access. Click into the field for the drop-down menu, select Yes, No, or Administrator. Administrator level users have all system permissions. Selecting Yes allows users access to the Admin depending on the dashboard permissions selected, and selecting No disallows users from having any administrative access.
- Admin Dashboard – This field is only clickable if you selected Yes on the Admin Access portion. Clicking into this field will show you the values Both, Standard, Realtime, and None. Selecting Both gives you both the Dashboard and the Realtime functions located at the top of the main Admin menu. Selecting Standard would display the Dashboard, selecting Realtime would display the Realtime section only and the None option would disallow the user from seeing either option.
- Admin Reports – Check this box if you want this employee to be able to access the Admin Reports area.
- Allow Other Stores Reports – This setting only matters if you have multiple stores that are linked together in the Bottle POS database. Check this box to view a Summary Report for your linked stores from the Settings > Stores section.
- Graph – Check this box if you want the employee to be able to view the Graph area of the Admin.
- Sales – You can use these checkboxes to give the employee permission to View / Edit the POS Sales area of the Admin.
- Invoices – You can use these checkboxes to give the employee permission to View / Edit Invoices in the Admin.
- Stored Items – You can use these checkboxes to give the employee permission to View / Edit / Delete saved Items in the Admin.
- Stock – You can use these checkboxes to give the employee permission to View / Edit the Inventory section in the Admin.
- Categories – You can use these checkboxes to give the employee permission to View / Edit Categories and Category Groups in the Admin.
- Suppliers – You can use these checkboxes to give the employee permission to View / Edit Suppliers in the Admin.
- Customers – You can use these checkboxes to give the employee permission to View / Edit Customers in the Admin.
- Receive – You can use these checkboxes to give the employee permission to View / Edit receive invoices in the Admin.
- Transfer – You can use these checkboxes to give the employee permissions to View / Edit transferred stock in the Admin.
- Orders – You can use these checkboxes to give the employee permissions to View / Edit purchase orders in the Admin.
- Closing – You can use these checkboxes to give the employee permissions to View / Edit shift closing data in Accounting > Closing.
- Expense – You can use these checkboxes to give the employee permissions to View / Edit expense management in Accounting > Expense.
- Assistant – You can use these checkboxes to give the employee permissions to View / Edit the Assistant function in the Admin left navigation bar.
- Clock In / Clock Out – You can use these checkboxes to give the employee permissions to View / Edit the Clock In / Out feature in the Admin.
- Task Management – You can use these checkboxes to give the employee permissions to View / Edit Register Tasks.
- Send Promotion SMS – You can use this checkbox to Allow the employee to send promotional text messages to customers.
POS Permissions – The settings described below cover permissions that affect the POS portion of the software.
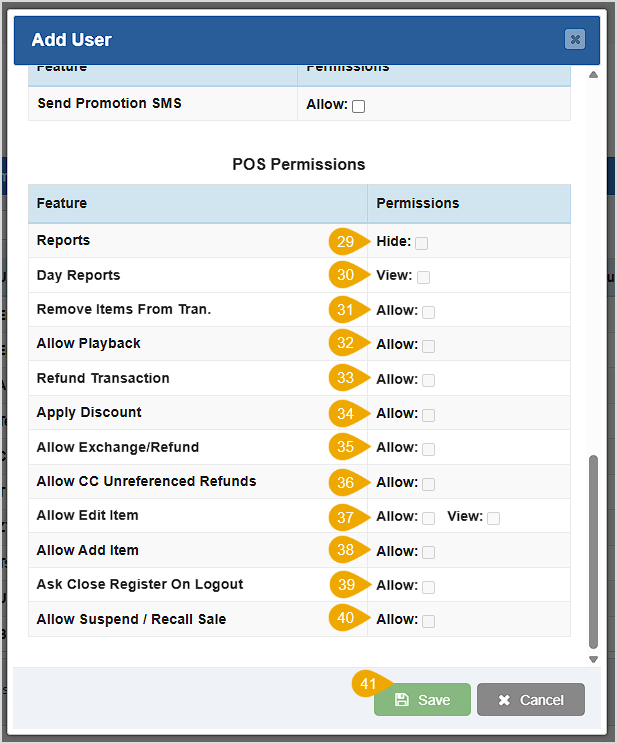
- Reports – You can use this checkbox to Hide the Reports feature from this employee.
- Day Reports – You can use this checkbox to give the employee permission to View the Day Reports.
- Remove Items from Transaction – You can use this checkbox to Allow the employee to remove items from transactions.
- Allow Playback – You can use this checkbox to Allow the employee to view the security footage playback from the transaction details on the POS.
- Refund Transaction – You can use this checkbox to Allow the employee to refund transactions.
- Apply Discount – You can use this checkbox to Allow the employee to apply discounts.
- Allow Exchange / Refund – You can use this checkbox to Allow employees to exchange an item for another, instead of a refund.
- Allow CC Unreferenced Refunds – You can use this checkbox to Allow the employee to do refunds that don't have an original card charge in the POS system.
- Allow Edit Item – You can use these checkboxes to either Allow the employee to Edit Items in the Edit Item window or, give permission to View the window in the Register.
- Allow Add Item – You can use this checkbox to Allow the employee to Create new Items in the Register.
- Ask Close Register on Logout – You can use this checkbox to Allow the POS system to prompt the employee whether or not to Close the Register when they logout. If this user is allowed to close a shift without a manager, they would have this permission.
- Allow Suspend / Recall Sale – You can use this checkbox to Allow the employee to Suspend as well as Recall transactions.
- Save or Cancel – Click the Save button to Save your changes or, click the Cancel button to cancel any changes that were made.
Please Note: You can always select the pencil icon on any employee account to edit the information, such as changing a password, or to change the permissions given.
Related Topics
How to Clock In & Out
Managing Timesheet Entries
Ringing Up Sales with the POS
Frequently Asked Questions
Q: Can I change the default password of the admin profile?
A: Yes, you can change the password for this account. You can do this by clicking the Pencil Icon, and changing the information in the Password and Confirm Password boxes.
Q: How many employee user accounts can I add to the system?
A: There is no limit on the amount of accounts the system can support.
Q: I have a question, but I can't find my answer here, how do I get more assistance?
A: You can ask any question at the number below. Contact our 24/7 support team at: (877) 381-4087
 October 01, 2024
Is this page helpful?
×Help us improve our articles