This article will teach you how to generate a Purchase Order using your Bottle POS Admin system. Purchase Orders are often the first step in the inventory purchasing process you initiate with a vendor. Your system will help you generate professional purchase orders and also provide recommendations on the best products for your business to purchase based on sales history.
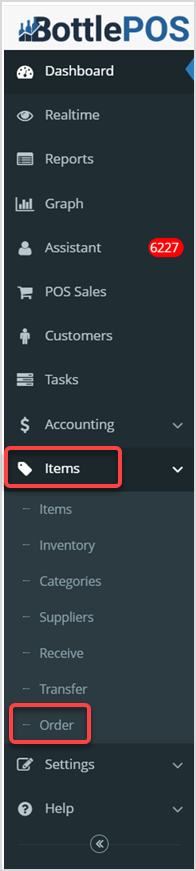
To get started, log into your Admin page. Once you've logged in successfully, click Items, and in the drop-down menu, click Order.
Orders Overview for Bottle POS Admin
The Purchase Orders Page
On the Orders page, here is how you can work with your Purchase Orders:
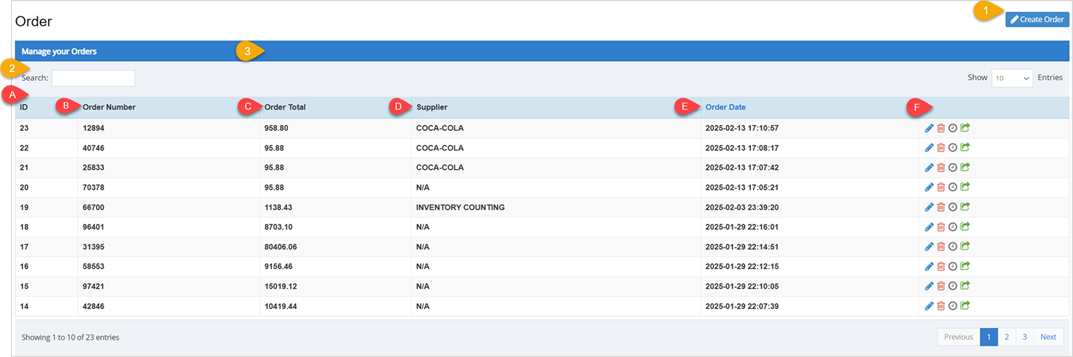
- Create Order - This button will open the Order Items window, where you can view, add and edit items for an order. Full details below.
- Search - Enter text into the Search to find a specific Supplier, number, or date.
- Data Table - This table displays the important details of each order:
- ID - This column displays the internal system identification number for each order.
- Order Number - This column displays the order number for each order.
- Order Total - This column shows the total dollar amount for each order.
- Supplier - This column displays the Supplier for each order.
- Order Date - This column shows the date and time of the order.
- Action Icons - You can utilize the following Action options for your orders:
- Click the blue Pencil icon for an order to review and modify the details.
- Click the red Trashcan icon to delete an order.
- Click the gray Clock icon to review the history of an order.
- Click the green Arrow icon to export the selected order to the Receive Orders page.
Creating Purchase Orders
When you click the Create Order button at the top right of the Orders page, the Order Items window will open. Here's how to work with the Order Items window:
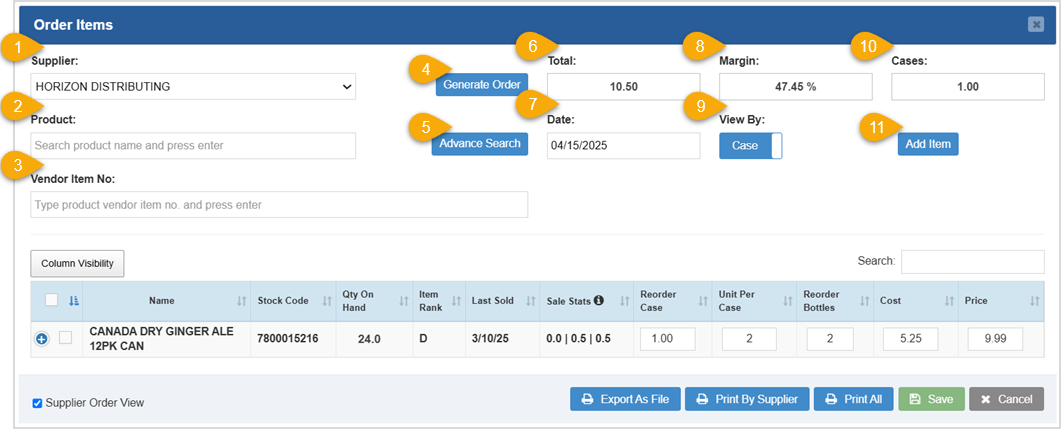
- Supplier - Click in the field to view your Suppliers in the drop-list and select the one you want.
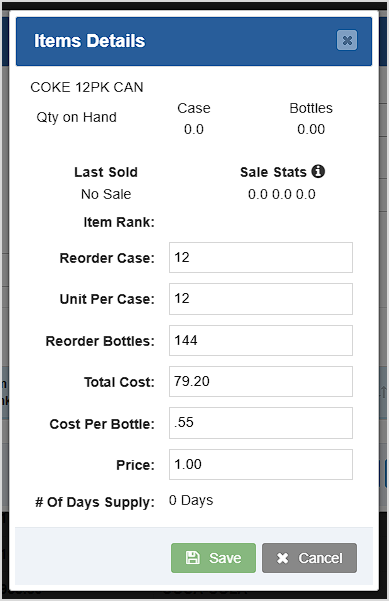
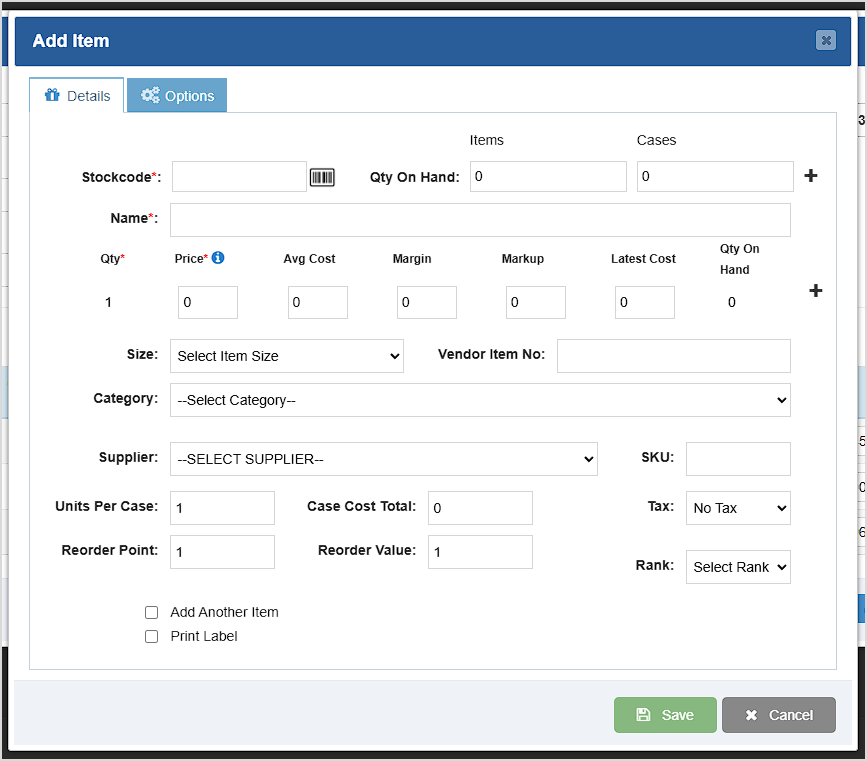
- Product - Enter the name of the Product you want to add to the order. When it pops up in the drop-list, select it. When you select the item you want, it will load in the Items Details window, where you can configure the item for your order. When you have the item configured the way you want, click Save to add it to the order:
- Vendor Item No. - If a product you want has a Vendor Item Number, you can scan or enter it here and a list of matches will drop down for you. Click the one you want and the Item Details window will open, as described above, so you can configure the item and Save it to the data table of the order.
- Generate Order - After you have selected a Supplier, click this button to automatically populate your order with items that need to be reordered. Note that this works only for items that have Reorder Point values saved.
- Advanced Search - Use this feature if you can't find the items for which you're looking. This feature is very flexible: you can search using any information you have. Click the Search button at the bottom to see the results.

- Total - This area displays the total cost of the items in the Purchase Order.
- Date - This area displays the current date by default. You can click to open a date-picker and change it.
- Margin - This area displays the profit margin percentage of items in the table.
- View By - You can select either Bottles or Case and the Sale Stats column will adjust the items sold as well as the quantity on hand accordingly.
- Cases - Displays the number of cases in the order.
- Add Item - Click this button to create a new item and add it to the order. The standard Add Item window will open for you and you can create the item in the normal way. When you click to Save it, the item data will populate in the Purchase Order.
The following functions focus on the data table in the lower part of the Add Items to Order window:
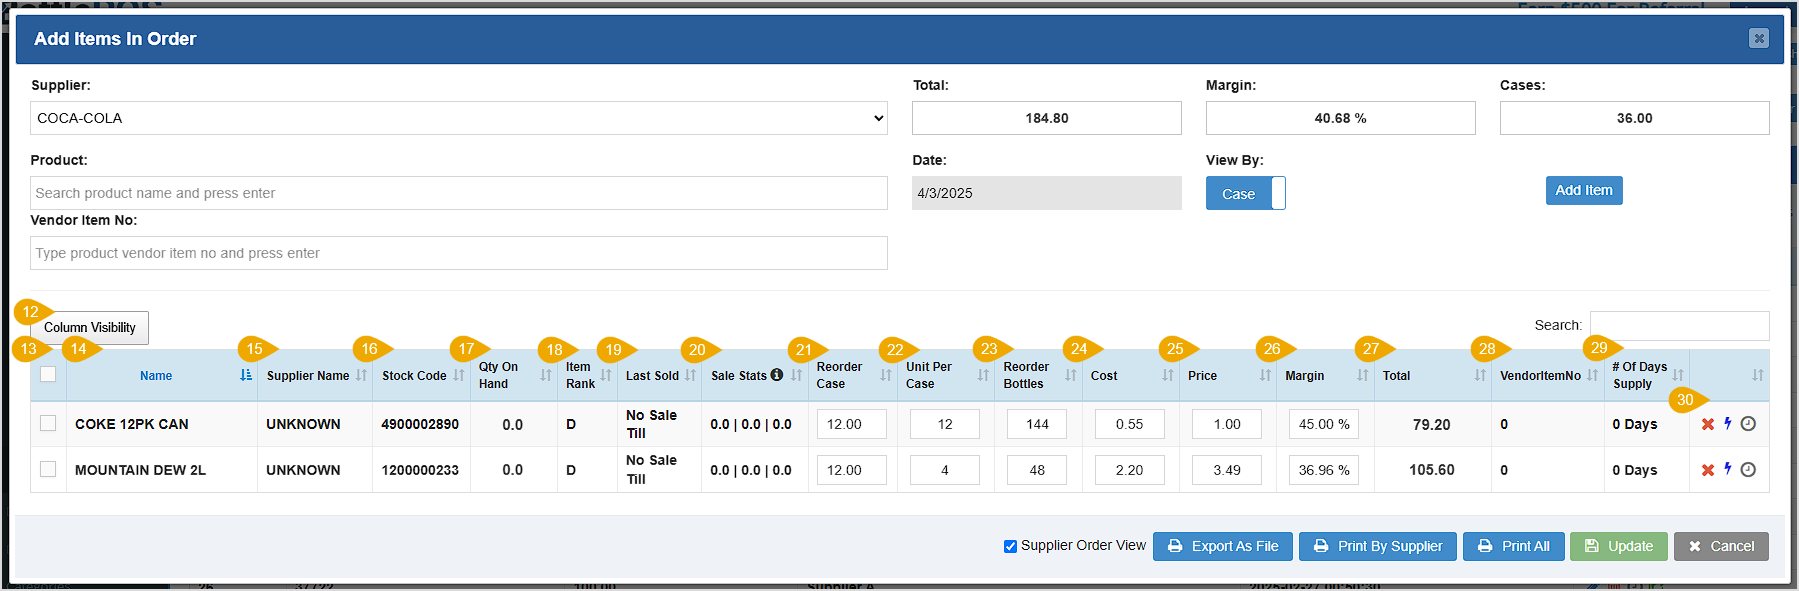
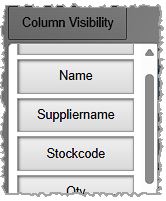
- Column Visibility - Click this button to select the columns you want to display in the data table.
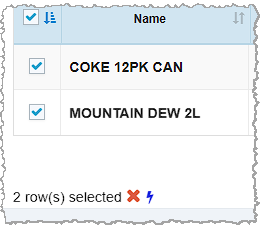
- Checkbox Column - You can select multiple items or click the checkbox at the top of the column to select all and apply either the Remove action using the X Icon or the Discontinue Item action using the Lightning Icon. With more than one item selected, you'll see those functions and the number of selected rows below the data table on the left, as pictured here:
- Name - This column displays the Name of each product you've added to the order.
- Supplier Name - This column lists the Supplier name for the items in the order. By default this column is not visible, since the Supplier will usually be the same for all items.
- Stock Code - By default, the POS takes every UPC (Uniform Product Code) for an item scanned into the system and converts it to a 10 digit UPC-A format. The code for each item will be displayed in this column.
- Quantity On Hand - This column displays the quantity you have on hand of each item.
- Item Rank - This column displays the performance Rank of each item. Rank A is the top 20% of your sales, Rank B is the middle 60% of your sales, Rank C inventory falls into the bottom 20% of your sales, and Rank D inventory has no sales history.
- Last Sold - This column displays the date each item was most recently sold.
- Sale Stats - This column displays the number of cases of each item sold in the past 30 / 90 / 120 days.
- Reorder Case - This column displays the number of cases to be ordered.
- Unit Per Case - This column displays the number of individual units per case.
- Reorder Bottles - This column displays the number of individual units to be ordered in the Purchase Order.
- Cost - This column displays the cost per unit of each product.
- Price - This column displays the selling price of each item.
- Margin - This column displays the profit margin percentage of each item.
- Total - This column displays the total cost of each item.
- Vendor Item Number - This column will display the Vendor Item Number for each item.
- Number Of Days Supply - This column displays the system's estimate of number of days supply for each item that will result from the finalization of the order.
- Actions - Here are the different Action options you have for the items in the order:
- Click the red X Icon to remove an item from the order.
- Click the blue Lightning Icon to discontinue a product, meaning this item will no longer be added to an order when the Generate Order button is selected.
- Click the grey Clock Icon to review Item History.
The functions described below are at the bottom of the Order Items window:
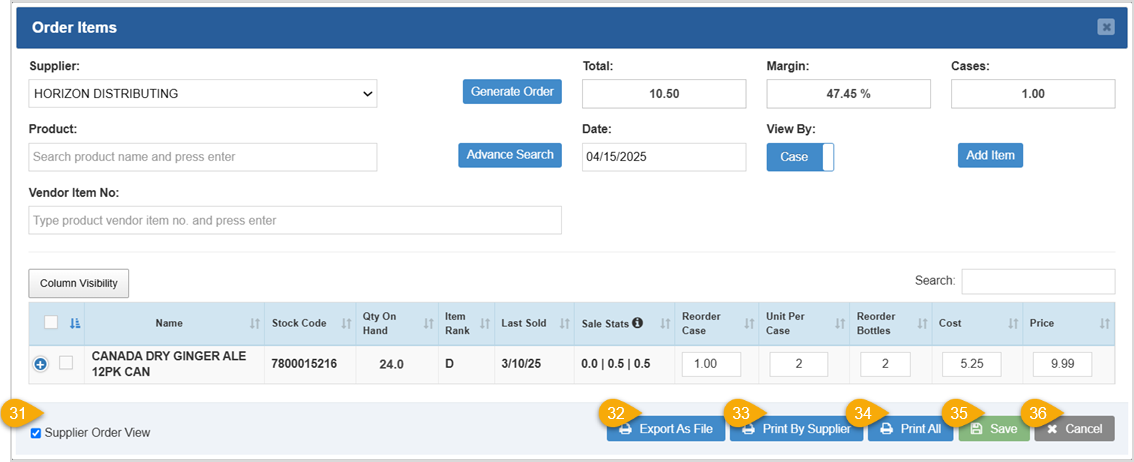
- Supplier Order View - If checked, this order is printed or exported displaying the Supplier related values, which are: Vendor Item No, Name, Recorder Case, Units Per Case, and Reorder Bottles.
- Export As File - Click this button to export the purchase order as a CSV or PDF File.
- Print By Supplier - Click this button to print the order, organized by Supplier.
- Print All - Click this button to print the order as it appears in the data table.
- Save - Click this button to save the changes you've done on this page.
- Cancel - Click this to close the window. If you have unsaved changes, the system will prompt you to save them.
Completing a Purchase Order
The last and most important step, when the shipment arrives, is to receive the products into inventory. At any point before you receive the shipment, on the Order page of the Items menu, click the green Arrow action on the far right of the order's line to export it to the Receive page. It can wait there until you're ready to receive the inventory.

Once you've clicked to export the order, you'll be taken to the Items > Receive page, and the Receive Items window will open with your order loaded. Review the order and make changes if necessary.
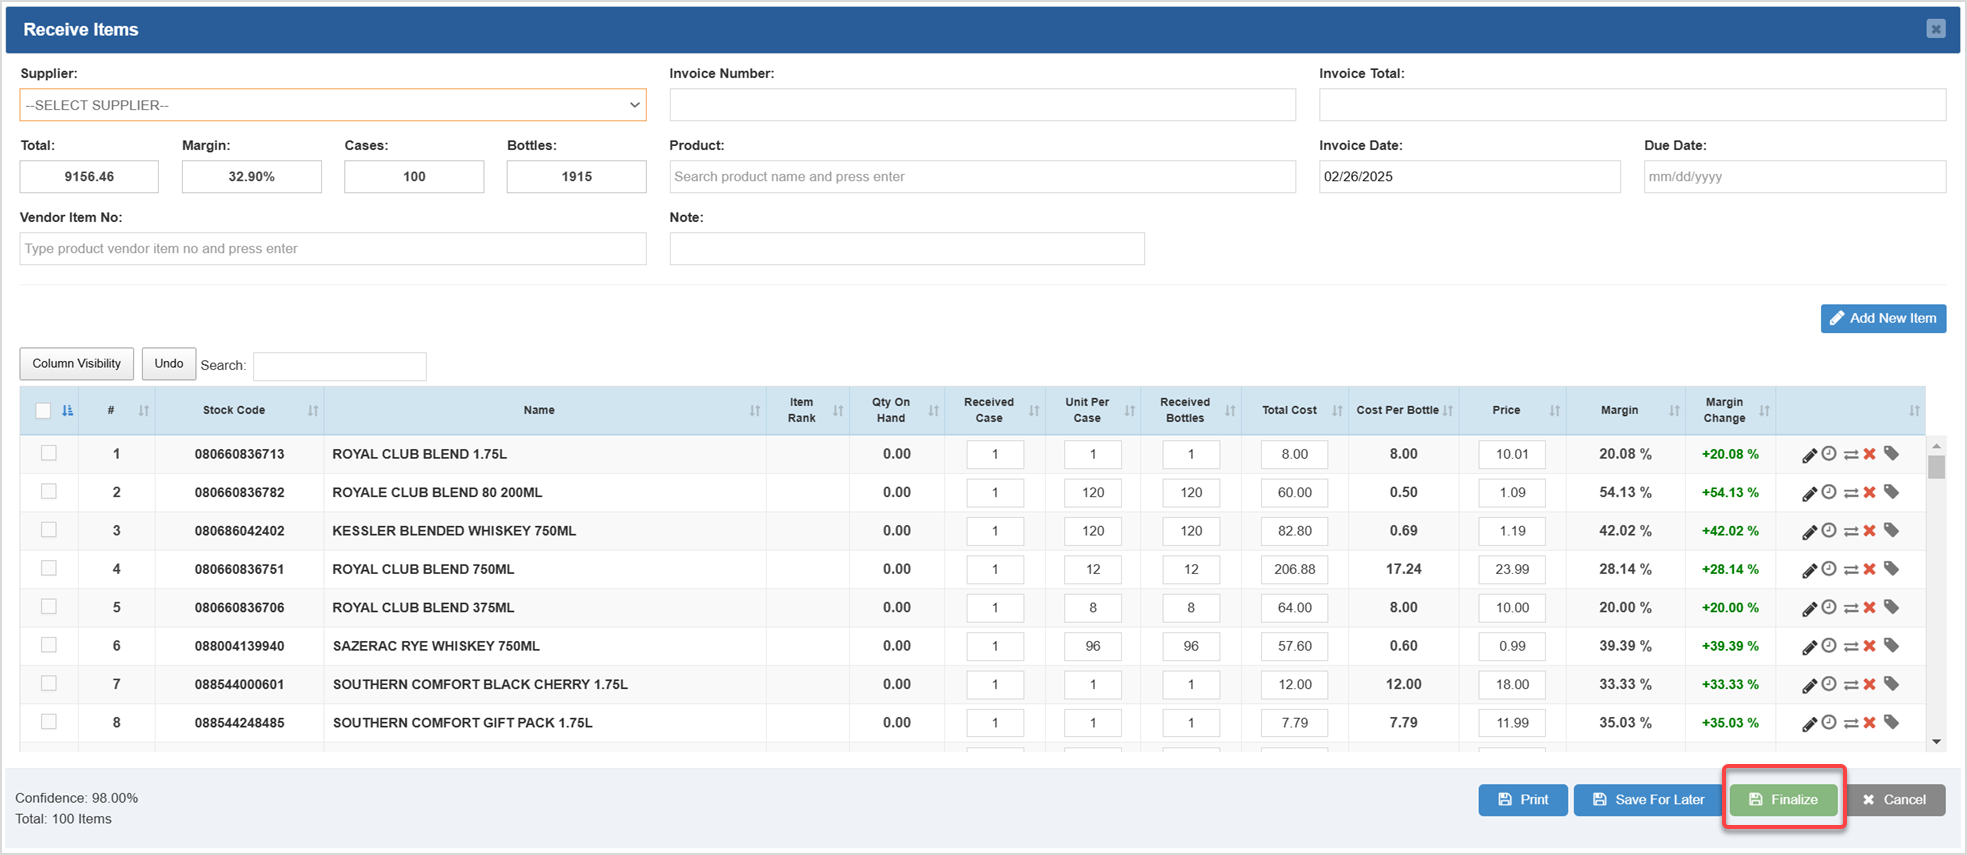
You can click the Save for Later button if you don't have the shipment yet. When you're ready, click the Finalize button to finish receiving the inventory.
Related Topics
Receive Invoices in the Admin
How to Add an Inventory Item
Frequently Asked Questions
Q: How do I add Suppliers to the system?
A: You can add a new supplier to the system from the Supplier panel. Review the following article for more information on how to add suppliers to the system.
Q: I have a question, but I can't find my answer here, how do I get more assistance?
A: You can ask any question at the number below. Contact our 24/7 support team at: (877) 381-4087
 October 01, 2024
Is this page helpful?
×Help us improve our articles