Managing Timesheet Entries
It's common for employees to forget to clock in or out and when that happens you need an easy option
 October 01, 2024
Learn how to configure your customer-facing screen in a way that best suits your business. The customer screen can be used for more than just showing the customer their transaction details. You can also display advertisements, allow customers to enter a phone number for loyalty rewards, and even allow them to leave a review for your store.
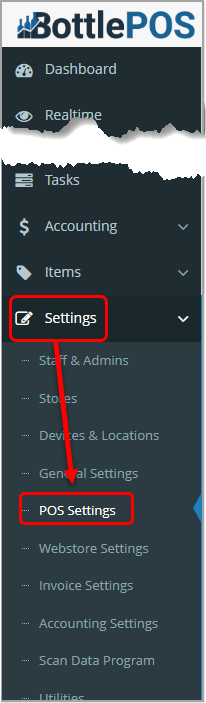
To customize the customer-facing POS screen, click POS Settings on the Settings menu in your Admin system. Admin privileges are required to complete the steps in this article.
|
Selection |
Allows Customer Interaction? |
Description |
|
Welcome Screen |
No |
This option displays a blue screen that states 'Welcome to <Business Name>.' |
|
Slideshow |
No |
This option allows you to upload images. After you select this option:
|
|
Number Entry |
Yes |
This option displays an interactive keypad that your customers can use to enter the phone number associated with their account.
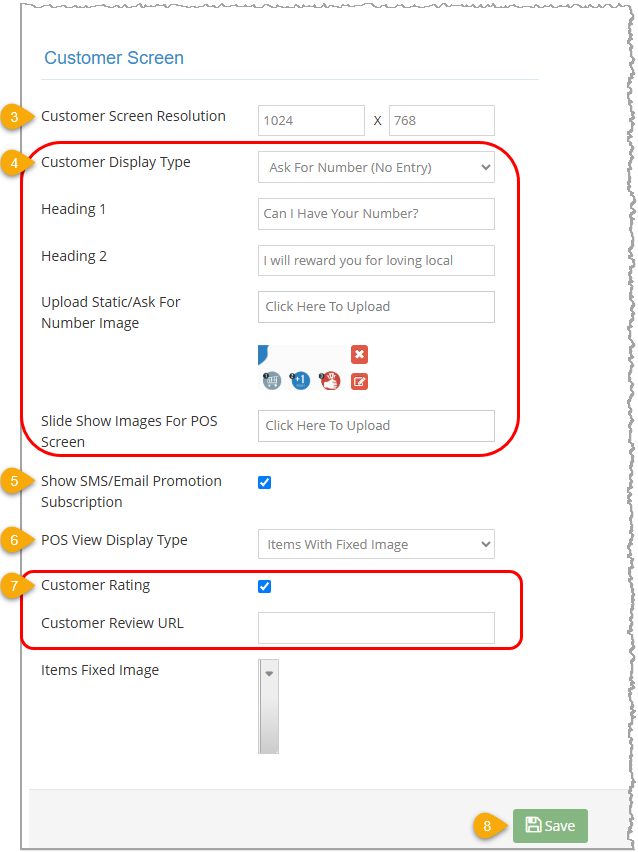
Enter text into the Heading 1 and Heading 2 fields to guide your customer on what they should do. For example, you might type 'Can I have your number?' in Heading 1 and 'Thank you for being a loyal customer!' in Heading 2. |
|
Ask For Number (No Entry) |
No |
This option allows you to set up a custom background and message to display to the customer asking them to provide you with a phone number that you can enter in the POS app on the Register tab.
Enter text into the Heading 1 and Heading 2 fields to guide your customer on what they should do. For example, you might type 'Can I have your number?' in Heading 1 and 'Thank you for being a loyal customer!' in Heading 2.
Click in the Upload Static / Ask For Number Image box to upload an image to display to the customer. Images must use the .jpg, .png, or .gif format. |
|
Ask For Number (With Entry) |
Yes |
This option allows you to set up a custom background and message to display to the customer asking them to use the keypad to enter their phone number.
Enter text into the Heading 1 and Heading 2 fields to guide your customer on what they should do. For example, you might type 'Can I have your number?' in Heading 1 and 'Thank you for being a loyal customer!' in Heading 2.
Click in the Upload Static / Ask For Number Image box to upload an image to display to the customer. Images should use the .jpg, .png, or .gif format. |
|
Selection |
Allows Customer Interaction? |
Description |
|
Items Only |
Yes* |
This is the default option. It shows your customers the items, transaction details, and loyalty details for the sale on the right side of the screen. |
|
Items With Slideshow |
No |
This option allows you to upload images to display on the right side of the customer-facing screen.
Click in the Slide Show Images for POS Screen box to upload one or more images to the right side of the customer screen. Images must use the .jpg, .png, or .gif format. When selected, the Enable Autoplay and Set Slideshow Interval options will determine how these images shuffle. |
|
Items With Fixed Image |
Yes* |
This option allows you to upload an image to display on the right side of the customer-facing screen.
Click in the Items Fixed Image field to select the image you want to use from the images you've uploaded in the Slide Show Images for POS Screen field.
Please Note: If you select Customer Rating, below, that option will show on the screen instead of the image you select here. |
|
Items With Keypad |
Yes |
This option displays an interactive keypad on the right side of the customer-facing screen that your customers can use to enter the phone number associated with their account. If a phone number was already entered, the image selected in the Fixed Image field displays in this area. |
|
*When Customer Rating is selected. |
||
Q: Where can I see how my customers are rating my business?
A: You can see the number of ratings for each rating type in your Summary report in the Reports section of the Admin (back office) app.
Q: Is there a limit to how many images I can upload for my slideshow?
A: No, but uploading too many may slow down your POS.
Q: I have a question, but I can't find my answer here, how do I get more assistance?
A: You can ask any question at the number below. Contact our 24/7 support team at: (877) 381-4087
Is this page helpful?
×Help us improve our articles