The Bottle POS has a myriad of options for you on how you can configure your POS to work the way you need. See what's available for you!
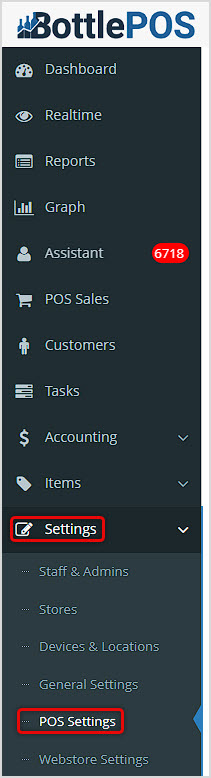
You can get to this part of the system by logging into your Admin and clicking Settings on the left. In the menu that opens, click on POS Settings.
Working With Your POS Settings
Your POS Settings area contains receipt printer configuration settings, sale options, and much more. In this article we'll explore what is there for you. For all areas, remember to scroll to the bottom and click the Save button to finalize any changes you make.
Receipt
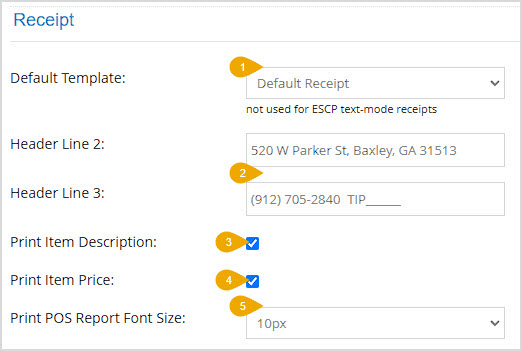
The Receipt area is at the top of the left column on the POS Settings page. In this area you can configure the following settings:
- Default Template – Your Default Receipt template will print standard receipts using the system defaults. There is also a PAX Default Receipt if you use the PAX A920 Pro card processing terminal.
- Header Line 2 & Line 3 – In the Header of your receipts, your company name will print. You can enter whatever you want to print in Line 2 and Line 3 of your header by using these fields.
- Print Item Description – You can check this box if you want additional details, like the Size, printed for the Items on your receipts. With this un-checked your receipts will only print the Name of each item.
- Print Item Price – With this setting on, your receipts will display prices for line items in the transaction.
- Print POS Report Font Size – This is the default Font Size for text in your receipts and system report printouts. You can set any size from 10px to 50px.
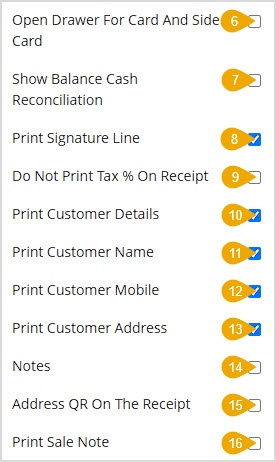
- Open Drawer for Card and Side Card – If you want your cash drawer to open every time you do a transaction using the Card or Side Card payment methods, check this box.
- Show Balance Cash Reconciliation – When your sales clerks are closing out the Register, if you have this option checked they will see the Balance information for their drawer count that will allow them to verify if the drawer is over or short.
- Print Signature Line – If you want to print a Signature Line on receipts for card transactions, check this box.
- Do Not Print Tax Percentage On Receipt – If you leave this box blank, if Tax is charged on a transaction, the percentage will print out on the receipt along with the tax amount being charged. If you check the box, only the tax amount will print.
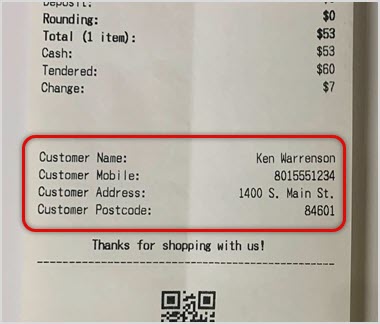
- Print Customer Details – If you want to have customer details print on your receipts turn this setting on, and the three settings below will become active for you. For this setting and the three below, see the example receipt below for how this information appears when printed.
- Print Customer Name – Check this box to print the Customer's Name below the transaction information on the receipt.
- Print Customer Mobile – Check this box to print the Customer's Mobile phone number below the transaction information on the receipt.
- Print Customer Address – Check this box to print the Customer's Address and Postcode below the transaction information on the receipt.
- Notes – If you want the Customer Note to print on receipts for the customer, you can turn this setting on.
- Address QR on the Receipt – This function is currently in need of further development and is non-functioning.
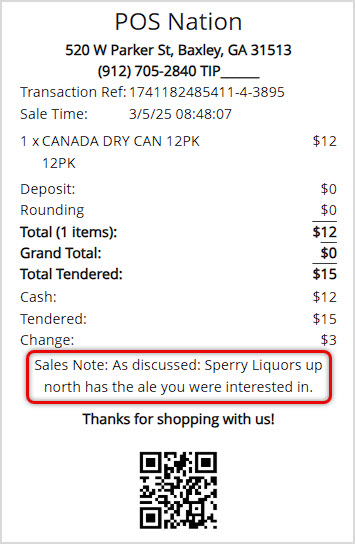
- Print Sale Note – Check this box if you want Sale Notes you add to a Register transaction to print on the receipt for the customer, as in the example below.
- Receipt Currency Codepage – This is an alternate codepage used to print currency characters in the Receipt Currency Characters setting below, for currency symbols other than the dollar sign. If you use dollars, you don't need to do anything here.
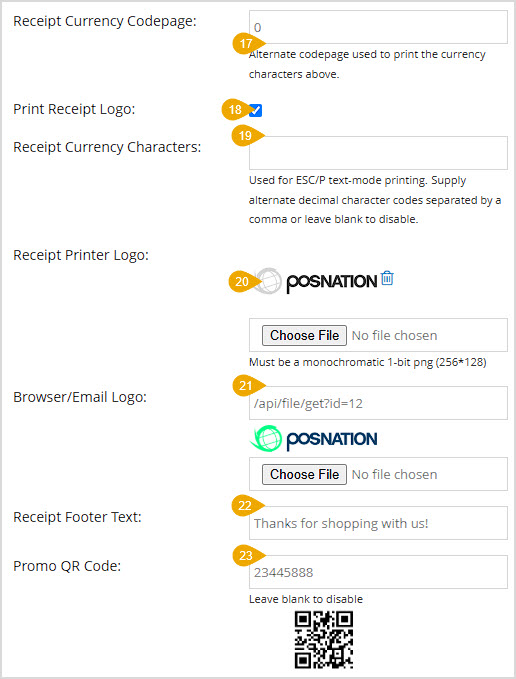
- Print Receipt Logo – If you have loaded a logo image file for your receipts below, you can use this control to print or not print it, as needed.
- Receipt Currency Characters – This is only needed if you use the ESC/P text-mode printing. For currency symbols you need, enter the Unicode character codes separated by commas. For example, the decimal code for the Japanese Yen sign is 0165 (if you hold down Alt and enter 0165 where you're entering text, the Yen sign will be entered). So if the Yen is one of the currency symbols you need to print, you would enter 0165 in this field. If you are not needing non-dollar currency symbols, or if you don't use the ESC/P text-mode printing, leave this blank.
- Receipt Printer Logo – You can upload a grayscale version of your logo if you wish for it to print at the top of your receipts, as pictured below. Your image will need to be a grayscale PNG file sized at 256px wide by 128px high. Click the Choose File button to find the logo file. Once it's uploaded, if you want to remove it, you can use the trashcan icon next to the logo thumbnail. Please note that if the logo image file isn't formatted correctly or is incompatible, the POS will not print receipts.
- Browser / Email Logo – If you wish to have your logo used in receipts produced electronically, you can upload the full color logo here. Click the Choose File button to find the logo file.
- Receipt Footer Text – Enter whatever text you want to appear at the bottom of your receipt text, just above any QR codes you might have. For example: 'No returns. All sales are FINAL.' See a visual example above in the receipt image for the Print Sale Note function.
- Promo QR Code – If you the URL you want for a promotion into this field, the system will generate the Promotion's QR code and will print at the bottom of your receipts.
POS Search

The POS Search area is near the bottom of the left column on the POS Settings page. In this area you can configure the following setting:
If you check the box to Show Tags on POS Search, if an item has a Tag, the tag will display on the drop-list next to the suggested item when using the Stock Search.
Customer Screen
The Customer Screen area is at the bottom of the left column on the POS Settings page. In this area you can configure the following settings:
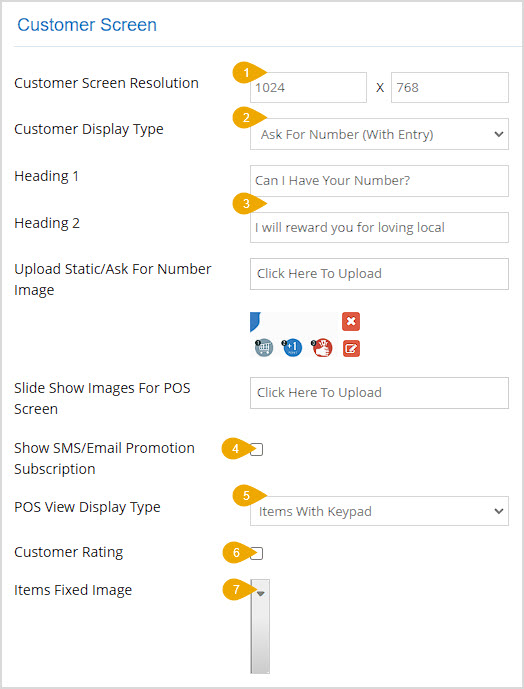
- Customer Screen Resolution – Most customer-facing displays use the default pixel resolutions, so it is unlikely you will need to enter anything here. If the area is blank or if your screen has a different resolution, enter the width and height of your customer screen in pixels.
- Customer Display Type – There are several types of customer displays you can have with the Bottle POS:
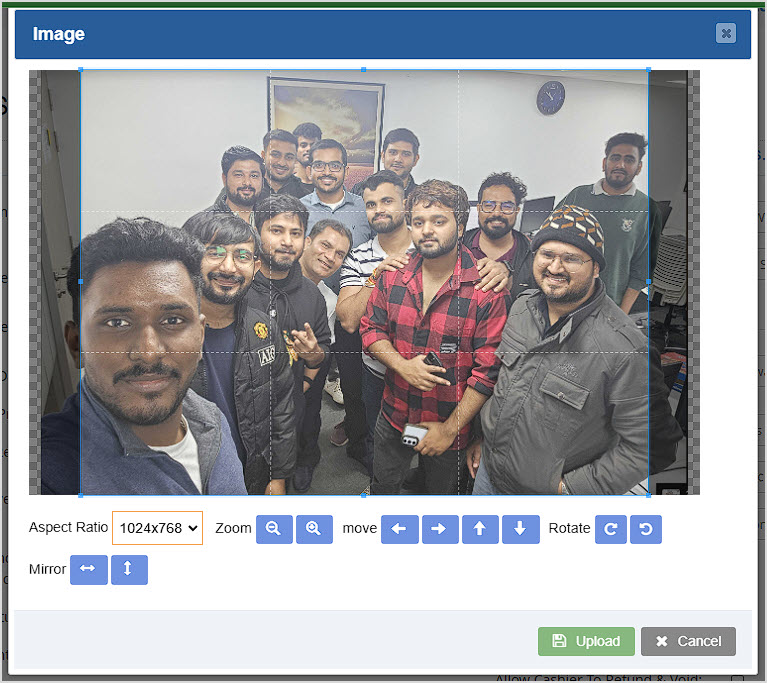
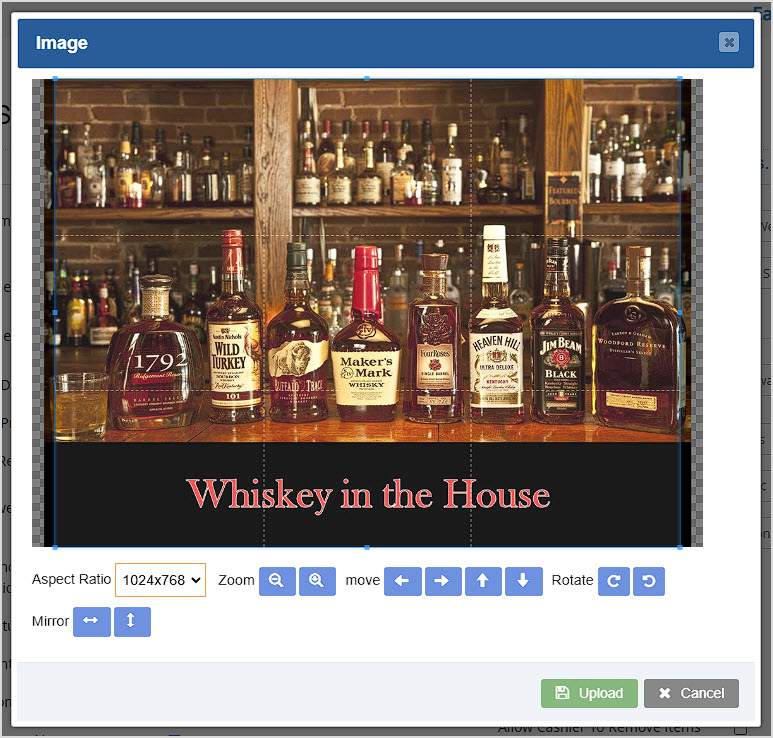
- By default, the Aspect Ratio will match the width and height of your Customer Screen you entered above.
- Use the Zoom In or Zoom Out buttons to focus on the parts of the image you want.
- You can either use the four directional Move buttons to move the image to feature the part of it you want, or you can drag the image with your mouse.
- You can use the Rotate Clockwise or Rotate Counter-clockwise buttons if needed.
- The Horizontal Mirror button will flip the image sideways, while the Vertical Mirror button will flip it up and down, if needed.
- When you've got the part of the image you want to show on the screen displaying within the highlighted area, click the Upload button.
- For each image you upload, you will see a Thumbnail. Each will have an X button to remove the image and an Edit button that will open the Image window again if you need to make changes.
- There is no functional limit to how many images you upload this way, but as a practical matter, your customers won't see more than a few.
-
- Number Entry – If you just want the Mobile Number entry field to display on your Customer Screen at all times before starting a transaction, use this option.
- Ask for Number (no entry) – If you want your sales clerks to enter the Mobile Number for your customers, use this option. The Customer Screen will display the Heading 1 and Heading 2 text you enter, as well as a static image from the Upload Static / Ask for Number Image function detailed below, if any of those elements are saved.
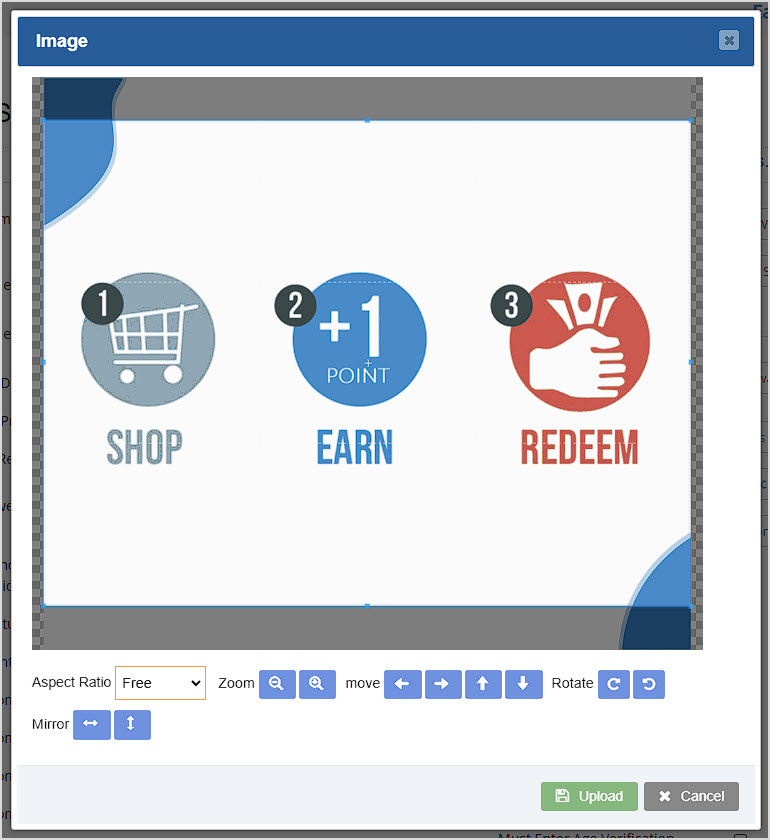
This type of Customer Screen and the one below allow you to Upload Static / Ask for Number Image. To do this, you'll click on the Click Here to Upload button and after you choose the image you want the Image window will open for you. You have the same controls described above to help you focus on the area of the image you want. Click the Upload button when you're ready and you'll see a thumbnail of the image with Edit and Delete buttons. Unlike the Slideshow, this area uses only a single image.
- Ask for Number (entry) – If you want the customers to have the option of entering their number or for your sales clerks to do so, use this option. The Customer Screen will display the field your customers can use to enter their Mobile Number as well as the Heading 1 and Heading 2 text you enter, and a static image from the Upload Static / Ask for Number Image function detailed below, if any of those elements are saved.
- Heading 1 / Heading 2 – These fields allow you to enter text that you want to appear on your Customer Screen. This will display up until items are added to the transaction, at which point the screen will start displaying the line items.
- Show SMS / Email Promotion Subscription – If you want your customers to be able to opt into promotional texts and emails, check this box.
- POS View Display Type – You have four options on how your items and other Customer Screen content will display:
- Items Only – If you want to just show the items being purchased and don't need an on-screen keyboard, slideshow, or a fixed image, use this option.
- Items with Slideshow – This setting works best on larger displays. On the right side of the screen the Slideshow will run, and on the left the screen will display the transaction items.
- Items with Fixed Image – This option by default displays the first image uploaded for the slideshow on the right and the transaction line items on the left. You can use the Items Fixed Image setting to choose a different image, if you like.
- Items with Keypad – This option displays a permanent number-entry keypad on the right side of the screen and on the left the transaction line items will display.
- Customer Rating – If you want the Customer Screen to offer the customer the option to give a 5-star rating to the store after checkout, check this box. The rating screen displays on the right hovering over the image. If you have number entry active it will not display the rating option until the phone number is entered.
- Items Fixed Image – As described above, if you don't want to use the first Slideshow image for your fixed image, you can choose a different one here.
POS Records: Load Sale Records
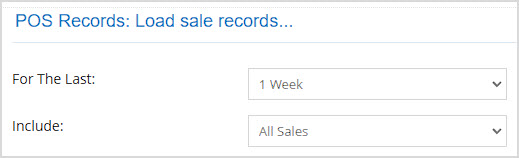
The POS Records area is at the top of the right column on the POS Settings page. In this area, you can set some parameters for what the Sales tab of your POS will load and display:
- For the Last – Set the time frame for how far back the POS will go for the transactions the Sales tab will load. You can choose 1 Week, 1 Day, or 1 Month.
- Include – Set which transactions will be loaded from among Device Sales (for the Device the user is currently signed into), Location Sales (for the Location the user is currently signed into), or All Sales.
Sale Options
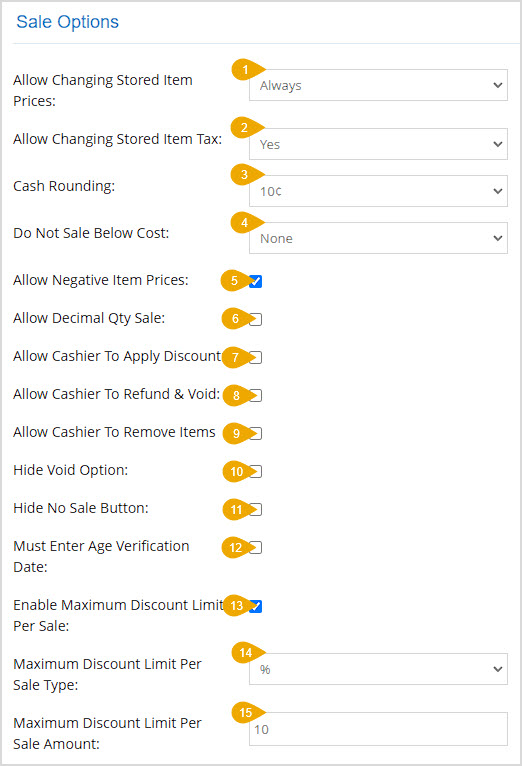
The Sale Options area is near the top of the right column on the POS Settings page. Here are the options you have in this area:
- Allow Changing Stored Item Prices – You can choose when your sales clerks will be allowed to change prices for items using this setting. You can restrict it so that only When Price is Blank or Zero it's allowed, or you can Always allow prices to be changed in the Register.
- Allow Changing Stored Item Tax – You can set this to either Yes to allow or No to prevent your sales clerks from changing the way items are set for Tax in the Register.
- Cash Rounding – If you would rather sell inventory for amounts that don't involve odd change, you can set your Cash Rounding to either 5-cents, 10-cents, or none. If you choose to use rounding, the system will round transaction totals up to the nearest 5 or 10 cents.
- Do Not Sale Below Cost – If your sales promotions might reduce item prices below your Cost, you can use this setting to govern how the Register will work whenever that happens. You can set it to None to allow it, Alert to have the system pop up an alert for the sales clerk and give them the option to allow or prevent it, or Not Allowed to prevent it from happening.
- Allow Negative Item Prices – Check this box to allow items to be returned by giving them a negative Price.
- Allow Decimal Quantity Sale – If you sell items that can be sold as partial quantities, such as coarse kosher salt sold by the pound or a six-pack-and-a-half of bottles, you can use this setting to allow the Quantity field to accept them.
- Allow Cashier to Apply Discount – Check this box if you allow your sales clerks to manually enter Discounts into the Register.
- Allow Cashier to Refund & Void – Check this box if you allow your sales clerks to do refunds and voids.
- Allow Cashier to Remove Items – Check this box if you want to allow your sales clerks to remove items from transactions. With this off, the sales clerk will need to cancel the transaction if an item is in it they don't need and start a new one.
- Hide Void Option – Check this box if you don't want your sales clerks to see the Void button.
- Hide No Sale Button – Check this box if you don't want your sales clerks to see the No Sale button that opens the cash drawer.
- Must Enter Age Verification Date – If you need to require your sales clerks to verify age for every transaction, check this box. Turning this setting on will require your sales clerks to enter the customer's birth date. With if off, they can just click Yes when asked if the customer's age is verified.
- Enable Maximum Discount Limit Per Sale – Use this checkbox to enable (checked) or disable (unchecked) the Maximum Discount Limit Per Sale function for your Register devices.
- Maximum Discount Limit Per Sale Type – You can base the maximum discount on a Percentage or a Dollar Amount using this drop-list.
- Maximum Discount Limit Per Sale Amount – You can enter a value into this field to set the percentage off or dollar-amount off for the maximum discount limit.
Other Options
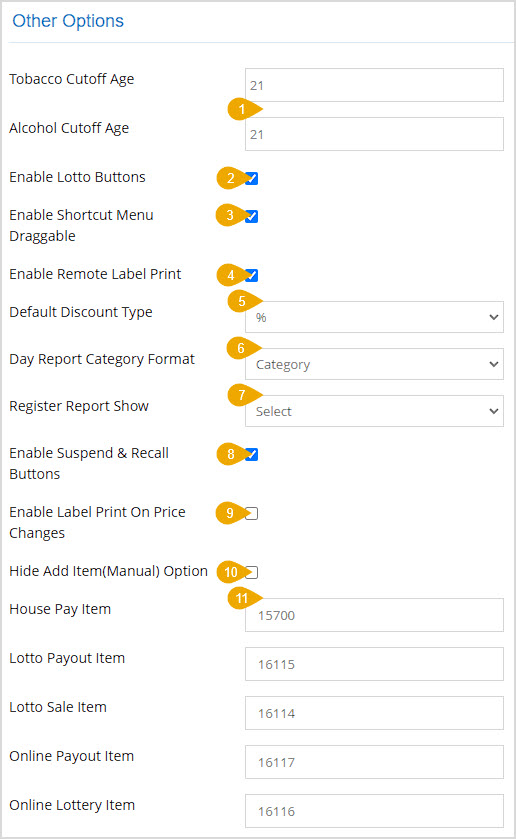
The Other Options area is down in the middle of the right column on the POS Settings page. In this area you can configure the following settings:
- Tobacco & Alcohol Cutoff Age – This adjusts the text at the bottom of the Register for alcohol and tobacco cutoff dates.
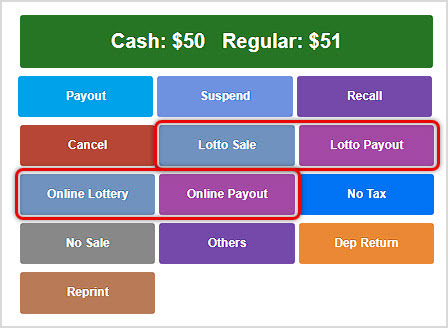
- Enable Lotto Buttons – If you sell lottery tickets, you can check this box to enable the Lotto shortcut buttons for Lotto Sale, Lotto Payout (and Online Lottery, Online Payout, if you do online lottery sales) in the lower right of your Register.
- Enable Shortcut Menu Draggable – Check this box to allow your sales clerks to drag and drop shortcut keys into whatever arrangement they like. When they rearrange the buttons in this way, the new arrangement will be used for all other sales clerks.
- Enable Remote Label Print – Check this box to allow users logged into the Admin to print labels to printers connected to your POS.
- Default Discount Type – Use this drop-list to set discounts in the Register to default to either Percentage or Dollar amount.
- Day Report Category Format – Use this drop-list to set whether your Day Report in your POS will organize data by Category (includes Category Group), Category Group (doesn't display Categories), or None (no data by Category or Category Group). Only Categories or Category Groups that had sales for the day will appear in the Day Report.
- Register Report Show – For the Register Report (in the POS under Reports), if you don't manually close the Register shift, you can use this setting to govern when the Register Report will reset. You can set it to:
- One Day – This will show data for the current shift. If the shift was closed more than a day ago, the report will be blank with this setting. If your store is open every day and you close your shifts out regularly this setting is good.
- Last Closing Within One Month – The Register report will load data for the most recent shift you closed within the past 30 days if you use this option.
- Last Closing Within Two Months – The Register report will load data for the most recent shift you closed within the past 60 days if you use this option.
- Last Closing Within One Months – The Register report will load data for the most recent shift you closed within the past 90 days if you use this option.
- Enable Suspend & Recall Buttons – If you want your sales clerks to be able to suspend a transaction temporarily and recall it when the customer is able to complete payment check this box.
- Enable Label Print on Price Changes – With this setting on, any time a price is changed for an item in the system, a new label will print for that item at the time of the update.
- Hide 'Add Item' Manual Option – If you don't want your sales clerks manually creating items from the Register, check this box and the Add Item button below the item table in the Register will no longer appear.
- Special Item Stock Codes – For your lottery items, you can set what the Item ID will be when added to the Register.
TV Screen
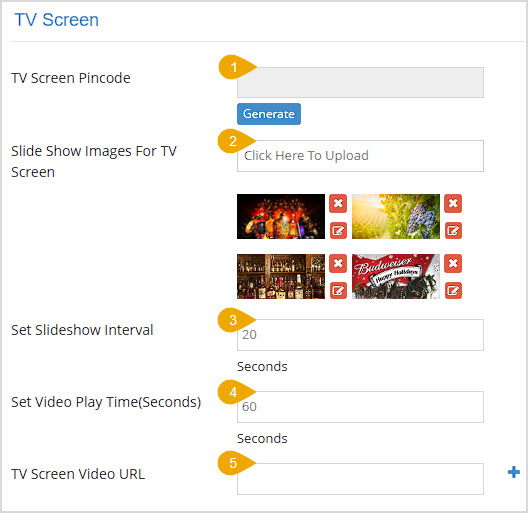
The TV Screen area is at the bottom of the right column on the POS Settings page. If you have a TV in your store you can use it to show a series of images in a slideshow or you can set it to play streamed content from the URL of your choice. Here are the settings to help you configure your TV the way you want:
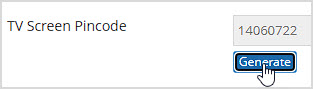
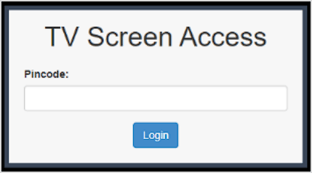
- TV Screen Pincode – Click the Generate button to create a Pincode.
- Slide Show Images for TV Screen – As with the Customer Screen described above, you are able to load images to display on your TV Screen that will run as a slideshow. The alternative is displaying the video feed from a URL, described below. Click the Click Here to Upload button and after you choose your image it will open in the Image window. You can use the controls to highlight the part of the image you want to display (for a full description of the controls, scroll up to the section about the Customer Screen) and once you have what you want, click the Upload button. Images you upload will have thumbnails with Delete buttons and Edit buttons you can use to remove the images or adjust them, respectively.
- Set Slideshow Interval – Enter the number of seconds you want each slideshow image to display into this field.
- Set Video Play Time (Seconds) – Enter the number of seconds you want the video to play into this field. Some time frames in seconds of note: 10 min = 600 seconds. 30 min = 1,800 seconds. 1 hour = 3,600 seconds. 1 day = 86,400 seconds. You can set the video stream to play for as long as you like. Leave it blank to have no limit on how long the video plays.
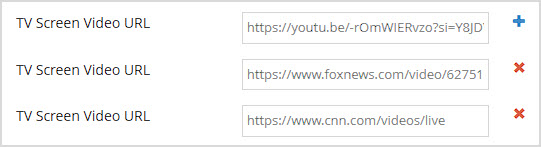
- TV Screen Video URL – Enter the URL for the video you want to play. You can click the Plus button to add more URL fields and enter more video sources. For extra fields you have added, you can click the X button to delete them if you need. The system will pop up a notice to confirm that you truly want to delete it.
You will want confirm the URL and log into Bottle POS using the Pincode in the following way:
- Open a Web Browser on the Smart TV or other device.
- Enter your URL into that browser and a Pincode prompt window will open for you.
- Enter the Pincode from the TV Screen Pincode field above and click the Login button.
Whatever Video Play Time you set is how long each will run, and the system will then load the next URL. When the time elapses, the system will either reload the URL if you only list one to start the video from the beginning, or it will load the next one. When the time elapses for the last URL in the list, the first will load again and run.
Related Topics
General Settings
Ringing Up Sales with the POS
How to Run Promotions
Register Reports
Working With Customers in the Register
Frequently Asked Questions
Q: How many images can I load in the slideshow?
A: There is no functional limit to how many images you add in the slideshows for the Customer Screen and the TV Screen, but as a practical matter your customers won't see more than a few of them.
Q: Can I have TV screens showing different slideshows or videos?
A: You can have multiple TV screens showing the same slideshows or videos, but you can't set them to show different content.
Q: I have a question, but I can't find my answer here, how do I get more assistance?
A: You can ask any question at the number below. Contact our 24/7 support team at: (877) 381-4087
 October 01, 2024
Is this page helpful?
×Help us improve our articles