If you have multiple stores using Bottle POS, you can add them to your Admin and transfer inventory between them with ease! Take a look at how simple it can be!

You can get to this part of the system by logging into your Admin app and clicking Items on the left. Near the top of the menu that opens, click on Transfer.
Store Setup
Before you start creating Transfers, make sure you have your different Stores set up in the system so you can transfer inventory to them. Please note, this functionality is not necessary if you only have a single store using Bottle POS. You'll need a Bottle POS account for each store. To start working with your Store setup, in the menu on the left click Settings and in the list that opens, go to Stores. The Stores page will show you all stores you have set up for Transfers within the current store you are logged into.
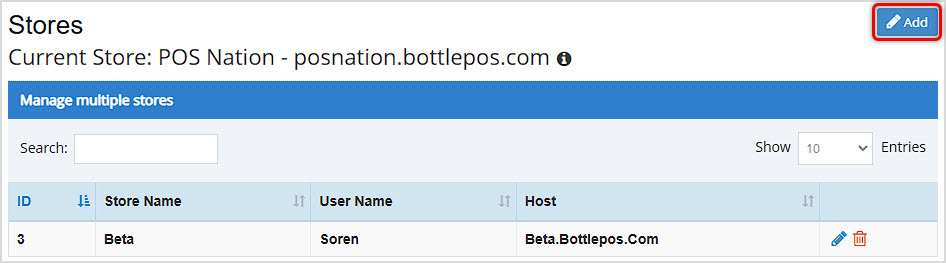
If you don't see the Store(s) you need to transfer on your Stores page, your current location doesn't recognize them yet. Click the Add button in the upper right to add a Store to the list.
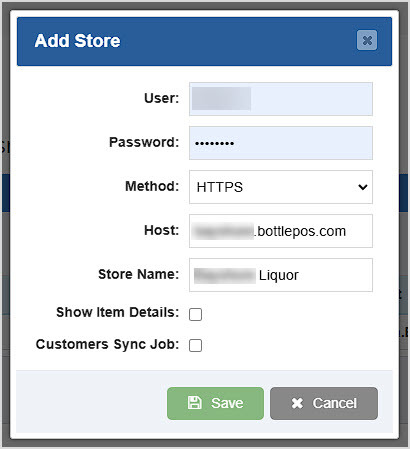
- In the Add Store window, enter the store details.
- User - Enter the Admin username for the store.
- Password - Enter the Admin password for the store.
- Method - Leave this set as HTTPS.
- Host - Enter the store URL, e.g. storename.bottlepos.com
- Store Name - Enter the name you want the system to use for the store.
- Show Item Details - Checking this box will show you Item details from the new Store's database. This setting will only work if you have the Show Other Location Item Details setting enabled under Settings > General Settings > Other Settings.
- Customers Sync Job - Checking this box will have the system sync customers from the new store to your current store any time a new one is added. It will also update reward points that are added to synced customers between stores.
- Click the Save button. You'll see your Store in the list, and the current store can now transfer to that one.
Running a Transfer
Once you have loaded the Transfer page under the Items menu, you can work with the features described below.
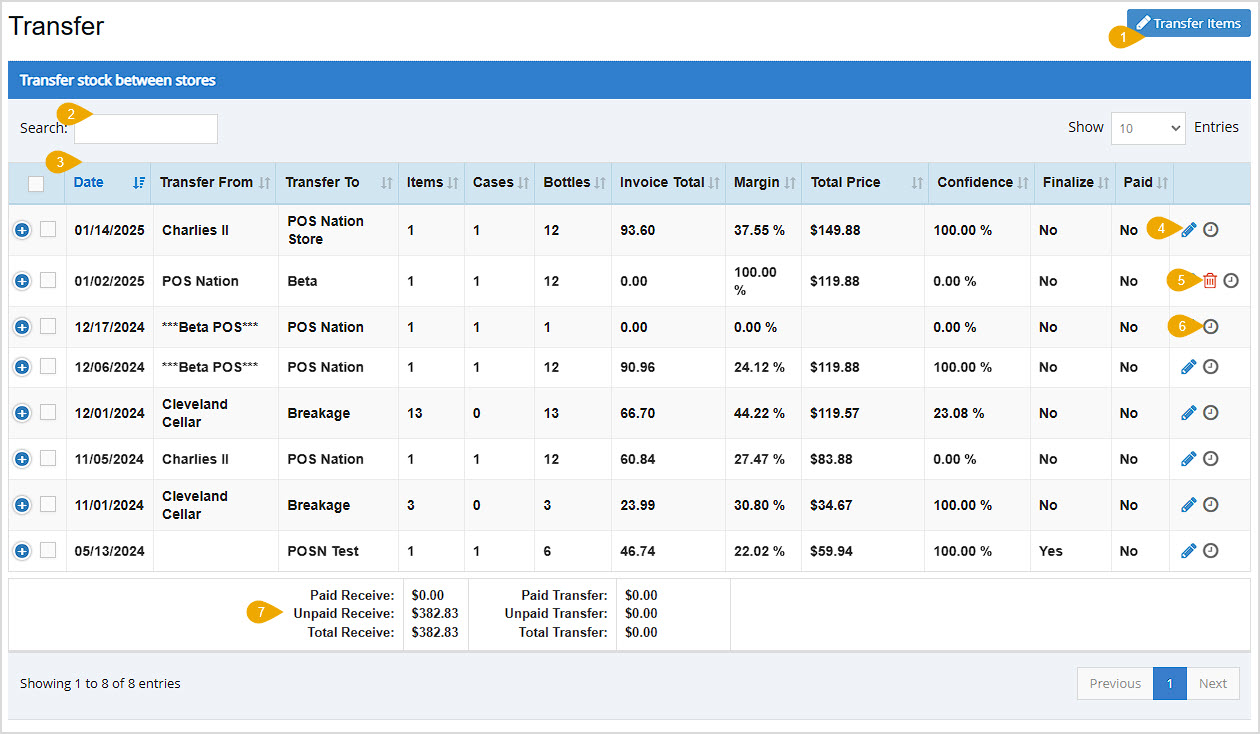
- Transfer Items - Click this button to open the Transfer Items window, where you can configure your transfer and load the items you're transferring. This process is described in greater detail in the section below on Working with the Transfer Stock Window.
- Search - You can Search by Date, Transfer From or Transfer To store name, Invoice Total, Total Price, Total Cost, or Invoice Number. You cannot search here for items within Transfers.
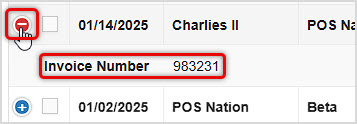
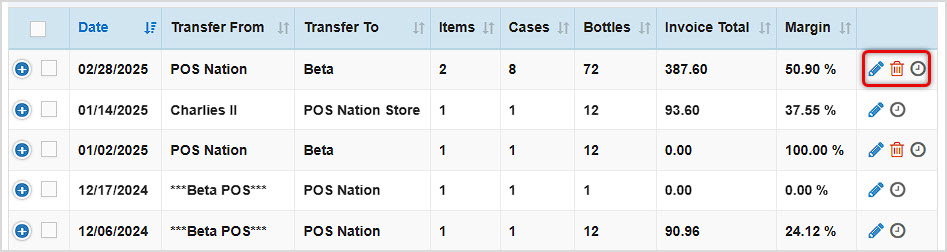
- Data Table - This page has a lot of data columns and if your screen width can't display them all, the lines will have blue + icons on the far left to let you expand and see the data columns that can't display. In the example above, the Invoice Number column wasn't visible and will display when a line is expanded. Click the red - icon to collapse the line again.
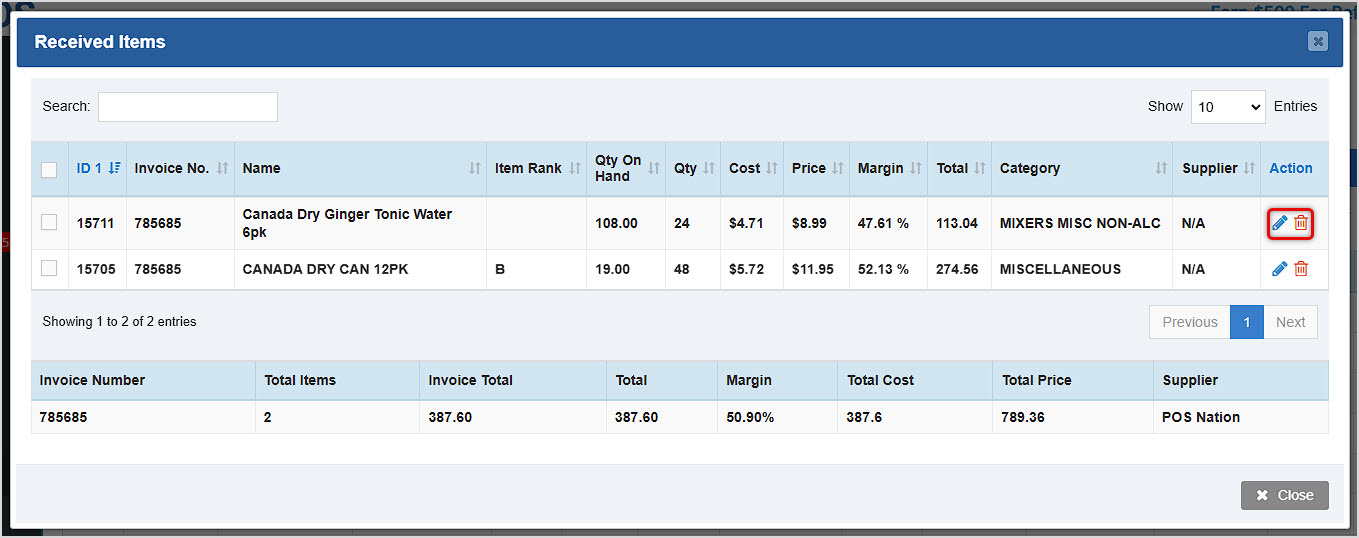
There are columns for Checkboxes (if you select more than one, you can Merge Invoices as needed), Date, Transfer From and Transfer To store names, number of Items, number of Cases, number of Bottles, Invoice Total (this should be a dollar amount), Margin, Total Price, Total Cost, Confidence (this is how closely the transferred quantity matches previous transfers for the item), Finalize (Yes if the Transfer is complete, No if it's pending), Paid (Yes or No if the receiving store has paid for the inventory or not), and Actions (use the Pencil Icon to Edit, the Trashcan Icon to Delete, and the Clock Icon to open the Received Items window (more below in the Received Items description below).
- Edit Transfer - You can click a Pencil Icon on the far right of the Transfers page line items to open the Transfer Stock window and either add more items (only if the Transfer is not complete) or edit details about existing items. For full details on the Transfer Stock window, look at the section below about it.
- Delete Transfer - You can click the Trashcan Icon to Delete a Transfer for any Transfers from the Store you're logged into that are not Finalized. You will be asked to confirm deletion.
- Received Items - Click the Clock Icon to open the Received Items window. This area gives you important details about the items in the Transfer and allows you to click a Pencil Icon to open an Edit Item window and adjust full item data, or you can click a Trashcan Icon to remove an Item from the Transfer.
- Paid Receive and Paid Transfer Totals - These areas total the amounts for Paid and Unpaid Receive and Paid and Unpaid Transfers for you.
Working With the Transfer Stock Window
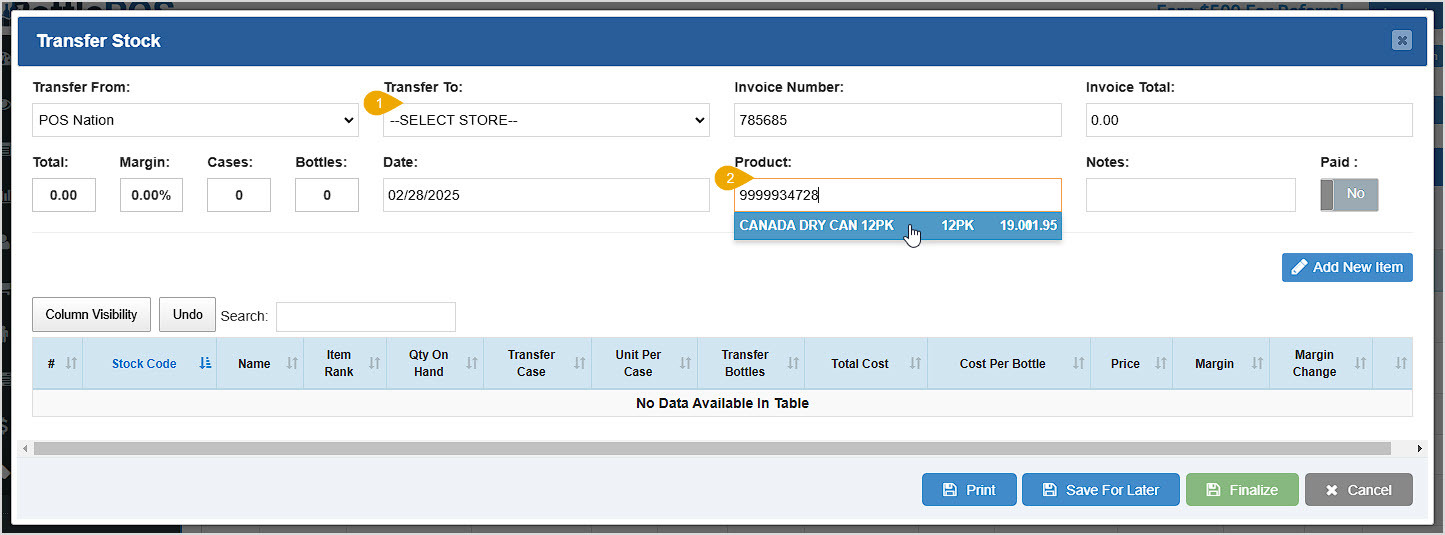
When you click the Transfer Items button or click to Edit a saved Transfer, the Transfer Stock window will open for you. By default the Date is the current day, you can change it if you need. You can also add Notes or mark it Paid as needed. Start by loading your items.
Adding Items to the Transfer
To set up your Transfer, follow these steps:
- Set the destination store using the Transfer To drop-list. The source of the Transfer will be the store you're logged into, but you can change it if needed in the Transfer From drop-list.
- Scan or enter item barcodes into the Product field to add them into the Transfer. When you scan, a list of matches will come up. Click on the one you want and it will populate in the table in the lower part of the window.
- In the Item Details window that opens, you'll see details for adding quantities to the Transfer based on whatever data is saved for the item. As you enter quantities for Transfer Case (the quantity that will be transferred), Units Per Case, and Transfer Bottles, the system will do the math for you. For example, if you enter the number 4 into the Transfer Case field and the Units Per Case is already set to 12, in the Transfer Bottles field the resulting number 48 will populate, as will Total Cost and Cost Per Bottle if that data is saved for the Item.

- Click Save to add the item to the Transfer.
Setting Up the Transfer
As you configure the details for your Transfer, the data for Total, Margin, Cases, Bottles, and Invoice Total will populate.

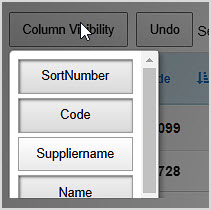
Please Note: You can set which columns are visible in this window using the Column Visibility button on the left. In the panel that pops up, Column buttons that are visible appear as if they have been clicked, as you can see below. You can select or deselect any Columns you prefer and the table will display or hide them accordingly. Also, as you work with the line items to set them up for transfer, you can click the Undo button on the left if you need to reverse any changes you've made. You can also Print the Transfer at any time using the Print button at the bottom of the window.
- You can click the Add New Item button if you are transferring an item that hasn't been saved to the source Store's database. Please Note: you will only see this the first time you open the Transfer Stock window; after you Save for Later or Finalize the Transfer you will no longer see it. When you click this button, you'll be given a blank line in the table at the bottom of the window into which you can add data for the new item. You will need to add the item to your current Store's database, and to do so you can click the Plus icon on the far right.

When you click the Plus icon, the Add Item window will appear and you can add full details for the item. Data such as the Units Per Case, Cost Per Bottle, and Price will populate into the Transfers window if you add it here.
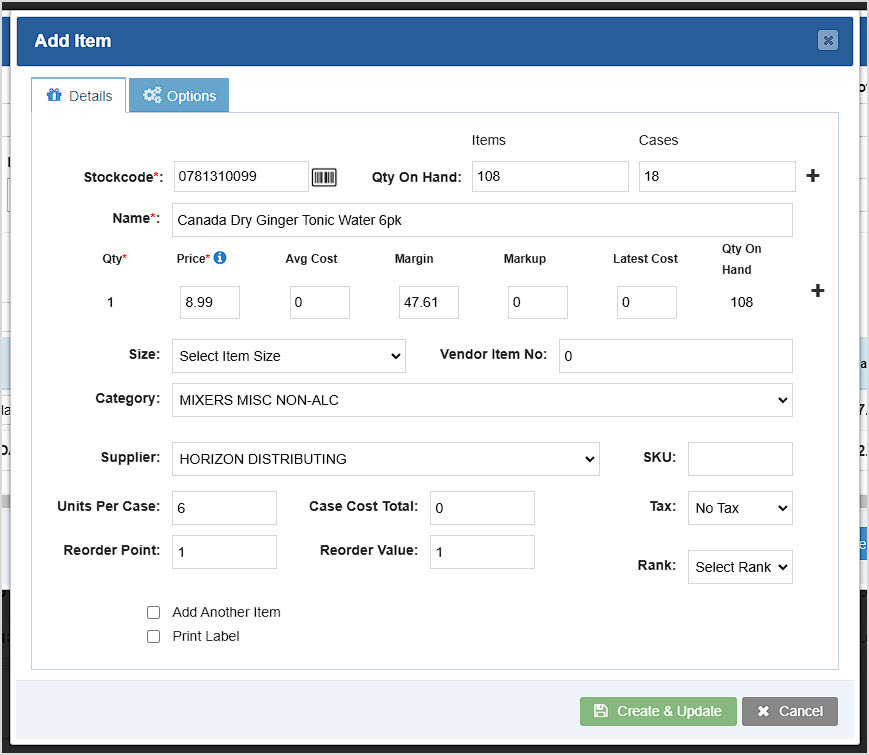
- For items you added from the Product field above, the Stock Code for the item will display here. If you're entering a new item, unless you already entered the Stock Code into the Add Item window via the Plus icon, you will need to scan or enter in the stock code. If the system finds a match it will pop up a warning that the item is already saved in the system. If you click OK it will allow you to continue to add the item data.
- For items you added from the Product field above, the Name for the item will display here. If you're entering a new item, unless you already entered it into the Add Item window via the Plus icon, you will need to enter the Name.
- For items you added from the Product field above, the Transfer Case, Units Per Case, and Transfer Bottles quantities for the item will display here as you entered them. If you're entering a new item, you will need to enter data for these areas manually, and the system will do the math as you enter your quantities as described in part 3 of the Adding Items to the Transfer section above, or if you entered that data into the Add Item window via the Plus icon.
- For items you added from the Product field above, the Price for the item will display here if it is saved in the database. If you're entering a new item, you will need to enter it manually, and the system will do the math for the Margin and Margin Change if you have your Cost Per Bottle saved in the database for the item.
- If you need to pause and finish the Transfer later, click the Save for Later button and you'll be able to add more items and configure them as needed.
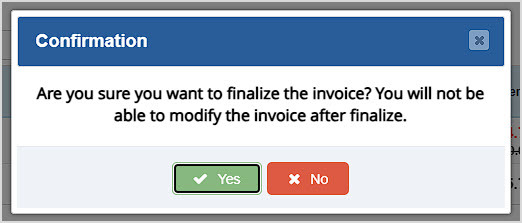
- When you have added and configured all the items you need for the transfer, click the Finalize button to transfer the quantities to the destination store in the database. Whenever the amount for the Transfer is paid, you can toggle the Paid button to Yes and it will be marked as paid. You'll be asked to confirm that you want to Finalize the Transfer, and you'll be advised that you won't be able to make further changes to it after finalizing. Click Yes to confirm.
Once you have either Saved for Later or Finalized, the Transfer will appear in your list of Transfers and you can use the Actions on the right of the line item to Edit, Delete, or work with Received Items using the Pencil Icon, Trashcan Icon, and Clock Icon, respectively.
Related Topics
Manage Your Stock Inventory Levels
Inventory Bulk Updater
Transfer Report
Frequently Asked Questions
Q: Can I transfer to multiple stores at once?
A: No, you can only transfer to a single Store at a time.
Q: I have a question, but I can't find my answer here, how do I get more assistance?
A: You can ask any question at the number below. Contact our 24/7 support team at: (877) 381-4087
 October 01, 2024
Is this page helpful?
×Help us improve our articles