You can work with your Items in powerful and flexible ways using the main Items page in your Bottle POS Admin. Take a look at what you can do!
You can get to this part of the system by logging into your Admin app and clicking Items on the left. At the top of the menu that opens, click on Items.
How to Work with Items
Working with Your Items Page

Your Items page lists all inventory Items saved in the database. Here are the page features:
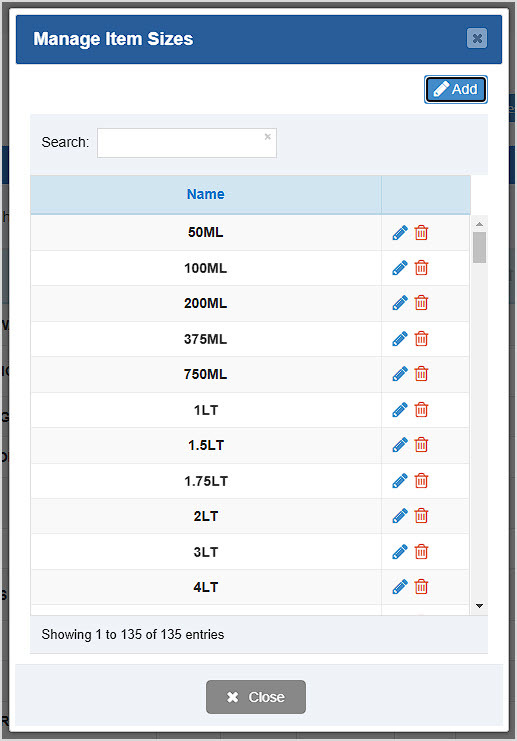
- Manage Item Sizes - You can see any Sizes you have created for your inventory here. You can click the Add button to make new ones. If needed you can click the Pencil Icon to Edit an item, or the Trashcan Icon to Delete one. You'll be asked to confirm that you really want to delete it. For more details on this feature take a look at this article: Manage Item Sizes
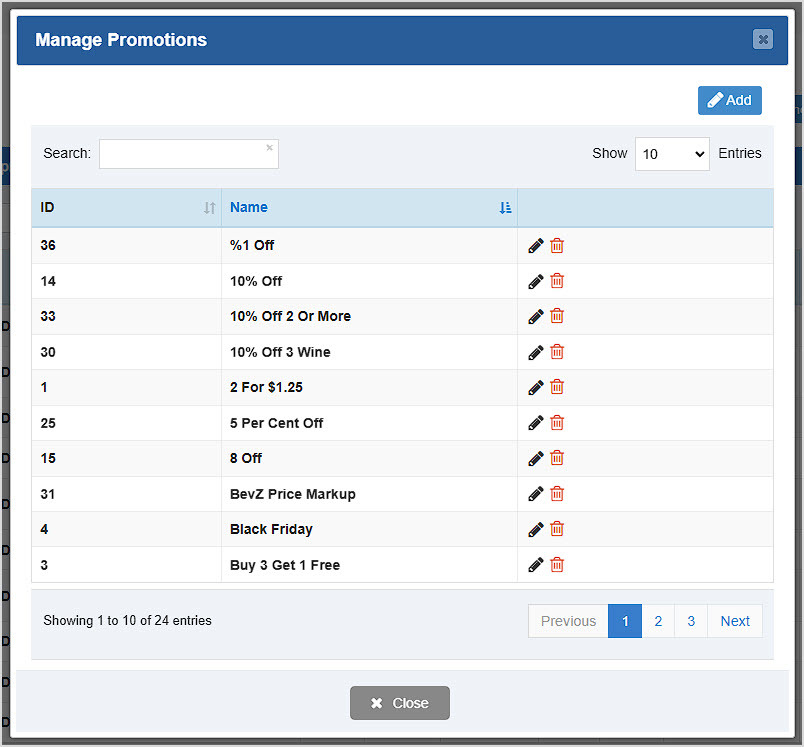
- Manage Promotions - You can see all Promotions you've created for your items in this window. The system-created ID is listed as well as the Name of the promotion. You can Search by keyword for the one you want. You can also click the Add button to create a new promotion. You can click the Pencil Icon to Edit a promotion or click the Trashcan Icon to Delete one. You'll be asked to confirm deletion. For full details on this feature take a look at this article: How to Run Promotions
- Export CSV - You can click this button to download a CSV spreadsheet of all of the items saved in the database. You can use the checkboxes on the left to select the items you want and download a spreadsheet of only those items.
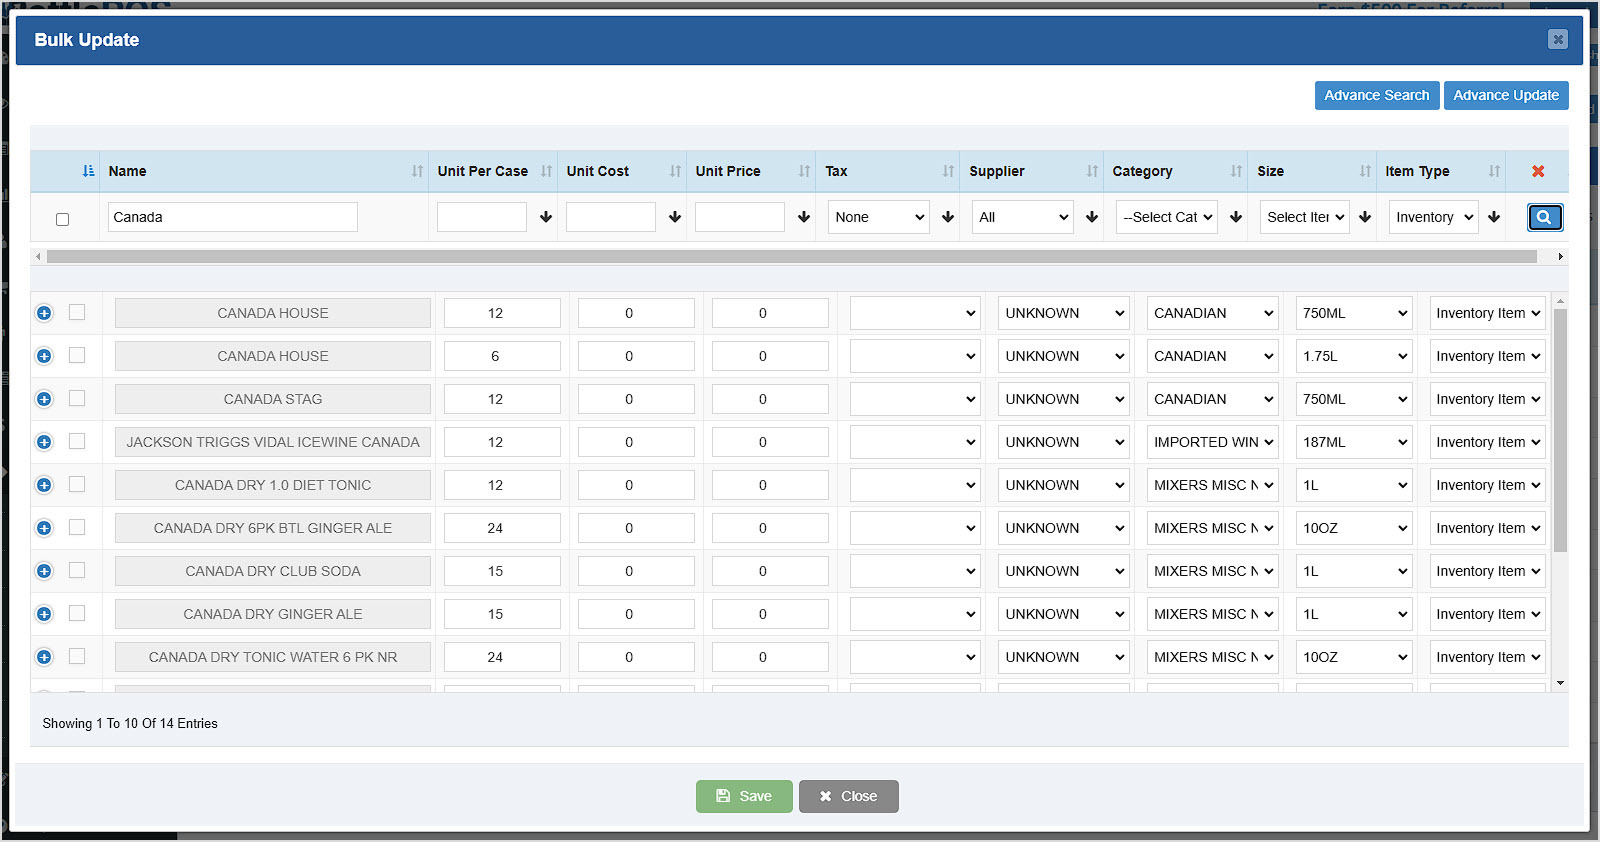
- Bulk Update - You can click this button to open the Bulk Update window. This is a very powerful tool for updating many products at once. You can use the search fields in the top row to find items by clicking the Magnifying Glass Icon on the far right, or the more powerful Advance Search can help you find items by a very wide variety of Item data points. For full details take a look at this article: Inventory Bulk Updater
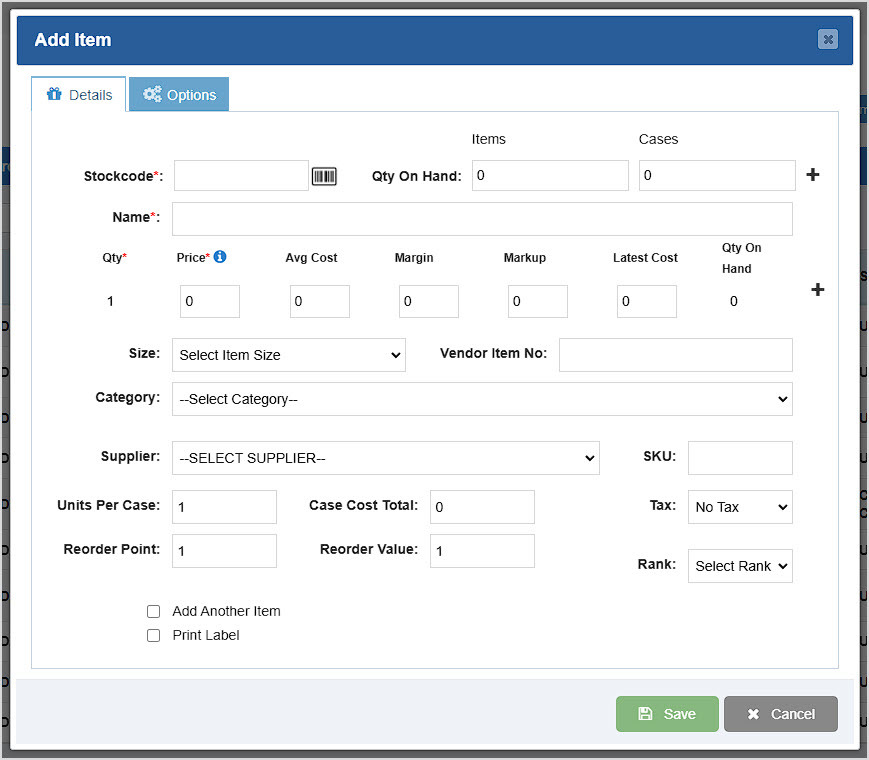
- Create New Item - You can click the Add button to create a new Item for your inventory. Required information includes the Stockcode (you can click the Barcode Icon to have the system create a new code for you), Name, Quantity (will be set to 1 unless you set a different amount in the Quantity On Hand area), and Price. For full details on this feature take a look at this article: How to Add an Inventory Item
- Search - In this field you can search by item Name, Size, Quantity, Cost, Price, Margin, Stockcode, Category, Supplier, Reorder Point, and Reorder Value from the visible data table. You can check the Exact Search box to restrict your search to exactly the text you enter.
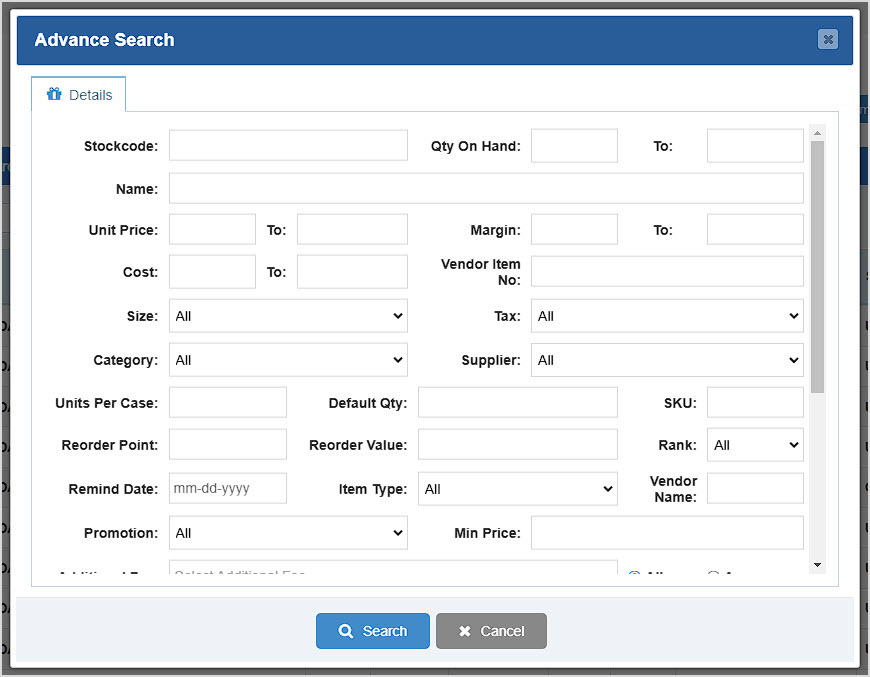
- Advance Search - This is a powerful filtering tool that allows you to find items you want holistically by different item attributes. The full list of searchable attributes includes Stockcode, Quantity On Hand (range 'from' and 'to', noted hereafter as Range), Name, Unit Price (Range), Cost (Range), Margin (Range), Vendor Item Number, Size, Tax, Category, Supplier, Units Per Case, Default Quantity, SKU, Reorder Point, Reorder Value, Rank, Remind Date, Item Type, Vendor Name, Promotion, Minimum Price, Additional Fee (All / Any), Tags (All / Any), and Notes. Also, from the Item settings, you can filter for items that have or don't have the following options toggled: Do Not Auto Update, Prompt For Quantity, Add to Shortcut Keys, Hide Inventory, Do Not Apply Manual Discount, Do Not Show to Webstore, Bulk Sale, Do Not Track Inventory, Close Out Item, EBT Eligible, and Exclude from Promotions.
- Item Data Table - The column by which the table is currently sorted will have its header colored blue for you. You can sort the table relative to any column by clicking on the column header, or click again to reverse-sort. The table on the Items page has the following columns. In the first column you can use the Checkboxes to select items you want to Export if you need a custom list.
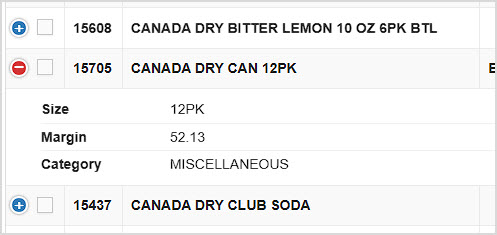
If you have a single item checkbox checked, some Action Icons show up below the data table, as pictured below. For the four functions you see, they are, respectively, Delete (Trashcan Icon), Clone (Copy Icon), Normal Price Label (Tag Icon), and Print Promotion Price Label (Pricetag Icon).
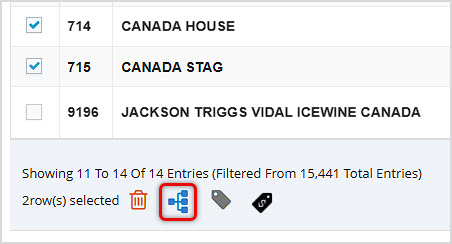
If you have two or more items selected, the Clone button changes to Merge Items (Merge Icon), as pictured here.
- Item ID - This column references the ID number given to each item by the system. This number is for internal reference only.
- Name - The full Name of each item is listed in this column.
- Size - If the item has a Size assigned, it is listed in this column.
- Rank - If you have assigned a Rank to an item, it appears in this column. Ranks range from A to D, with A being the highest volume of sales.
- Quantity on Hand - This column displays the inventory quantity on-hand for the store you're currently logged into.
- Number of Supply Days - This is a calculation in days of how long your current stock for an item will last. It is based on the transaction history for the item.
- Cost - This is the cost you paid per unit for the item.
- Price - This is the price you charge per unit for the item.
- Margin - This column shows the percentage of profit calculated from your price per unit for the item.
- Stockcode - This column shows the Stockcode(s) for each item. In some cases, you may have more than one for an item.
- Category - This column displays the Category each item is in.
- Supplier - This column displays the Supplier assigned to each item, if any.
- Reorder Point - This column displays the inventory quantity at which the item should be reordered.
- Reorder Value - This is the quantity of the item you order whenever you reorder it.
- Actions - On the far right side of each line item are icons for tools you can use for each item:
- Pencil Icon - Click this icon to Edit the Item. For more details take a look at this article: LINK: How to Edit Existing Items
- Trashcan Icon - Click this icon to Delete the Item. You will be asked to confirm that you really want to remove it completely from the database.
- Clock Icon - Click this icon to open the item's Stock History window. The Detail tab will load for you:
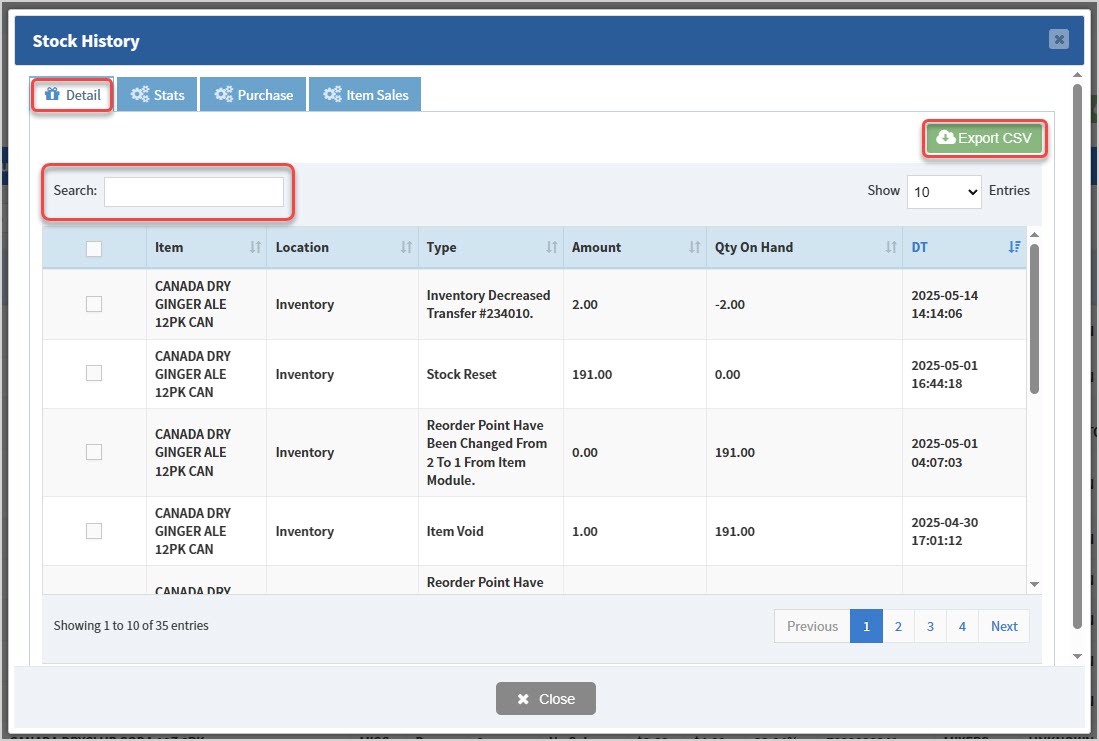
On the Details tab you can Search for history events by keyword, Amount, Quantity on Hand, or Date & Time. In the data table you can see the Item name, Location, the event Type with details about what happened, the Amount involved, the resulting Quantity on Hand, and the Date & Time it happened. You can click the Export CSV to download a CSV spreadsheet file of all inventory events for the item, or you can use the checkboxes on the left and download only those you choose.

On the Stats tab, you can view sales volume over time for the item. A relatively new item might look like the one below. You can adjust the Interval and date Range used in the chart, and you can see useful statistics at the bottom.
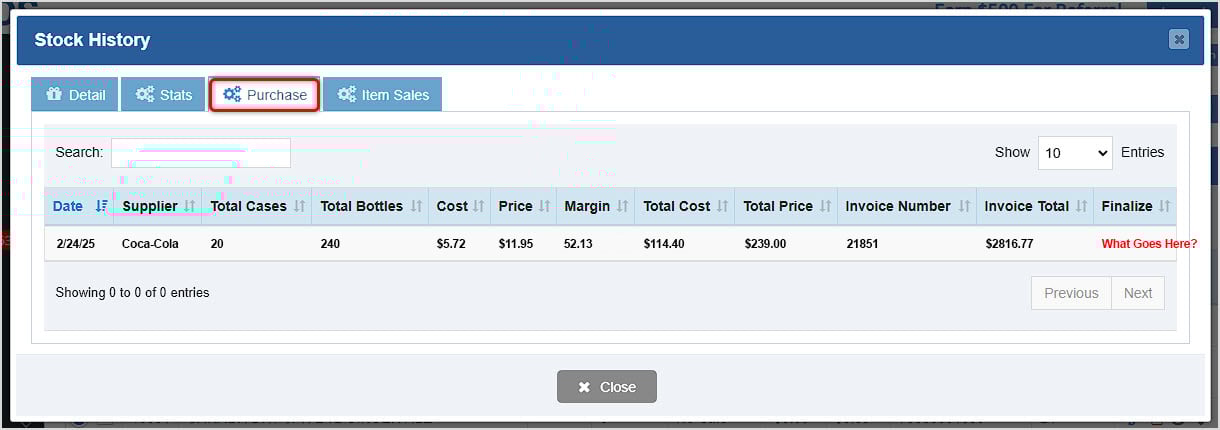
On the Purchase tab you can see details from Supplier orders for the item, including the Date, Supplier, Total Cases, Total Bottles, Cost per item, Price per item, Total Cost of the quantity ordered, Total Price the quantity ordered will sell for, Invoice Number, Invoice Total, and a button to Finalize the Receive order if it has not already been received. You can Search by any of the data in the table listed above.
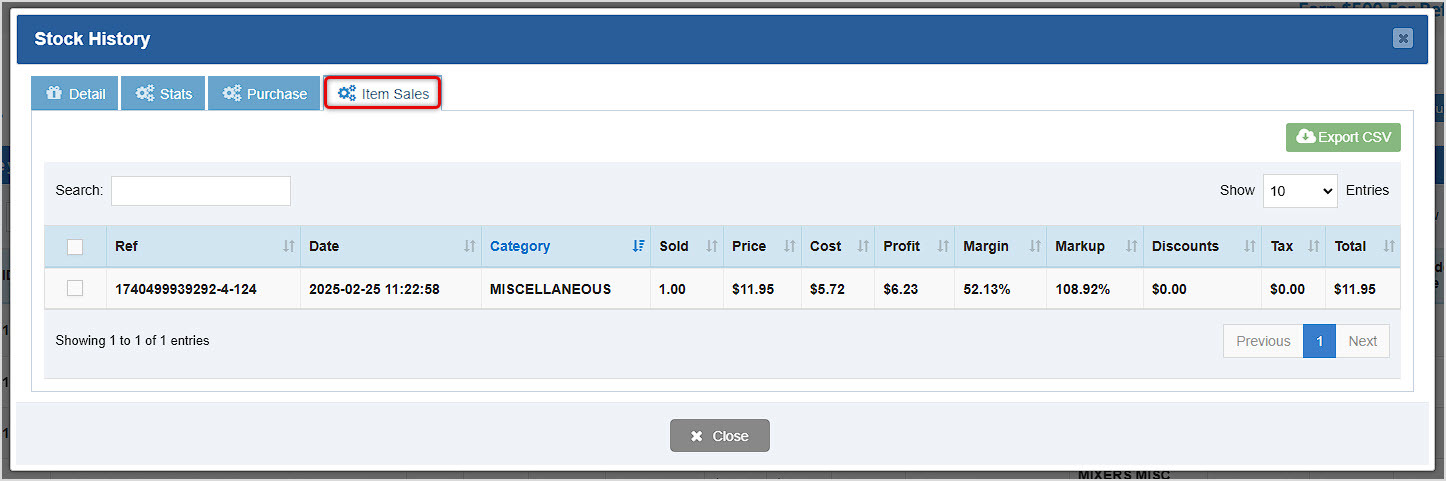
On the Item Sales tab you can see all transactions in which the item has been sold. The data table shows the transaction Ref number, Date, the Category of the item, how many were Sold, Price, Cost, Profit, Margin, Markup, Discounts, Tax, and the transaction Total. You can Search by any data in the table, and you can click the Export CSV button to download a spreadsheet of all the data. You can also use the checkboxes on the left and download only the ones you choose.
- Tag Icon - You can click this icon to send a label print job to the current open Register with a label printer connected. Please note, this only works if that Register is set with Remote Printing active (you can configure that setting in your POS Settings area).
Related Topics
How to Print Labels from the Admin
How to Clone Item Details to a New Item
How to Create Lottery and Hotkeys
How to Scan and Manage Inventory Using Your Smart Phone
Manage Your Stock Inventory Levels
Frequently Asked Questions
Q: Can I create items from the Register?
A: Yes. You can create items if needed from the Register using the Add Item button, or if you scan and it fails to find an item, the system will offer to let you add an item. For full details on this topic take a look at this article: LINK: Adding New Inventory from the Register
Q: I have a question, but I can't find my answer here, how do I get more assistance?
A: You can ask any question at the number below. Contact our 24/7 support team at: (877) 381-4087
 October 01, 2024
Is this page helpful?
×Help us improve our articles