Your Accounting Settings area has configuration for Taxes, Bottle Deposits, and more. See how simple it is to configure this area!
You can get to this part of the system by logging into your Admin app and clicking Settings on the left. In the menu that opens, click on Accounting Settings. In this article we'll explore what is there for you. For all areas, remember to click the Save button at the bottom to finalize any changes you make.
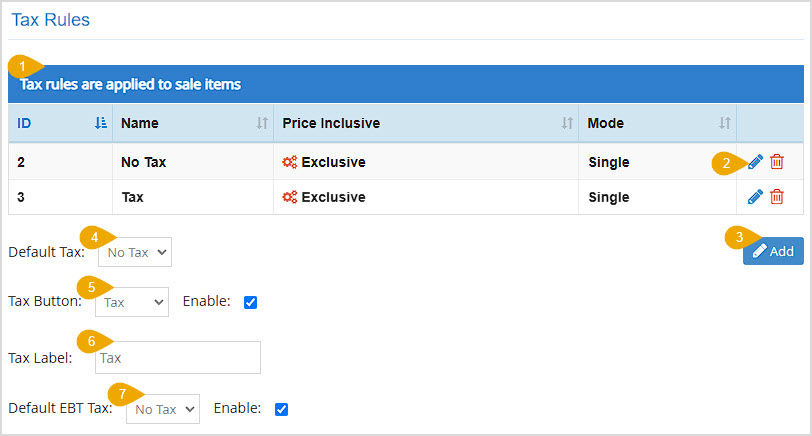
Tax Rules
Your Tax Rules can be applied to Items to determine how they handle Taxes.
In this area you can configure the following settings:
- Data Table - You can click the column headers to Sort or click again to Reverse Sort as needed. The Tax Rules data table has columns for the following:
- ID - The system will give each Tax Rule a simple ID number based on the order in which they were created. This is for internal reference only.
- Name - The Tax Rule Name will appear in this column.
- Price Inclusive - This column will identify whether or not the Tax Rule is set to be Price Inclusive or Price Exclusive. Price Inclusive tax rules are indicated with a green settings icon, and Price Exclusive tax rules are indicated with a red settings icon.
- Mode - This column displays whether a Tax Rule applies as the Single tax allowed for an item or if Multiple taxes can be applied to items using the rule.
- Actions - The far right of the table contains Tools for working with the line items, described below.
- Tax Rule Tools - You can click the Pencil Icon to Edit a Tax Rule. You can also click the Trashcan Icon to Delete a Tax Rule. You'll be prompted to confirm that you really want to delete it.
- Add Tax Rule - Click the Add button to create a new Tax Rule. You'll see a blank version of the Edit Tax Rule window shown below:
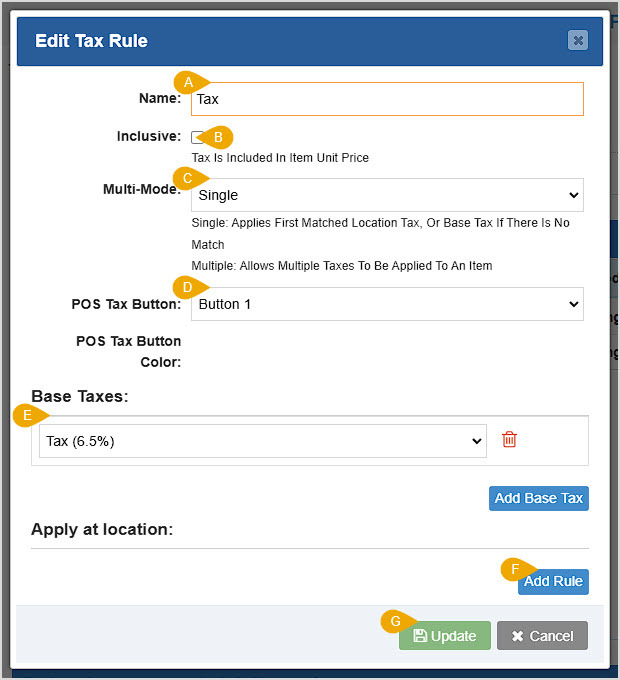
- Name - Enter the Name of the Tax Rule here.
- Inclusive - If the Tax Rule will be included in the Price of items, check this box. If the Tax will be separate and in addition to the Price, leave this box unchecked.
- Multi-Mode - If you want the Tax Rule to function for a sole tax rate, use the Single option in the drop-list. This will apply the first matched Location tax, or if one isn't found, the Base tax. If the Tax Rule will allow more than one tax rate to be combined, choose Multiple from the drop-list.
- POS Tax Button - If you have the Fixed Keypad active in your Register you will be able to use Tax Buttons to apply the Tax Rule to items you create within the Register. The system will automatically apply a Button Color.
- Base Taxes - In a Single mode tax rule, use the drop-list to set the Tax Item rate you want. For Multiple mode tax rules, you can add however many Tax Item rates you need. You can Remove a Base Tax by clicking the Trashcan Icon on the far right of its line item. Click the Add Base Tax button to choose a new Tax Item and a new line will populate for you.
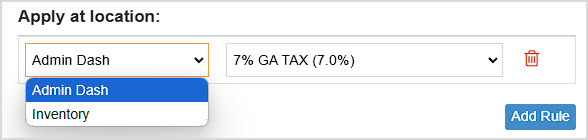
- Apply Rule to Locations - If you need the Tax Rule to apply differently at different Locations, you can click the Add Rule button to set Locations and the Tax Item rates that will apply for the rule.
- Save / Update - To finish adding or editing your Tax rule, click the Save or Update button, respectively.
- Default Tax - For new Items added to the system, you can set which Default Tax Rule will apply using this drop-list, which will display each saved Tax Rule.
- Tax Button - If you want a button in your Register to apply a Tax Rule, use the drop-list to select the tax rule you want and check the box to Enable it. It will appear among the Shortcut buttons in the lower right of the Register.
- Tax Label - You can label the Tax Button with the name you want in this field.
- Default EBT Tax - If you sell items eligible for EBT you can use the drop-list to select the Tax Rule that will apply to EBT items. Check the box to Enable the function if you will use it.
Tax Item Rates
Use this area to configure different tax rates that can be applied in your Tax Rules.
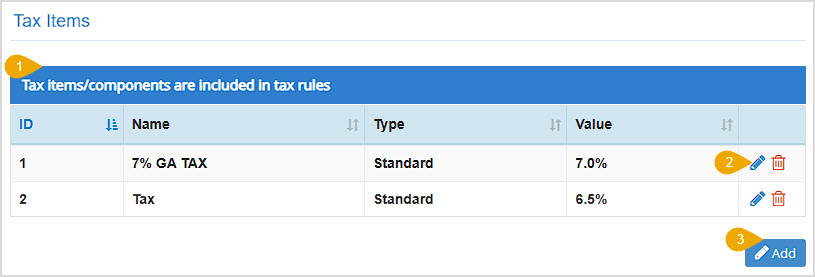
- Tax Item Data Table - You can click the column headers to Sort or click again to Reverse Sort as needed. The data table for your tax items will show the simple ID given to each item by the system, the Name, Type (Standard or VAT), Value percentage, and the Tools you have for each item (see below).
- Tax Item Tools - You can click the Pencil Icon to Edit a tax item, or click the Trashcan Icon to Delete one. If you click to delete, you'll be prompted to confirm that you really want to delete the tax item.
- Add Tax Item - If you click the Add button, you'll see a blank version of the Edit Tax Item window:

You can A) enter the Tax Item Name, B) if you use a different name internally you can add an Alt Name, C) you can set the Type of tax item (either Standard or VAT), and D) you can set the rate percentage that will be charged in the Value field. E) Click Save or Update if you are adding or editing, respectively.
Bottle Deposit
Use this area to configure how the system will handle Bottle Deposit funds.

- Search - You can Search by the deposit item Name or Amount.
- Bottle Deposit Data Table - You can click the column headers to Sort or click again to Reverse Sort as needed. The data table has columns for the simple ID number given to the deposit item, the Name, dollar Amount, and Tools for working with saved deposits (see below).
- Bottle Deposit Tools - You can click the Pencil Icon to Edit a deposit item, or click the Trashcan Icon to Delete. If you click to delete, you'll be prompted to confirm that you really want to delete it.
- Add Bottle Deposit - Click the Add button to create a new Bottle Deposit. The Add Bottle Deposit window will open:
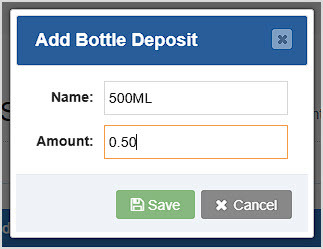
Enter the Name you want for the Bottle Deposit and the Amount you charge customers for each bottle. Click Save or Update if you are adding or editing a Bottle Deposit, respectively.
- Enable / Disable - Check this box if you want to use Bottle Deposits in the POS. Un-check it if you want deposits to be disabled.
- Label - Enter the text you want to appear for Deposit charges on receipts and in reports.
- Taxable - Check this box if Bottle Deposits are taxable where you do business.
- Bottle Deposit Return Amount - This function is tied to the Deposit Return button in the Register. When you click the button in the Register, the amount you enter here is what the system will return to the customer for whatever quantity of bottles they are returning.
Additional Fees
Use this area to configure any extra fees you might need to charge.
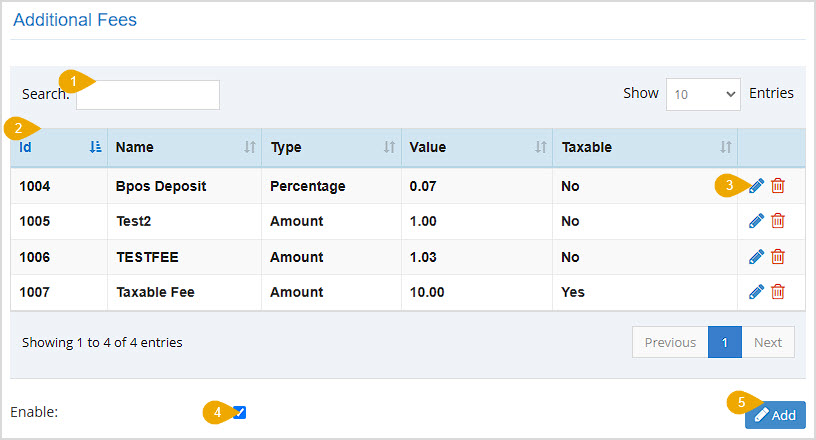
- Search - You can search by ID, Name, Type, Value, or Taxable in this table.
- Additional Fees Data Table - You can click the column headers to Sort or click again to Reverse Sort as needed. The data table has columns for the simple ID number given to the fee, the Name, Type, dollar Value, Taxable status, and Tools for working with the fees (see below).
- Additional Fee Tools - You can click the Pencil Icon to Edit a fee, or click the Trashcan Icon to Delete. If you click to delete, you'll be prompted to confirm that you really want to delete it.
- Enable / Disable Fees - Check this box if you want to apply fees in your POS. Leave it unchecked if you don't want to apply fees.
- Add Additional Fee - Click the Add button to create a new fee. The Add Additional Fee window will open:
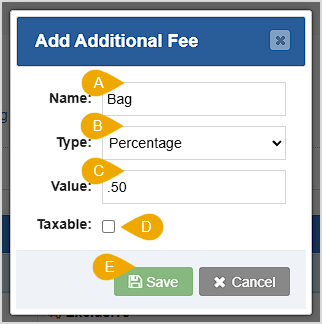
You can A) enter the Name of the fee, B) set the Type to Amount or Percentage, C) enter the dollar or percentage Value that will be charged for the fee, and D) set whether the fee is Taxable or not with this checkbox. E) Click the Save or Update button to add or edit the fee, respectively.
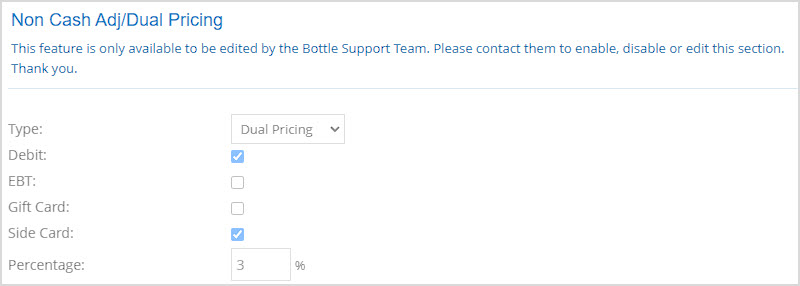
Non-Cash Adjusted / Dual Pricing
This area is where we can enable your Register to display Cash and Card pricing for transactions so you can charge different amounts for cash purchases. This feature is only available to be edited by the Support Team. Please contact us to enable, disable, or make updates to this area.
Default Starting Cash
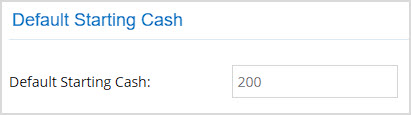
Set your Register's default starting cash in this area by entering the Amount into this field that you use for your cash drawers. This amount will be used when starting a new Shift and will be taken into account when running a Shift Report.
Related Topics
Ringing Up Sales with the POS
How to Add an Inventory Item
How to Set Up Bottle Deposit
How to Set Up Sales Tax
Frequently Asked Questions
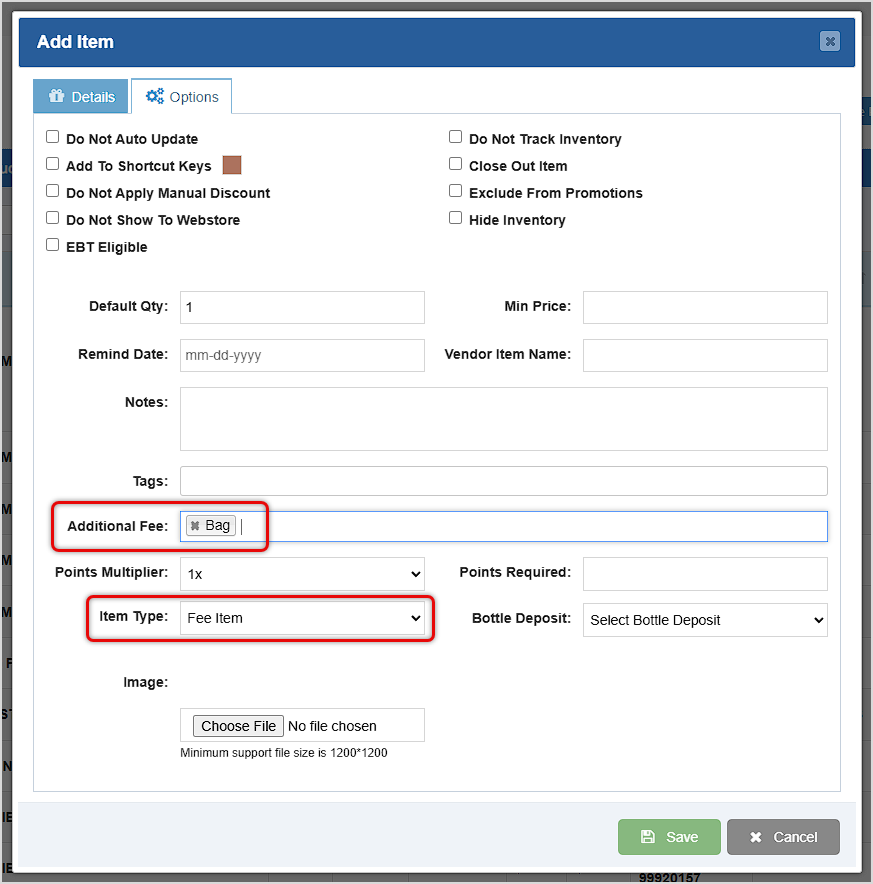
Q: How do I add an additional fee to the Register?
A: You are actually able to add fees to your items, and the fees will then be added to the transaction to which you have added the item. Create your Fee in the Additional Fees area of the Accounting Settings page as described above, then create an Item from the Items page and on the Options tab of the Add / Edit Item window set the Item Type to be a Fee Item and the Additional Fee drop-list to the fee you created, as pictured below. For regular items, you can have them apply an Additional Fee regardless of the Item Type by selecting the fee you want from the Additional Fee drop-list.
Q: I have a question, but I can't find my answer here, how do I get more assistance?
A: You can ask any question at the number below. Contact our 24/7 support team at: (877) 381-4087
 October 01, 2024
Is this page helpful?
×Help us improve our articles