The makes it easy to create and run Promotions for your store. Take a look at your options!
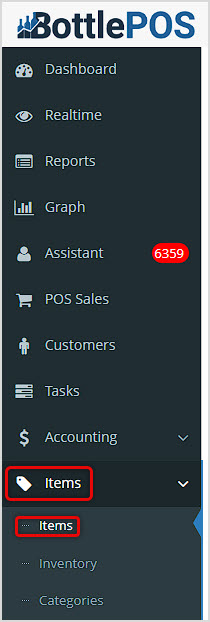
You can get to this part of the system by logging into your Admin app and clicking Items on the left. At the top of the menu that opens, click on Items.
How to Create Promotions
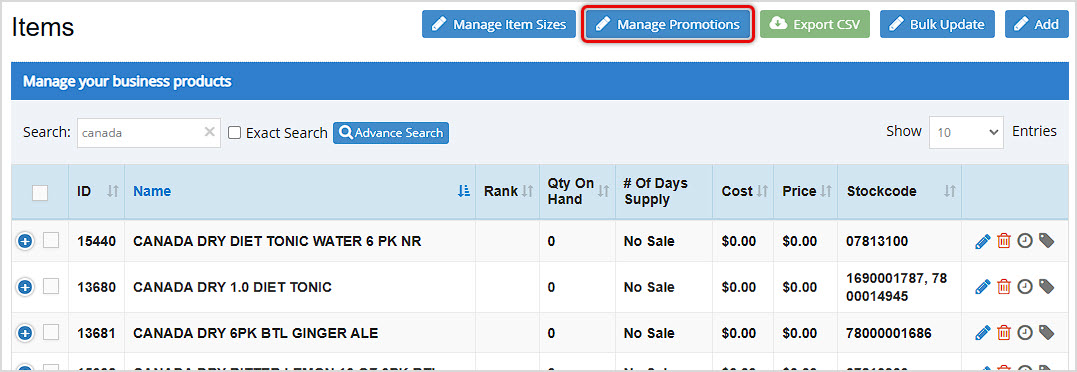
On the main Items page, click the Manage Promotions button in the upper right.
The Manage Promotions window will open, and displays all Promotions currently saved in the database. You can click a Pencil Icon to Edit a Promotion. If you are done with a Promotion, you can click the Trashcan Icon to Delete it. You'll be asked to confirm that you really want it deleted.
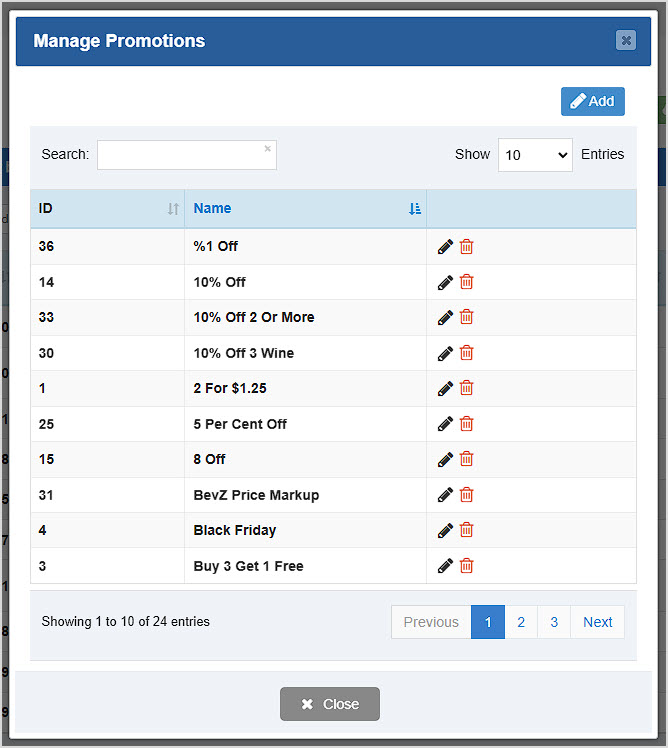
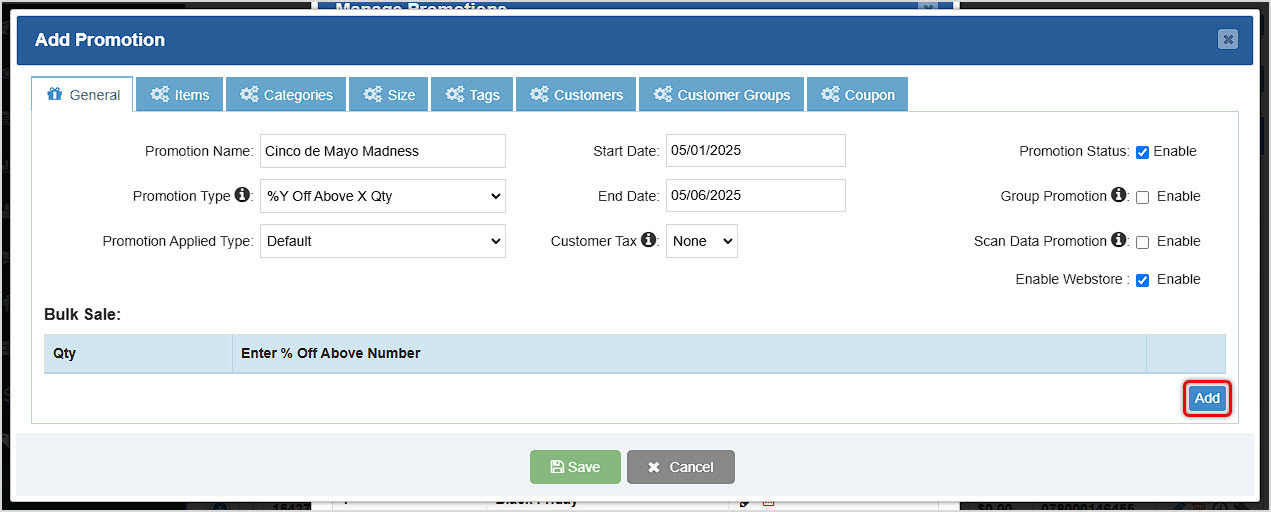
Click the Add button to create a new promotion. The Add Promotion window will open with the General tab active for you.
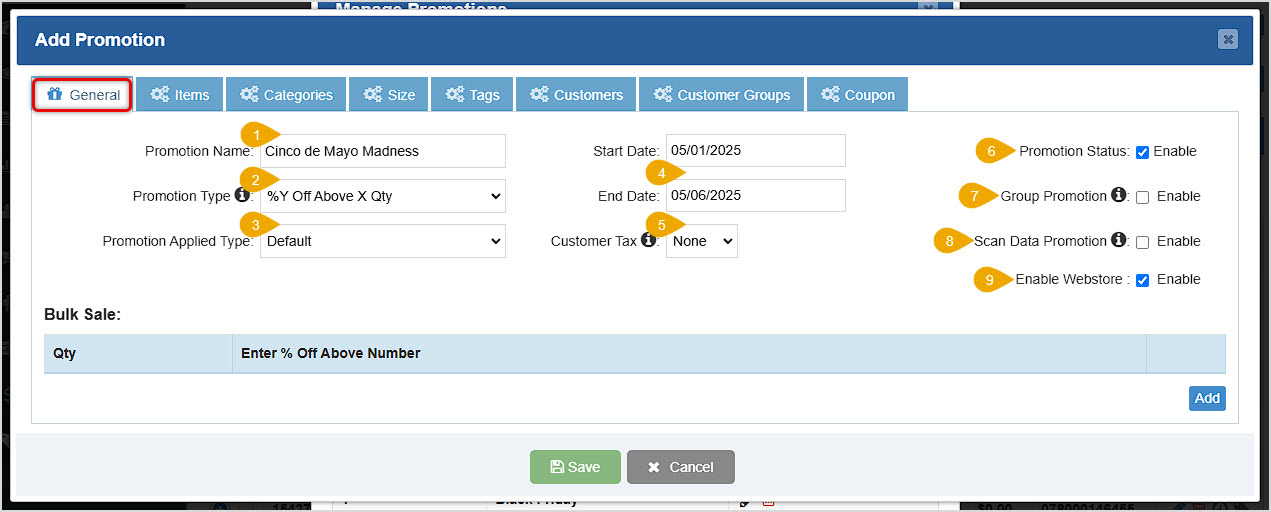
Use the General Tab to configure some important information for the Promotion:
- Promotion Name - Enter a descriptive Name of your promotion.
- Promotion Type - Your POS supports multiple types of promotions, here are some examples:
- X Qty for $Y: 2 Water Bottles for $3
- $Y Off X Qty: $1 Off of 2 Water Bottles.
- %Y Off X Qty: 10% Off of every 2 Water Bottles.
- %Y Off Above X Qty: 10% Off of 2 or more Water Bottles.
- $Y To Above X Qty: 2 or more Water Bottles for $1 Each.
- Fixed Item Pricelist: User-designated Price for items you select.
- Promotion Applied Type - Default will allow the promotion to run every day within the Start and End dates set below. Weekly will allow you to choose which days of the week within the specified date range the promotion will be active (checked boxes) or inactive (empty boxes).

- Start Date / End Date - These fields will allow you to define the Start Date and End Date of the promotion. Leave these fields blank if you don't want your promotion to end.
- Customer Tax - This field will allow you to designate a specific Tax Code for this promotion. If you leave it blank it will use the Default Tax Code already set for the item. This setting only works when a customer that has been added to the promotion is added to the sale (see section on How to Limit Your Promotion to Specific Customers section below). If you need more information on how to set up taxes, take a look at this article: LINK: How to Set Up Sales Tax
- Promotion Status - This field allows you to Enable or Disable your promotion as needed. By default it will be enabled.
- Group Promotion - This field enables exclusive item filtering. If you filter a promotion to apply to a specific Category and Size, it will apply to either of these designations. If you enable this setting, the item will need both qualifications. There is more information on how to do this in the section below on how to Associate Items, Categories, or Tags with Your Promotion. Example: Any Water Bottle or 16oz bottle vs. only 16oz Water Bottles
- Scan Data Promotion - If you check the box for this option, data from this promotion will be exported for Scan Data. Review the article listed below for more information on how to set up Scan Data. LINK: Scan Data Program
- Enable Webstore - If you check the box for this option, your promotion will be active in the Webstore for your customers there.
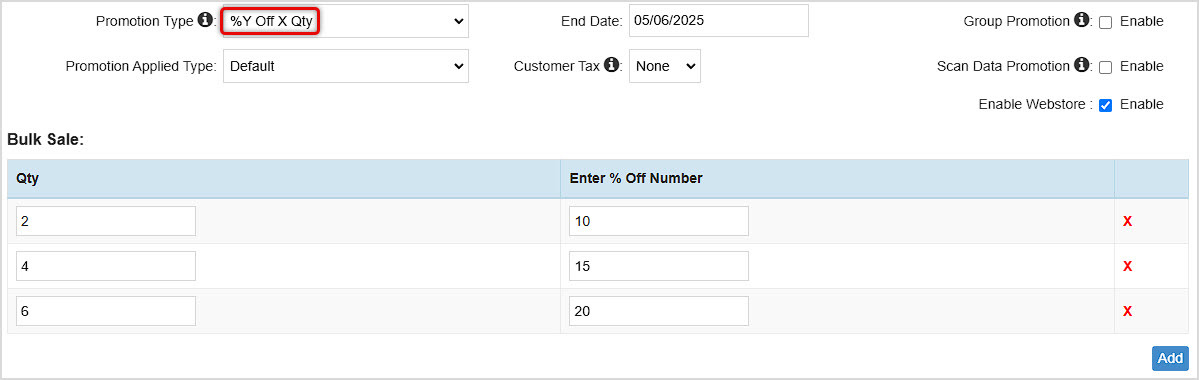
Set Up the Discount Table for the Promotion
The Discount Table controls the math behind the price reduction that a customer receives when purchasing the products associated with a promotion. Your system allows for multiple levels of discounts based on the quantities you specify. For this step, we will be using a %Y Off Above X Qty Promotion Type.
- Under Bulk Sale, Click Add at the bottom right corner, as pictured above.
- Enter a Quantity. Example: If you want this promotion to apply to every item after the first one, enter 2 in the Quantity field.

- Enter the Percentage Off. Example: If you enter 20, the promotion will charge the normal amount for the first item, and would give 20% off of every item added after that for eligible items.
- Other promotion styles might offer greater discounts at larger quantities. For example, if you are doing a %Y Off X Qty promotion, you can add more Quantity line items with greater discounts. Example:
- 2 for 10% off
- 4 for 15% off
- 6 for 20% off
Associate Items, Categories, Sizes, or Tags with Your Promotion
After you have set up the General tab, you'll want to make adjustments to apply this promotion to specific items. Your POS system allows you filter your inventory by the following methods:
- Items Tab - This tab will allow you to select specific items in your inventory to include in this promotion. This method is good for promotions that apply to a limited number of specific items.

- Click to open the Items tab.
- You can Search by Item Number, Barcode, or Name.
- Click the Checkbox for each item to be included, then click the Add Selected Items to Promotion button.
- Alternatively, you can click the Plus button to add items one at a time.
- Your selected items will populate in the Items In Promotion list.
- You can click the Trashcan Icon on the right to remove any items you've added.
- As you add items, the number of Items in Promotion will appear in red in the Items tab.
- Categories Tab - This tab will allow you to select entire categories in your inventory to be included in this promotion. Please note that ALL items in selected categories will be eligible for the promotion discount.

- Click the Categories tab.
- Search by category Name.
- Click the Checkbox for each category to be included, then click the Add Selected Categories to Promotion button.
- The Categories you have selected will populate in the Categories in Promotion list.
- Alternatively, click the Plus button to add categories one at a time.
- You can click the Trashcan Icon on the right to remove any Categories you've added.
- The number of selected categories will appear in red on the Categories tab.
- Size Tab - This tab will allow you to select specific item sizes in your inventory to be included in this promotion. Please note that ALL items in selected sizes will be eligible for the promotion discount.

- Click the Sizes tab.
- Search by size Name.
- Click the Checkbox for each size to be included, then click the Add Selected Sizes to Promotion button.
- The sizes you have selected will populate in the Sizes in Promotion list.
- Alternatively, click the Plus button to add sizes one at a time.
- You can click the Trashcan Icon on the right to remove any sizes you've added.
- The number of selected sizes will appear in red on the Sizes tab.
- Tags Tab - This tab will allow you to select specific tags in your inventory to be included in this promotion. Please note that ALL items with your selected tags will be eligible for the promotion discount. For more information on Item Tags, take a look at this article: LINK: Working With Item Tags

- Click the Tags tab.
- Search by tag Name.
- After you have selected a tag from the drop-list, it will remain in the Tag Search line.
- You can click the Trashcan Icon on the right to remove any tags you've added.
- The number of selected tags will appear in red on the Tags tab.
- You can select any number of tags.
If you are finished configuring your promotion, click the Save button at the bottom. You can click the Pencil Icon in the main list of Promotions to Edit your promotion whenever needed.
Please Note: By default, if you filter your items by multiple methods (any combination of Items, Categories, or Sizes, etc.) the POS Software will include ALL items that match ANY of those criteria. If you want to enable exclusive filtering so that items included in this promotion meet ALL the assigned criteria, you can click to enable Group Promotions on the General tab.
How to Limit Your Promotion to Specific Customers
In the event that you will need to limit this Promotion to specific customers or a group of customers, you are able to do so:
- Customers Tab - This tab will allow you to select specific Customers in your database to be eligible in this Promotion. Please note that ONLY selected customers will be eligible for the promotion discount.

- Click the Customers tab.
- Search for a Customer by Name or Mobile Number.
- Select the Customer from the drop-list.
- As you click to add them, the selected customers will populate in the data table below.
- You can click the Trashcan Icon on the right to remove any customers you've added.
- The number of selected customers will appear in red on the Customers tab.
- Customer Groups Tab - This tab will allow you to select Customer Groups in your database to be eligible in this promotion. Please note that ONLY selected groups will be eligible for the promotion discount, and ALL customers in selected groups will be eligible.

- Click the Customer Groups tab.
- Search for a Customer Group by Name.
- Select the Customer Group from the drop-list.
- As you click to add them, the selected customer groups will populate in the data table below along with the Number of Customers currently assigned to each.
- You can click the Trashcan Icon on the right to remove any customer groups you've added.
- The number of added customer groups will appear in red on the Customer Groups tab.
If you don't add any Customers or Customer Groups, ALL customers will be eligible for the promotion.
If you are finished configuring your promotion, click the Save button at the bottom. You can click the Pencil Icon in the main list of Promotions to Edit your promotion whenever needed.
How to Generate a Coupon QR Code for Your Promotion
If you would like to require your customers to present a Coupon to take advantage of the promotion, you can generate one from the Coupon tab of the Add Promotion or Edit Promotion window.
Please Note: Coupons with QR codes can only be used in your brick-and-mortar store.
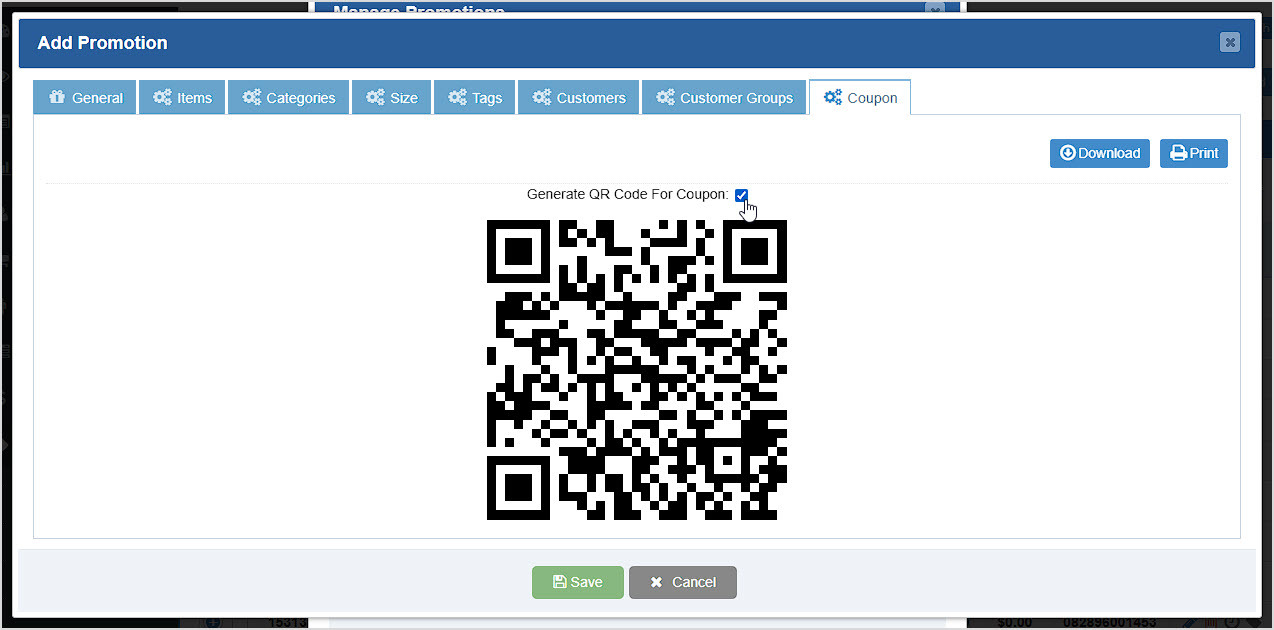
- Click the Coupon tab.
- Check the box to Generate QR Code for Coupon.
- A QR code will appear, as pictured above.
- You can click to Download a PNG image of the code or Print the QR Code as needed.
Please Note: If this setting is enabled, the QR code must be scanned into the POS Register for the promotion to apply. Your Register will no longer automatically apply the discount.
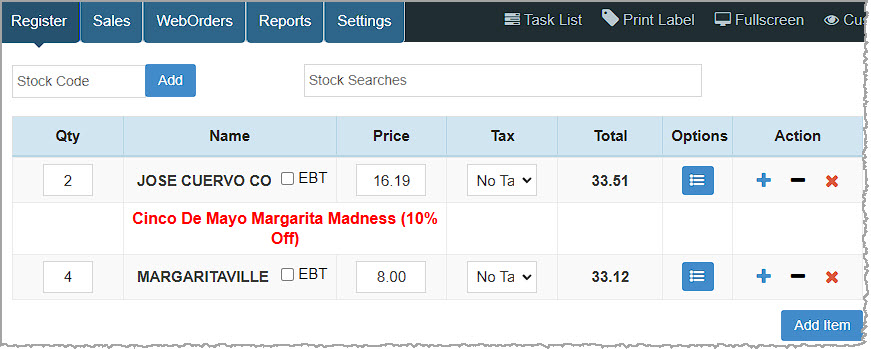
The above image shows what the discount looks like when a QR code is scanned into the Register.
Related Topics
Manage Items Page
How to Add an Inventory Item
Ringing Up Sales with the POS
How to Set Up Sales Tax
Scan Data Program
Working With Item Tags
Frequently Asked Questions
Q: How do I add a Buy One Get One (BOGO) Free promotion?
A: In order to set up a BOGO Free, we recommend using the %Y Off of X Qty promotion type. For example, QTY: 2, %Off: 50, so every 2 of the items purchased are 50% off, making one free.
Q: How do I create a promotion with multiple discount levels?
A: In order to set up multiple discount levels by quantity, click the Add button on the right of the Bulk Sale area at the bottom of the General tab of your Add Promotion or Edit Promotion window. Set the new variables as you add line items. This will allow you to incremental discount levels. Make sure to double check the end result in the POS in order to verify the math is working as intended!
Q: I have a question, but I can't find my answer here, how do I get more assistance?
A: You can ask any question at the number below. Contact our 24/7 support team at: (877) 381-4087
 October 01, 2024
Is this page helpful?
×Help us improve our articles