Register General Settings

October 01, 2024
The Bottle POS Register can be configured in many useful ways. Take a look at your options!

To get to this part of the system, sign in to your Register App. Click Settings and the General tab for Register Settings will load for you. These settings are only visible to full Admin-level users.
Please Note: There are also configuration options in the Settings area of the Admin in the POS Settings area, and there are links to the article for that area in the Related Topics section near the bottom of this article.
Bottle POS Register General Settings
There are a lot of settings on the General tab for you to consider, so we've broken this topic into three areas covering the upper section, middle section, and lower section of the page. Let's take it from the top:

- Use On-Screen Keypad - With this checked, whenever you are entering a numeric value, such as the Quantity for an item in the Register, the number keypad will pop up for you. This will allow you to use your mouse or if you have a touchscreen, to just tap in what you want on the screen. If this is off, you will use your keyboard for numeric entry.
- Show Fixed Keypad - With this option on, you'll see a keypad that will remain on the screen in the lower left, below the totals area. This keypad allows you to quickly add manual items to the Register with specific tax rates by entering a total and choosing the tax from the tax buttons. You can configure the Tax Hotkeys from the Tax Rules area of the Accounting Settings page of the Admin app.
- Auto-Launch Customer Screen - With this setting checked, whenever you add a Customer Mobile and click on the customer name, the Customer Info window will open automatically. With it off, you can click the Options button next to the Customer Mobile field to open the Customer Info window.
- Show Total on Customer Screen - As you are ringing items into the Register for the transaction, the connected customer-facing display will show each Item Name, Quantity, and Total for each item as well as a Transaction Total for the customer if this is on.
- Show Price on Customer Screen - As you are ringing items into the Register for the transaction, the connected customer-facing display will show the itemized Price information for the customer if this is on.
- Show Customer Number - Check this box to display the Customer Mobile field in the lower left of your Register. If you don't take customer information, you can turn this off.
- Show Sale Notes - Check this box to show the Notes field in the lower left of the Register.
- Always Show Shortcuts - Check this box to display Shortcut Keys you've created in the upper right of your Register. With it off, you will have a Shortcuts button that can open them when needed.
- Enable Weborder Notifications - With this on, whenever a Weborder comes through, in the lower left you'll see an alert pop up you can click on to view the incoming order. With it off, you will still see the number of new orders over the WebOrders button at the top of the screen.
- Hide Total Details - Check this box to hide Subtotal, Additional Fees, Tax, Deposit, and Total in the lower left of the Register. Those details will still print on the receipt for the customer.
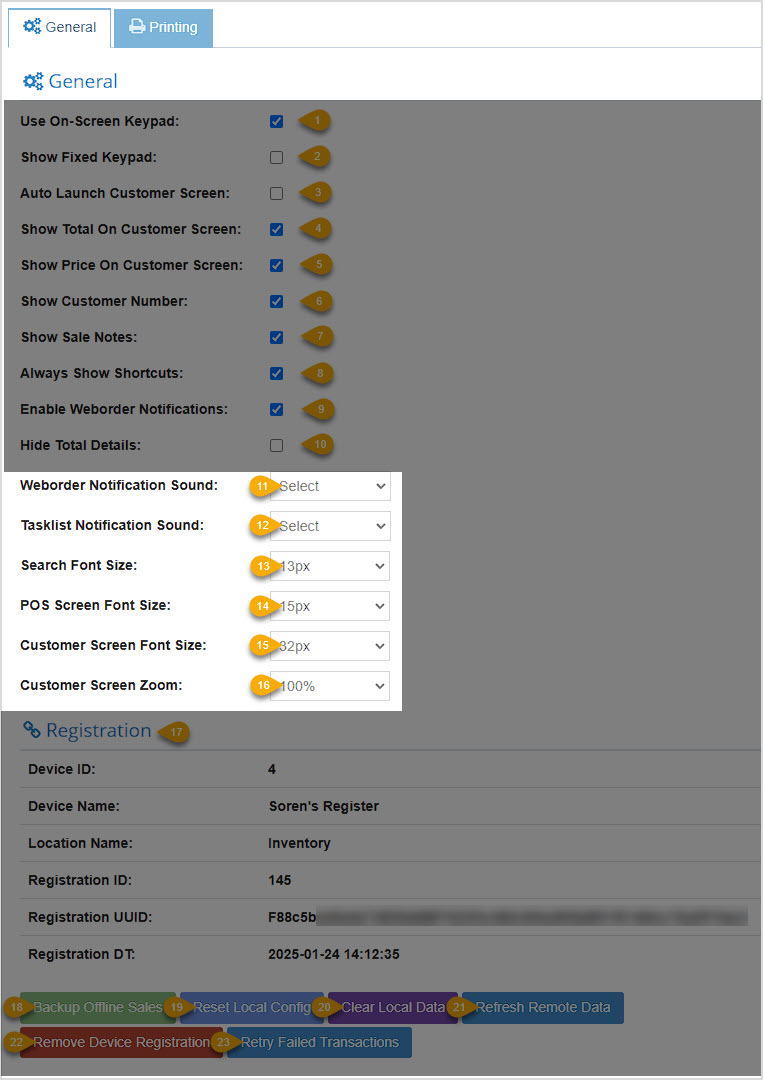
- Weborder Notification Sound - If your Register device has one or more speakers, you can open the drop-list and try the different sounds listed and select the one you like. The chosen sound will play each time you receive a Weborder. If you leave it at 'Select', no sound will play whenever a Weborder comes through.
- Tasklist Notification Sound - If your Register device has one or more speakers, you can open the drop-list and try the different sounds listed and select the one you like. The chosen sound will play each time the Start time of a Tasklist item comes up. If you leave it at 'Select', no sound will play whenever a Task comes through.
- Search Font Size - When viewing the search results for Stock Searches at the top of the Register, you can set the text size to whatever works for you.
- POS Screen Font Size - Select an option from this drop-list to set how large or small the text is on your POS screen.
- Customer Screen Font Size - Select an option from this drop-list to adjust the font size used on your customer-facing display screen. We recommend a large font size to accommodate customers with poor eyesight.
- Customer Screen Zoom - If needed, you can reduce or increase the 'zoom' of the customer-facing screen for a better fit or an easier reading size.
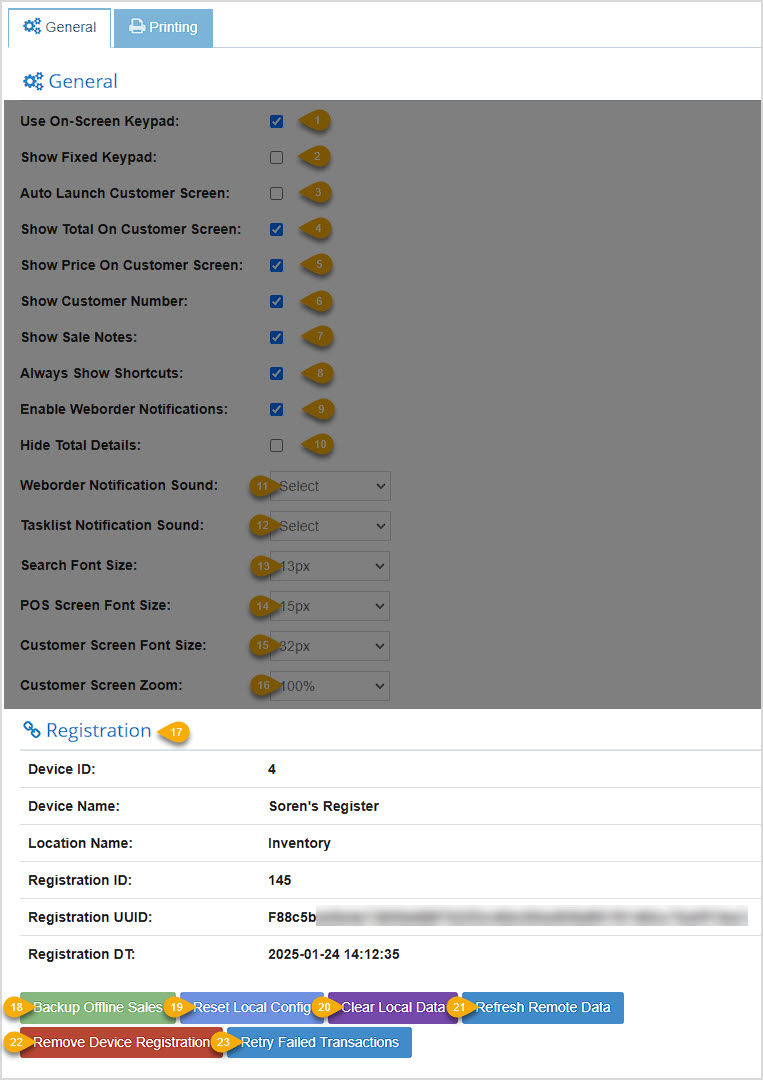
- Device Registration - This area contains technical reference information specific to the registration of your device within the Bottle POS system. When working with Support on hardware issues you may be asked to refer to this.
- Backup Offline Sales - Offline sales are automatically saved locally if you're using the Desktop Bottle POS app. They sync automatically with the database once your device comes back online. This setting is a way you can save offline sales data somewhere else with ease if needed for troubleshooting.
- Reset Local Config - For the device you are currently logged into with the Bottle POS, click this button to reset all configured settings for your Register to their defaults and clear any custom settings you may have made, such as custom Tenders or Shortcut Keys. This is basically a 'factory reset' for your Register configuration.
- Clear Local Data - Click this button to remove all transaction and customer data that is stored locally on your system device. You would mainly use this if you don't want to leave such data when changing to a new device.
- Refresh Remote Data - If your system has been offline, click the Refresh Remote Data button to update the desktop app with whatever might have changed for the system in the interim. You can also use this to refresh your Bottle POS with updates from the Admin that might not have synced yet.
- Remove Device Registration - If you will no longer be using the device to which you are currently logged in, you can remove it from here. You will be asked to confirm that you really want to remove the device. This process will log you out, remove the device from those registered with your Bottle POS, and offer you a login prompt.
- Retry Failed Transactions - In the lower right of your Register where you normally see 'POS is Online', if you have been offline, the system will display that you have transactions that have not synced to the cloud. Click the Retry Failed Transactions button to force an upload of those transactions once you're back online.
Related Topics
Manage POS Devices and Locations
General Settings
POS Settings
Accounting Settings
Frequently Asked Questions
Q: Where can I configure custom payment types to use in my register?
A: In the Admin, in the General Settings, on the right you can scroll down to Tender Settings and add what you need from there. For full details on working with tender types, click here: Tender Types
Q: How can I set up what prints on my receipts?
A: You can set up general Printing behavior from the Register at the top of the Register app under Settings using the Printing tab. Register Printer Settings
But for the Receipt printout content you can set that from the Admin in the Settings > POS Settings page at the top in the Receipt area.
Q: I have a question, but I can't find my answer here, how do I get more assistance?
A: You can ask any question at the number below. Contact our 24/7 support team at: (877) 381-4087
It's common for employees to forget to clock in or out and when that happens you need an easy option
Your Admin Dashboard is your hub for keeping your finger on the pulse of your business. Take a look
The Reports in the Bottle POS Admin can show you details about all of your data, however you need to
Is this page helpful?
×Help us improve our articles